
4D v16.3
Using static pictures
- 4D Design Reference
-
- Building forms
-
- Form editor
- Form properties
- Form Properties (Explorer)
- Creating a multi-page form
- Using inherited forms
- Modifying data entry order
- Inserting and organizing form objects
- Setting object display properties
- Rotation of text
- Using static pictures
- Using references in static text
- Duplicating on a matrix
- Incrementing a set of variables
- Scaling a form
- Using object methods
- Using object views
- Using shields
- Using the preconfigured library
- Creating and using custom object libraries
- Displaying information about objects on forms being executed
 Using static pictures
You can use two types of static pictures in your forms: independent pictures stored directly with the forms or picture references stored outside the forms. For better optimization, using pictures inserted by reference is generally recommended when pictures are used in several different places since it means that the picture will only be stored once. In addition, there is a link between the picture and each of its references so if you modify the source picture, all of its occurrences are automatically modified as well, wherever it is used in the database.
In 4D, pictures inserted by reference have the “Library Picture” type and independent pictures have the “Static Picture” type (displayed in the Type field of the Property List). To insert pictures by reference, you must either use the picture library or drag and drop a picture stored in the Resources folder of the database.
If you place a picture on page 0 of a multi-page form, it will appear automatically as a background element on all pages. You can also include it in an inherited form, applied in the background of other different forms. Either way, your database will run faster than if the picture was pasted into each page.
You can assign properties to static pictures that are inserted into forms. For example the Replicated display property can be used to set a small picture as the background picture of the form: the picture is replicated as many times as necessary to fill in the page of the form.
There are three ways to insert static pictures into your forms: by pasting a picture from the clipboard, by dragging and dropping a picture file or by dragging and dropping a picture from the picture library.
To paste or drop a static picture into a form:
- Copy a picture into the clipboard and paste it into the form.
OR
Select a picture in an external application (picture file in a system window, Web browser, other application, etc.) and insert it into the form using drag and drop.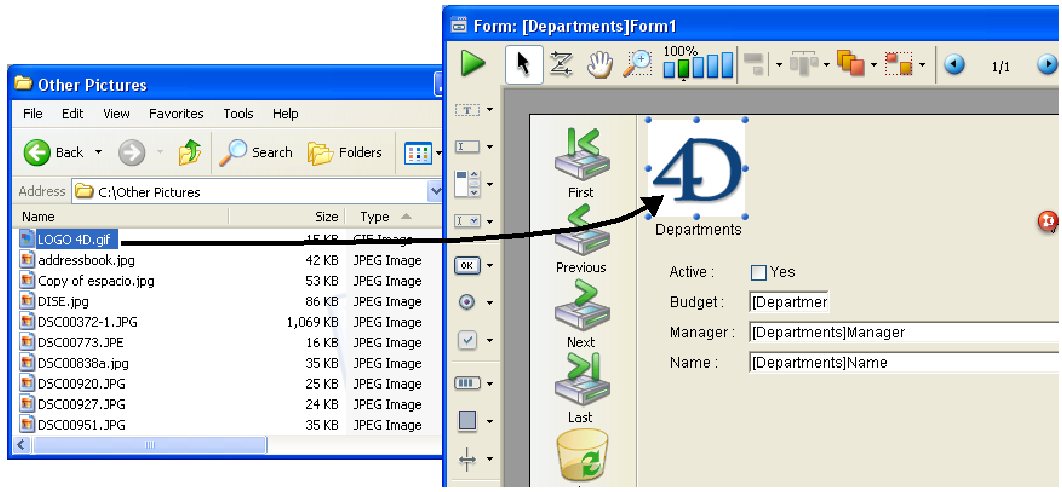
The original picture must be stored in a format managed natively by 4D (4D recognizes the main picture formats: JPEG, PNG, BMP, SVG, GIF, etc.). It is automatically pasted into the target area in its native format.
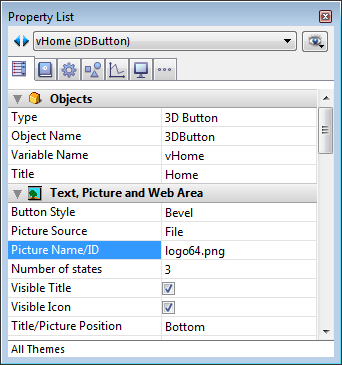
Notes:- This also works with library pictures, pictures associated with objects (for example a 3D picture button) and fields or variables in Application mode.
- You can insert a picture reference by dragging and dropping a file stored in the Resources folder of the database (see the “Automatic referencing of picture files” section below).
- Position the picture and set its properties as needed.
For more information about how the picture library works, refer to the Picture Library chapter.
To place a picture from the picture library on a form:
- Open the Picture Library in the Tool Box and click on the name of the desired picture.
- Drag it from the Picture Library to the form.
- If the picture you drag is defined as a table of thumbnails, it will automatically be inserted as a picture button (or picture pop-up menu if you hold down the Shift key when dragging the picture). If you want to insert it as a static or library picture, press the Alt key (Windows) or the Option key (Mac OS) when dragging the picture.
- By default, the inserted picture will be of the Library Picture type, i.e., 4D will maintain the link with the original picture of the library (insertion by reference). If you want to break this link, you must change the inserted picture to the Static Picture type using the Property List (see the following paragraph). The properties of static pictures and library pictures are generally identical.
- Reposition the picture as desired and set its properties.
The picture has a set of object properties, just like any object on the form. If you like, you can modify these properties.
When you insert a picture that comes from the Picture Library, you actually insert a reference to a picture. The Property List will indicate its Type (under Objects) as a Library Picture. If the picture is modified in the Picture Library, each instance of it will be modified accordingly. You may want to dissociate a picture inserted in a form from its source in the Picture Library.
To disassociate a picture from its source in the Picture Library:
- Display the picture’s properties in the Property List.
- In the “Objects” theme, click the Type line.
Two types are available: Library Picture (default value) and Static Picture. - Select Static Picture.
The picture is then treated as if it had been pasted from the Clipboard or from a dropped file.
You can use the Resources folder for storing static pictures used in your forms and work with them by reference. The display of these pictures is then optimized and their management is greatly facilitated.
Note: For more information about the Resources folder, refer to Description of 4D files.
More particularly, you can call on .png (bitmap) or .svg (vectorial) pictures. Inserting these pictures into forms can be carried out by a simple drag and drop operation from the Resources folder:
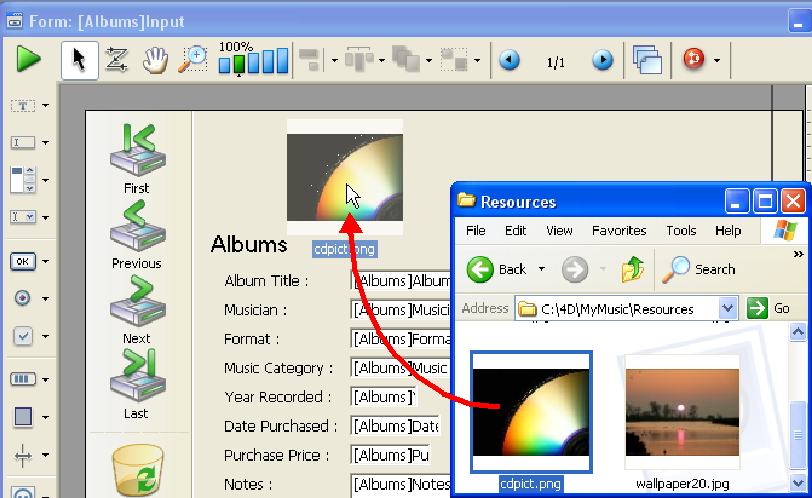
- If you drop the picture on a dynamic object (picture button, 3D button, picture pop-up menu, etc.), 4D automatically sets the "File" picture source and inserts the picture reference into the form as follows:“{pathname+}filename”.
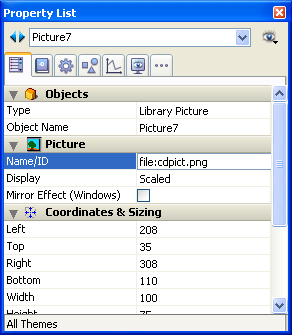
- If you drop the picture on an empty area of the form, a library picture is created and its reference is in the form: “file:{pathname+}filename”.
It is possible to place pictures in subfolders of the Resources folder. In particular, you can use the .lproj folder mechanism for pictures in different languages (for more information about this mechanism, refer to MissingRef).
You can set the display mode of a static or library picture that is placed in a form. The display mode determines the way a picture must be redrawn when the area containing it is resized.
To do this, you select the picture and then, in the "Picture" theme of the Property List, you choose an option from the Display menu:
- Scaled (default mode): When the picture object is resized, the picture is resized so that the entire picture remains visible.
- Truncated: When the picture object is resized, the picture keeps its proportions and only its boundaries change. The picture always stays in the center of the picture object. If the picture object is reduced to a smaller size than the picture, the picture is truncated.
- Replicated: When the size of the picture object is increased, the picture is replicated as many times as necessary to fill the new area. Recommended for background pictures since it doesn’t require a lot of memory.
If the picture size is reduced to a smaller size than the original picture size, the picture is truncated (not centered).
The Mirror Effect (Windows) option is found in the “Picture” theme of the Property List for pictures displayed in forms.
This option can be used in applications configured in “right-to-left” languages that have an inverted version of the interface (for more information about “right-to-left” mode, refer to ).
By default, the right-to-left mode does not reverse the contents of pictures in forms. However, it may sometimes be necessary to invert certain pictures. This is the case, for example, with pictures used in the interface, such as arrows, that are linked with the position of objects. When the Mirror Effect (Windows) option is checked, a left-to-right (mirror effect) inversion is applied to the picture:
This option is available for static pictures and library pictures, as well as for active objects using pictures (see Mirror effect (Windows)).
This option is only taken into account:
- In Application mode,
- Under Windows,
- When the “right-to-left” mode is enabled for the form.

Product: 4D
Theme: Building forms
4D Design Reference ( 4D v16)
4D Design Reference ( 4D v16.1)
4D Design Reference ( 4D v16.3)


