
4D v16.3
Setting object display properties
- 4D Design Reference
-
- Building forms
-
- Form editor
- Form properties
- Form Properties (Explorer)
- Creating a multi-page form
- Using inherited forms
- Modifying data entry order
- Inserting and organizing form objects
- Setting object display properties
- Rotation of text
- Using static pictures
- Using references in static text
- Duplicating on a matrix
- Incrementing a set of variables
- Scaling a form
- Using object methods
- Using object views
- Using shields
- Using the preconfigured library
- Creating and using custom object libraries
- Displaying information about objects on forms being executed
 Setting object display properties
Each object in a form has properties to set its appearance as well as how it is displayed and resized in the Application environment. These properties are available using the Property List (see the Form editor).
Specific properties related to dynamic objects are covered in the following chapters: Working with active objects, List boxes and Subforms and widgets.
To set the size of an object in the Form editor, you can:
- Drag one of its resizing handles.
- Resize it one pixel at a time by using the Ctrl key (Windows) or the Command key (Mac OS) and the arrow keys.
- Resize it by steps (by default, 20 pixels at a time).
- Manually enter its dimensions in the Property List.
You can resize an object using its handles in the standard way. If you press Shift and then drag the handle, the movement is constrained. Lines can then be only vertical, 45°, or horizontal, rectangles can only be square, and ovals can only be circular. If the magnetic grid is on, manual resizing will be carried out in 5-pixel increments. For more information about the magnetic grid, refer to Using the magnetic grid.
To resize an object one pixel at a time, you select it and then hold down the Ctrl key (Windows) or Command key (Mac OS) while using the arrow keys. Pressing the up or down arrow keys resizes the object’s height while pressing the left or right arrow keys resizes the object’s width. Holding down the Shift key at the same time causes the resizing to proceed in steps (by default, these steps are 20 pixels). You can change the default step value on the Forms Page of the Preferences.
To move or resize an object by entering coordinates manually, select it then expand the “Coordinates & Sizing” theme in the Property List. The coordinates are displayed in pixels, centimeters, or inches (depending on the ruler). The upper-left coordinates of the form area are 0,0. Enter new values in the coordinate entry areas.
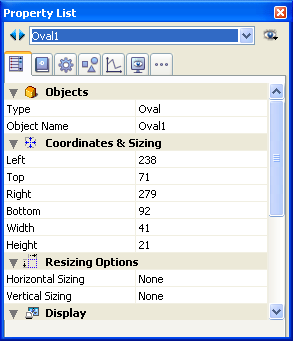
4D moves the boundaries of the object to the positions you entered. Depending on the values you use, the object may be resized or moved (or both).
Note: In a multi-platform context, applying style sheets can cause the object height to vary since this height is adjusted automatically so that it is a multiple of the height for the font set in the current platform. For more information about style sheets, refer to the Style sheets chapter.
You can resize static text areas and pictures automatically for optimal display based on their current graphic characteristics (font size, style, etc.):
- Right-click on the object and choose the Automatic Size command from the context menu.
OR
Hold down the Ctrl key (under Windows) or Command key (under Mac OS) and click on the lower right corner of the object.
This command produces the following effects:
- Static text areas, check boxes, radio buttons and buttons will be resized so that their contents correspond exactly to their boundaries.
- Fields and variables will be resized so that their height is at least equivalent to that of the current font and their width is 100 points — if the size of the object is greater than these minimum sizes, the command will have no effect.
- Pictures or picture buttons will be displayed using the original size of the source picture.
- Scrollable areas and hierarchical lists will be displayed with a height in keeping with that of the current font.
- Combo boxes, pop-up/drop-down lists and hierarchical pop-up menus will be displayed with their default minimum height if the current height is insufficient.
The Corner radius propriety is found in the "Coordinates & Sizing" theme of the Property List for objects of the Round rectangle type:

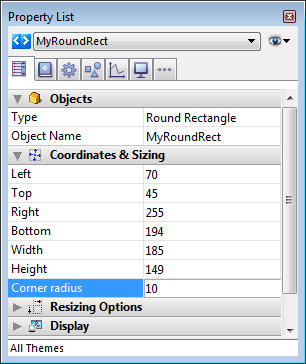
By default, the radius value for round rectangles is 5 pixels. You can change this property to draw rounded rectangles with custom shapes:
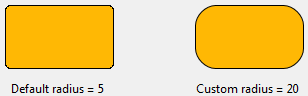
Minimum value is 0, in this case a standard non-rounded rectangle is drawn.
Maximum value depends on the rectangle size (it cannot exceed half the size of the shortest rectangle side) and is calculated dynamically.
You can also set this property using the OBJECT Get corner radius and OBJECT SET CORNER RADIUS commands.
In Application mode, when a user resizes the window displaying a form, the objects it contains are either resized or moved.
Automatic resizing works when a user resizes a window that displays a form. Automatic resizing causes an object to grow as the form is enlarged (or become smaller as the window is reduced). For example, if you use a rectangle that encloses the fields on an entry form, automatic resizing causes the rectangle to grow to the edges of the window as the user enlarges the window.
You can also enable automatic repositioning. Automatic repositioning moves an object either horizontally or vertically as the form is resized. When automatic repositioning is on, 4D tries to keep the object in view as the user reduces the size of the window. For example, if the user resizes a row of buttons so that some of the buttons become obscured, automatic repositioning tries to move the buttons either horizontally or vertically, so that they remain in view.
You enable automatic resizing or repositioning in the Property List. There are two lines, Horizontal Sizing and Vertical Sizing, for which you can assign three properties (None, Grow, and Move).
| Option | Result |
| Horizontal Sizing: Grow | When the user resizes the width of the window, 4D applies the same percentage to the object’s width |
| Horizontal Sizing: Move | When the user resizes the width of the window, 4D moves the object left or right the same amount as the width increase |
| Vertical Sizing: Grow | When the user resizes the height of the window, 4D applies the same percentage to the object’s height |
| Vertical Sizing: Move | When the user resizes the height of the window, 4D moves the object up or down the same amount as the height change |
The repositioning options enable the object to move in the specified direction to try to remain visible.
When the None option is used, the object remains stationary when the form is resized.
In 4D, the right side and bottom of windows have become “pusher” splitters by default. This means that objects found to the right or below the limits of a window on screen are automatically pushed to the right or toward the bottom if the window is enlarged:
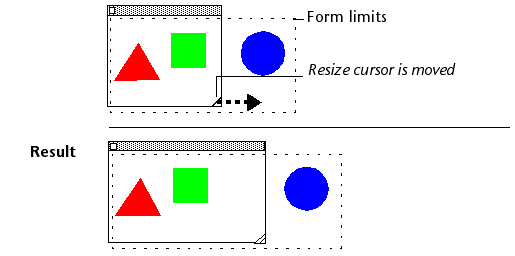
Note: This does not work with windows that have scroll bars.
You can associate the Invisible by Default property with most form objects.
This property, available in the "Display" theme of the Property List, simplifies dynamic interface development. In this context, it is often necessary to hide objects programatically during the On load event of the form then to display certain objects afterwards.
The Invisible by Default property allows inverting this logic by making certain objects invisible by default. The developer can then program their display using the OBJECT SET VISIBLE command depending on the context. For more information about this command, refer to the 4D Language Reference manual.
Note: Do not confuse this property with the Invisible property in pop-up menus, which allows not drawing the object while still leaving it active.
You can set the platform interface on an object-by-object basis, in the "Appearance" theme of the Property List. To do this, you have the following choices:
- Inherited from Form: The platform interface for the object is the same as the platform interface of the form. The platform interface of the form is set in the Form properties.
- System: Regardless of the platform set at the form level, the object is drawn according to the platform where the application is running.
- Printing: Regardless of the platform set at the form level, the object is drawn so as to be suitable for printing.
Note: If the database was converted from an earlier version of 4D, additional platform interface properties are available. For more information about platform interface properties, refer to Form properties.
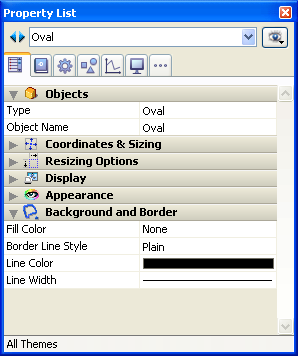
You can use the Background and Border properties to modify the border lines and graphic appearance of objects.
The Transparent attribute is available in the "Background and Border" theme for objects that can be opaque or transparent: fields, variables, list boxes, buttons, pictures or static text, etc. You can change the object's background to Transparent so that it takes the form’s background color or pattern.
The following examples shows a static picture without and with the Transparent attribute:


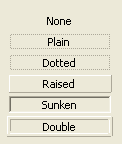
You can set the border line style for most objects using the "Background and Border" theme of the Property List or the Border Line Style submenu of the context menu. To do this, you have the following choices available:
- Transparent: Objects appear with no border.
- Normal: Objects appear framed with a continuous 1-pt. border line.
- Dotted: Objects appear framed with a dotted 1-pt. border line.
- Raised: Objects appear framed with a 3D effect (raised).
- Sunken: Objects appear framed with a sunken 3D effect.
- Double: Objects appear framed with a double line, i.e., two continuous 1-pt. lines separated by a pixel.
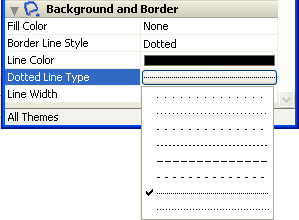
Note: The other properties of the theme are updated according to the type of line set. For example, when you select "Dotted", the Dotted Line Type property becomes available in the Property List.
The following example compares these styles under Windows:
For more information about the effects of these options on various form objects, refer to Buttons and Check Boxes.
4D lets you add colors to objects for display on screen or (if your printer supports color) for color printing.
You can specify different colors for the object background and border, either using the Color command in the context menu, or directly in the Property List.
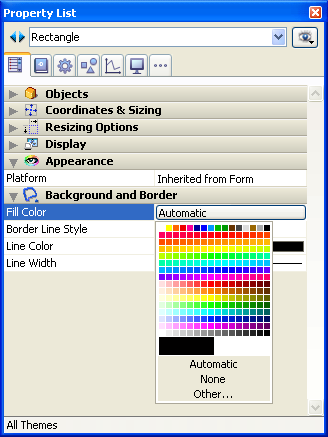
Note: In the Property List, the background color is called Fill Color and the border color is called Line Color. In the context menu, the foreground color corresponds to the border (line) color.
For the background color, the Property List includes two standard options:
- Automatic: the object is displayed with the automatic colors set in your OS.
- None: the object background will be transparent.
The Property List allows you to use the system color chooser to set a custom color by selecting Other...
This property is available when you select "Dotted" as the Border Line Style. You use it to choose a dotted line format:
4D lets you specify different widths for lines and objects that have lines such as ovals, grids, and rectangles.
You can specify line widths using the Line Width property in the Property List:
Choose one of the line widths. The first choice is the hairline, i.e., the thinnest line that can be printed by the printer, followed by 1, 2, 3 or 4 point lines. If you choose Other..., 4D displays a dialog box in which you can specify any line width up to 20 points.
You can set font and style attributes for text objects by means of the object properties found in the "Text" theme of the Property List.
You can set the following attributes:
- Style Sheet: Associates a style sheet with the object. For more information about style sheets, refer to the Style sheets section.
- Font: Name of font used in the object.
- Style: Style used in the object (bold, italic, underline).
- Font Size: Font size in points.
- Font Color: Font color used in the object. In the context menu, the font color is equivalent to the foreground color.
- Row Style Array / Row Font Color Array: Name of arrays for managing styles and colors (only available for array type list boxes).
- Horizontal Alignment: Horizontal location of text within the area that contains it.
- Vertical Alignment: Vertical location of text within the area that contains it (only available for list boxes).
- Orientation: Modifies the orientation (rotation) of the text area. For more information about this point, refer to Rotation of text.
- Multi-style: Applies custom styles to dynamic text areas (fields or variables) in the Application environment. For more information about this, refer to the GET DATA SOURCE LIST section.
- Allow Font/Color Picker: Allows user modification of the object's font or color for the current session when the corresponding system selector is called using the OPEN FONT PICKER or OPEN COLOR PICKER command. This option controls the scope of action for the system picker (font picker and color picker) commands. It is available for form objects of the field, variable and combo box type. By default, it is unchecked for all form objects. You must explicitly check it for every object where you want font and/or color attributes to be modifiable using the system picker window.
We updated and unified the frameworks used for text rendering in 4D v13 under OS X, in accordance with Apple's recommendations (abandoning of obsolete QD/MLTE frameworks and generalization of the use of CoreText).
Despite our efforts to limit its impact, using the new CoreText framework may cause slight variations in the rendering of text areas for applications converted to 4D v13 under OS X, particularly as concerns line spacing. These variations may make it necessary to resize certain form objects during the conversion of v12 databases.

Product: 4D
Theme: Building forms
4D Design Reference ( 4D v16)
4D Design Reference ( 4D v16.1)
4D Design Reference ( 4D v16.3)


