
4D v16.3
Modifying data entry order
- 4D Design Reference
-
- Building forms
-
- Form editor
- Form properties
- Form Properties (Explorer)
- Creating a multi-page form
- Using inherited forms
- Modifying data entry order
- Inserting and organizing form objects
- Setting object display properties
- Rotation of text
- Using static pictures
- Using references in static text
- Duplicating on a matrix
- Incrementing a set of variables
- Scaling a form
- Using object methods
- Using object views
- Using shields
- Using the preconfigured library
- Creating and using custom object libraries
- Displaying information about objects on forms being executed
 Modifying data entry order
The data entry order is the order in which fields, subforms, and other active objects are selected as you hit the Tab or the Carriage return key in an input form. It is possible to move through the form in the opposite direction (reverse data entry order) by pressing the Shift+Tab or Shift+Carriage return keys.
Every enterable area into which you can type a value is included in the data entry order. Boolean fields (shown as radio buttons or check boxes), subforms, combo boxes, and areas that accept pictures are also included in the data entry order.
Thermometers, rulers, and dials can also be used to enter data. These objects, however, are not included in the data entry order. You select them by clicking on them.
If you don’t specify a custom entry order, by default 4D uses the layering of the objects to determine the entry order in the direction “background towards foreground.” The standard entry order thus corresponds to the order in which the objects were created in the form.
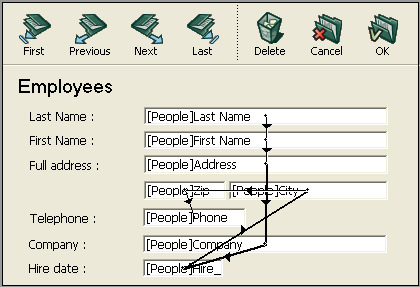
In some forms, a custom data entry order is needed. Below, for example, additional fields related to the address have been added after the creation of the form.
The resulting standard entry order thus becomes illogical and forces the user to enter the information in an awkward manner:
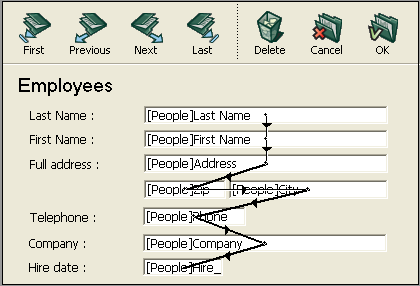
In cases such as this, a custom data entry order allows you to enter the information in a more logical order:
You can view the current entry order either using the “Entry order” shields, or by using the “Entry order” mode. However, you can only modify the entry order using the “Entry order” mode.
This paragraph describes viewing and modifying the entry order using the “Entry order” mode. For more information about viewing the entry order using shields, refer to Using shields.
To view or change the entry order:
- Choose Entry Order from the Form menu or click on the
 button in the toolbar of the window.
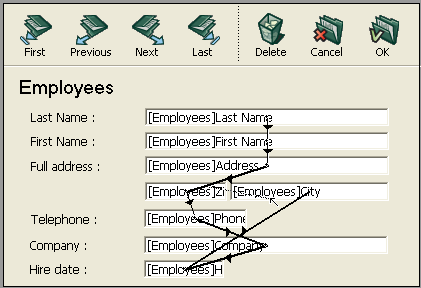
The pointer turns into an entry order pointer and 4D draws a line in the form showing the order in which it selects objects during data entry.
Viewing and changing the data entry order are the only actions you can perform until you click any tool in the Tools palette. - To change the data entry order, position the pointer on an object in the form and, while holding down the mouse button, drag the pointer to the object you want next in the data entry order.
4D will adjust the entry order accordingly. - Repeat step 2 as many times as necessary to set the data entry order you want.
- When you are satisfied with the data entry order, click any unselected tool in the toolbar or choose Entry Order from the Form menu.
4D returns to normal operation of the Form editor.
Note: Only the entry order of the current page of the form is displayed. If the form contains enterable objects on page 0 or coming from an inherited form, the default entry order is as follows: Objects from page 0 of the inherited form > Objects from page 1 of the inherited form > Objects from page 0 of the open form > Objects from the current page of the open form.
All enterable objects are part of the data entry order. To set the first object of the entry order, you must modify its location among the form levels. The Entry order mode must be disabled.
To establish one of the objects as the first in the data entry order:
- Select the object you want to be first in the entry order.
- Choose Move to Back from the Object menu.
OR
Select Move to Back from the Level submenu of the context menu for the object. - Choose Entry Order from the Form menu or click the button in the toolbar.
The selected object becomes the first object in the entry order and the object that was first becomes second. You can now drag from object to object in order to create the data entry order you want. - When you have finished, select Entry Order from the Form menu again or click any unselected tool in the toolbar.
The Form editor returns to normal operation.
While you are changing the data entry order, you can select a group of objects in a form so that the standard data entry order applies to the objects within the group. This allows you to easily set the data entry order on forms in which fields are separated into groups or columns.
To create a data entry group:
- Choose Entry Order from the Form menu or click the button in the toolbar.
- Draw a marquee around the objects you want to group for data entry.
When you release the mouse button, the objects enclosed or touched by the rectangle follow the standard data entry order. The data entry order for the remaining objects adjusts as necessary.
By default, all the fields are included in the entry order. If you want to exclude a field from the entry order while keeping its “Enterable” property, you simply need to deselect the Tabable property for this field. For more information, refer to the “The Tabable Attribute” paragraph in Data entry controls and assistance.

Product: 4D
Theme: Building forms
4D Design Reference ( 4D v16)
4D Design Reference ( 4D v16.1)
4D Design Reference ( 4D v16.3)


