
4D v16.3
Inserting and organizing form objects
- 4D Design Reference
-
- Building forms
-
- Form editor
- Form properties
- Form Properties (Explorer)
- Creating a multi-page form
- Using inherited forms
- Modifying data entry order
- Inserting and organizing form objects
- Setting object display properties
- Rotation of text
- Using static pictures
- Using references in static text
- Duplicating on a matrix
- Incrementing a set of variables
- Scaling a form
- Using object methods
- Using object views
- Using shields
- Using the preconfigured library
- Creating and using custom object libraries
- Displaying information about objects on forms being executed
 Inserting and organizing form objects
You can add objects to forms in several ways:
- By drawing the object directly in the form after selecting its type in the object bar (see Using the object bar)
- By dragging and dropping the object from the object bar
- By drag-and-drop or copy-paste operations on an object selected from the preconfigured object library (see Using the preconfigured library) or from a custom library (see Creating and using custom object libraries),
- By dragging and dropping an object from another form,
- By dragging and dropping an object from the Explorer (fields) or from other editors in the Design environment (lists, pictures, etc.)
Once the object is placed in the form, you can modify its characteristics using the Form editor.
You can work with two types of objects in your forms:
- Static objects (lines, frames, background pictures, etc.): These objects are generally used for setting the appearance of the form and its labels as well as for the graphic interface. They are available in the object bar of the Form editor. You can also set their graphic attributes (size, color, font, etc.) and their resizing properties using the Property List. Static objects do not have associated variables like active objects. However, you can insert dynamic objects into static objects (see Using references in static text).
- Active objects: These objects perform tasks or functions in the interface and can take many forms: fields, buttons, scrollable lists, etc. Each active object is associated with either a field or a variable. Active objects are described in the chapter Working with active objects.
Before you can perform any operation on an object (such as changing a line width or font), you need to select the object that you want to modify.
To select an object using the toolbar:
- Click the Arrow tool
 in the toolbar.
When you move the pointer into the form area, it becomes a standard arrow-shaped pointer. - Click the object you want to select.
Resizing handles identify the selected object.
To select an object using the Property List:
- Choose the object’s name from the Object List drop-down list located at the top of the Property List.
Using these two methods, you can select an object that is hidden by other objects or located outside the visible area of the current window.
To deselect an object, click outside the object’s boundary or Shift+click the object.
Note: It is also possible to select objects by double-clicking them in the result window of an overall search in the database (see Renaming).
If you have difficulty selecting an object that was created by the Form Wizard, switch to the background page by clicking on the  button or by choosing 0 in the pages menu and try again. You can also hold down Alt (Windows) or Option (Mac OS) and click on an object on page 0 in order to access it directly.
It is also possible to hide any element located on the background page by deselecting Page 0 from the Display submenu of the Form menu (or the Form editor context menu).
You may want to perform the same operation on more than one form object — for example, to move the objects, align them, or change their appearance. 4D lets you select several objects at the same time. There are several ways to select multiple objects:
- Choose Select All from the Edit menu to select all the objects.
- Right-click on the object and choose the Select Similar Objects command in the context menu.
- Hold down the Shift key and click the objects you want to select.
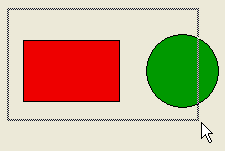
- Start at a location outside the group of objects you want to select and drag a marquee (sometimes called a selection rectangle) around the objects. When you release the mouse button, if any part of an object lies within or touches the boundaries of the selection rectangle, that object is selected.
- Hold down the Alt key (Windows) or the Option key (Mac OS) and draw a marquee. Any object that is completely enclosed by the marquee is selected.
The figure below shows a marquee being drawn to select two objects:
To deselect an object that is part of a set of selected objects, hold down the Shift key and click the object. The other objects remain selected. To deselect all the selected objects, click outside the boundaries of all the objects.
You can duplicate any object in the form, including active objects. Copies of active objects retain all the properties of the original, including name, type, standard action, display format, and object method.
You can duplicate an object directly using the Duplicate tool in the Tools palette or use the Duplicate Many dialog box to duplicate an object more than once. Also, using this dialog box, you can set the distance between two copies.
When duplicating a variable, you can use specific duplication features that allow you to include an automatic number in the copies’ names. For more information on this point, refer to Duplicating on a matrix.
To duplicate one or more objects:
- Select the object or objects that you want to duplicate.
- Choose Duplicate from the Edit menu.
4D creates a copy of each selected object and places the copy in front and slightly to the side of the original. - Move the copy (or copies) to the desired location.
If you choose the Duplicate menu item again, 4D creates another copy of each object and moves it the exact same distance and direction from the first copy. If you need to distribute copies of the object along a line, you should use the following procedure. Duplicate the original object, move the copy to another location in the form, and then duplicate the copy. The second copy is automatically placed in the same relation to the first copy as the first copy was in relation to the original object. Subsequent copies are also placed in the same relation to their originals. The figure below shows how this relative placement of copies works: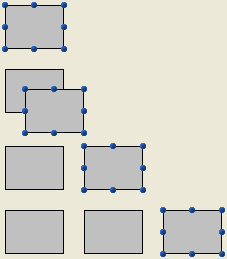
The "Duplicate Many" dialog box appears when you select one or more object(s) and choose the Duplicate Many... command from the Object menu.
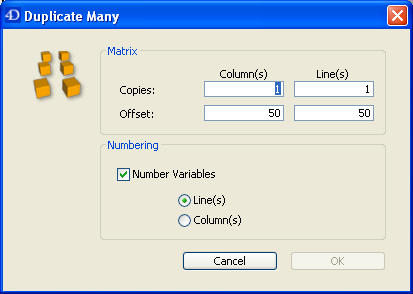
- In the upper area, enter the number of columns and lines (rows) of objects you want to get.
For example, if you want three columns and two lines of objects, enter 3 in the Column(s) area and 2 in the Line(s) area. If you want three horizontal new copies of an object, enter 4 in the Column(s) area and leave the default value, 1, in the Line(s) area. - For lines and columns, define the offset that you wish to leave between each copy.
The value must be expressed in points. It will be applied to each copy, or copies, in relation to the original object.
For example, if you want to leave a vertical offset of 20 points between each object and the height of the source object is 50 points, enter 70 in the column’s “Offset” area. - If you wish to create a matrix of variables, select the Number Variables option and select the direction in which the variables are to be numbered, either by line(s) or by column(s).
This option is active only when the selected object is a variable. For more information on this option, refer to Duplicating on a matrix.
You can move any graphic or active object in the form including fields and objects created with a template. When moving an object, you have the following options:
- Move the object by dragging it,
- Move the object one pixel at a time using the arrow keys,
- Move the object by steps using the arrow keys (20-pixel steps by default),
- Manually enter the coordinates of the object in the Property List (this point is described in "Setting initial size of objects" paragraph below).
As you begin dragging the selected object, its handles disappear. 4D displays markers that show the location of the object’s boundaries in the rulers so that you can place the object exactly where you want it. Be careful not to drag a handle. Dragging a handle resizes the object. You can press the Shift key to carry out the move with a constraint.
When the magnetic grid is on, objects are moved in stages indicating noticeable locations. For more information about this point, refer to Using the magnetic grid.
To move an object one pixel at a time:
- Select the object or objects you want to move.
- Use the arrow keys on the keyboard to move the object.
Each time you press an arrow key, the object moves one pixel in the direction of the arrow.
To move an object by steps:
- Select the object or objects you want to move.
- Hold down the Shift key and use the arrow keys to move the object.
By default, steps are 20 pixels at a time. You can change this value on the Forms Page of the Preferences.
4D lets you group objects so that you can select, move, and modify the group as a single object. Objects that are grouped retain their position in relation to each other. You would typically group a field and its label, an invisible button and its icon, and so forth. Groups can be part of other groups.
When you resize a group, all the objects in the group are resized proportionally (except text areas, which are resized in steps according to their font sizes.
Groups of objects are necessary for the coordinated functioning of radio buttons (see Radio Buttons and Picture Radio Buttons). They are also used to synchronize Grouped Scrollable Areas.
You can ungroup a group of objects to treat them as individual objects again.
An active object that has been grouped must be ungrouped before you can access its properties or method. However, it is possible to select an object belonging to a group without degrouping the set: to do this, Ctrl+click (Windows) or Command+click (Mac OS) on the object (the group must be selected beforehand).
Grouping only affects objects in the Form editor. When the form is executed, all grouped objects (except for radio buttons and scrollable areas) act as if they were ungrouped.
Note: It is not possible to group objects belonging to different views and only those objects belonging to the current view can be grouped (see Using object views ).
To group objects:
- Select the objects that you want to group.
- Choose Group from the Object menu.
OR
Click the Group button in the toolbar of the Form editor.
4D marks the boundary of the newly grouped objects with handles. No handles mark the boundary of any of the individual objects within the group. Now, when you modify the grouped object, you change all the objects that make up the group.
To ungroup an object:
- Select the grouped object that you want to ungroup.
- Choose Ungroup from the Object menu.
OR
Click the Ungroup button (variant of the Group button) in the toolbar of the Form editor.
If Ungroup is dimmed, this means that the selected object is already separated into its simplest form.
4D marks the boundaries of the individual objects with handles.
You can align objects with each other or using an invisible grid on the form.
- When you align one object to another, you can align it to the top, bottom, side, or horizontal or vertical center of the other object. You can directly align a selection of objects using the alignment tools or apply more advanced alignment settings using the Alignment Assistant. The latter option allows you, for example, to set the object that will be used as the position reference and to preview the alignment in the form before applying it.
- When you use the invisible grid, each object can be aligned manually with others based on “noticeable” positions which are depicted with dotted lines that appear when the object being moved approaches other objects.
The alignment tools in the toolbar (see Form editor) and in the Align submenu of the Object menu allow you to quickly align selected objects.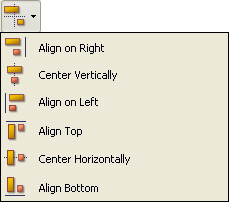
When 4D aligns objects, it leaves one selected object in place and aligns the remaining objects to that one. This object is the “anchor.” It uses the object that is the furthest in the alignment’s direction as the anchor and aligns the other objects to that object. For instance, if you want to perform a right alignment on a set of objects, the rightmost object will be used as the anchor.
The figure below shows objects with no alignment, "aligned left", "aligned horizontally by centers", and "aligned right":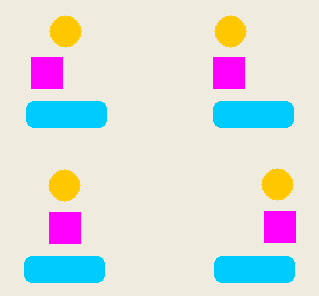
The Alignment Assistant allows you to perform any type of alignment and/or distribution of objects.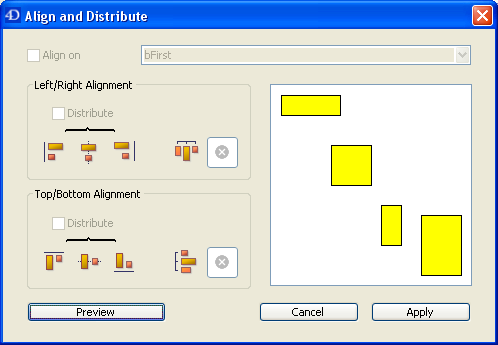
To display this dialog box, select the objects you want to align then choose the Alignment command from the Align submenu in the Object menu or from the context menu of the editor.
- In the “Left/Right Alignment” and/or “Top/Bottom Alignment” areas, click the icon that corresponds to the alignment you want to perform.
The example area displays the results of your selection. - To perform an alignment that uses the standard anchor scheme, click Preview or Apply.
In this case 4D uses the object that is the furthest in the alignment’s direction as the anchor and aligns the other objects to that object. For instance, if you want to perform a right alignment on a set of objects, the rightmost object will be used as the anchor.
OR:
To align objects to a specific object, select the Align on option and select the object to which you want the other objects to be aligned from the object list. In this case, the position of the reference object will not be altered.
You can preview the results of the alignment by clicking the Preview button. The objects are then aligned in the Form editor but since the dialog box does not go away, you can still cancel or apply the alignment.
Note: This dialog box allows you to align and distribute objects in one operation. For more information on how to distribute objects, refer to Distributing objects.
The Form editor provides a virtual magnetic grid that can help you place and align objects in a form. Magnetic alignment of objects is based on their position in relation to each other. The magnetic grid can only be used when at least two objects are present in the form.
This works as follows: When you move an object in the form, 4D indicates possible locations for this object based on noticeable alignments with other form objects. A noticeable alignment is established each time that:
- Horizontally, the edges or centers of two objects coincide,
- Vertically, the edges of two objects coincide.
When this happens, 4D places the object at the location and displays a red line indicating the noticeable alignment taken into account: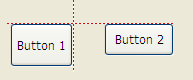

Concerning the distribution of objects, 4D proposes a distance based on interface standards. Like with magnetic alignment, red lines indicate the noticeable differences once they are reached. 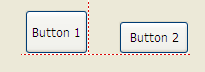
This operation applies to all types of form objects. The magnetic grid can be enabled or disabled at any time using the Turn Magnetic Grid On command in the Form menu or in the editor context menu. It is also possible to set the activation of this feature by default on the Forms Page of the application Preferences. You can manually activate or deactivate the magnetic grid when an object is selected by pressing the Ctrl (Windows) or Control (Mac OS) key .
Note: The magnetic grid also influences the manual resizing of objects.
You can distribute objects so that they are set out with an equal amount of space between them. To do this, you can distribute objects using either the Distribute tools in the Tools palette or the Alignment Assistant. The latter allows you to align and distribute objects in one operation.
Note: When the magnetic grid is on, a visual guide is also provided for distribution when an object is moved manually. For more information, refer to the previous section.
To distribute objects with equal spacing:
- Select three or more objects and click the desired Distribute tool.
- In the toolbar, click on the distribution tool that corresponds to the distribution you want to apply.
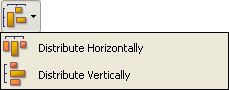
OR
Select a distribution menu command from the Align submenu in the Object menu or from the context menu of the editor.
4D distributes the objects accordingly. Objects are distributed using the distance to their centers and the largest distance between two consecutive objects is used as a reference.
To distribute objects using the Align and Distribute dialog box:
- Select the objects you want to distribute.
- Choose the Alignment command from the Align submenu in the Object menu or from the context menu of the editor.
The following dialog box appears:
- In the Left/Right Alignment and/or Top/Bottom Alignment areas, click the standard distribution icon.
 (Standard horizontal distribution icon)
The example area displays the results of your selection. - To perform a distribution that uses the standard scheme, click Preview or Apply.
In this case 4D will perform a standard distribution, so that the objects are set out with an equal amount of space between them.
OR:
To execute a specific distribution, select the Distribute option (for example if you want to distribute the objects based on the distance to their right side). This option acts like a switch. If the Distribute check box is selected, the icons located below it perform a different function:

- Horizontally, the icons correspond to the following distributions: evenly with respect to left sides, centers (hor.) and right sides of the selected objects.
- Vertically, the icons correspond to the following distributions: evenly with respect to top edges, centers (vert.) and bottom edges of the selected objects.
Note: This dialog box lets you combine object alignment and distribution. For more information about alignment, refer to Aligning objects.
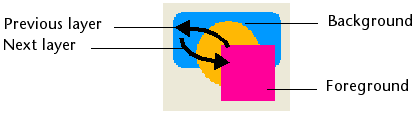
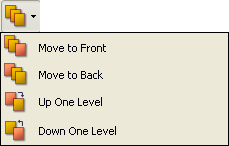
You will sometimes have to rearrange objects that are obstructing your view of other objects in the form. For example, you may have a graphic that you want to appear behind the fields in a form. 4D provides four menu items, Move to Back, Move to Front, Up One Level and Down One Level that let you “layer” objects on the form. These layers also determine the default entry order (see Modifying data entry order). The figure below shows objects in front of and behind other objects:
To move an object to another level, select it and choose:
- One of the Move to Back, Move to Front, Up One Level and Down One Level commands of the Object menu,
- One of the commands in the Level> submenu in the context menu of the editor,
- One of the commands associated with the level management button of the toolbar.
Note: When several objects are superimposed, the Ctrl+click / Command+click shortcut can be used to select each object successively by going down a layer with each click.
When ordering different levels, 4D always goes from the background to the foreground. As a result, the previous level moves the selection of objects one level towards the background. The next level moves the selection one level towards the foreground of the form.
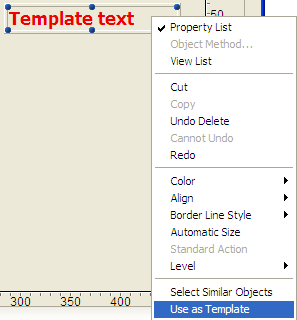
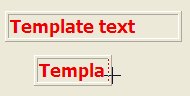
The Use as Template command, available in the context menu of the editor when an object is clicked, saves the clicked object as a template. This template and its properties will then be used when creating all objects of the same type.
In the following example, the command is applied to a Text object. All Text objects created afterwards will use the properties of the designated object by default:
A customized template can be used for each object type. There is a single customized template per object type for the entire database.
The template saves all object properties set when the command was executed, with the exception of fixed coordinates and the object method (if applicable).
To modify or replace an object template, you must create a new one for the object type in question.
You can also remove all object templates (and go back to the standard template) using the Clear Custom Templates command in the Object menu of the Form editor. When you select this command, a confirmation dialog box appears. If you validate this dialog box, all the object templates are reset to their default values.

Product: 4D
Theme: Building forms
4D Design Reference ( 4D v16)
4D Design Reference ( 4D v16.1)
4D Design Reference ( 4D v16.3)


