
4D v16.3
Form properties
- 4D Design Reference
-
- Building forms
-
- Form editor
- Form properties
- Form Properties (Explorer)
- Creating a multi-page form
- Using inherited forms
- Modifying data entry order
- Inserting and organizing form objects
- Setting object display properties
- Rotation of text
- Using static pictures
- Using references in static text
- Duplicating on a matrix
- Incrementing a set of variables
- Scaling a form
- Using object methods
- Using object views
- Using shields
- Using the preconfigured library
- Creating and using custom object libraries
- Displaying information about objects on forms being executed
 Form properties
Form properties are set in the Property List of the Form editor.
Certain form properties can be set using the Form Properties window specific to the Explorer. For more information about this point, refer to Form Properties (Explorer).
You can change the form type, i.e. its destination. For project forms, there are two types available: Detail Form and Detail Form for Printing. For table forms, two additional types are also available: List Form and List Form for Printing.
This property determines the options that appear in the Property List for the form.
It also allows you to restrict the number of forms displayed in the current Input and Output form selection lists (the List of tables window, see Browsing different tables and forms): only forms whose type corresponds to the list are displayed.
The Form Type property is found at the top of the Property List. When the form type is None, it is displayed in both menus of the List of tables.
Note: You can also set the form type using the Form Properties window specific to the Explorer (see Form Properties (Explorer)).
These properties are described in Using inherited forms.
The default window title is used when the form is opened using the Open window and Open form window functions in the Application environment. The default window title appears in the Title bar of the window. To set the default window title, enter it in the Window Title entry area of the Property List.
You can use dynamic references to set the window titles for forms, i.e.:
- A standard XLIFF reference (see MissingRef).
- A table or field label: The syntax to apply is <?[TableNum]FieldNum> or <?[TableName]FieldName>. The reference is resolved when the FORM SET INPUT command is called (if the * parameter is passed and if it is followed by a call to Open window) and when the Open form window command is called.
- A variable or a field: The syntax to apply is <VariableName> or <[TableName]FieldName>. The current value of the field or variable will be displayed in the window title.
Notes:
- The number of characters for a window title is limited to 31.
- You can also set the window title using the Form Properties window specific to the Explorer (see Form Properties (Explorer)).
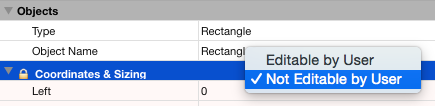
The Editable by user property is used to indicate that the form can be customized by the users via the user form editor in the Application mode (see User forms). Implementing this mechanism requires additional settings as well, which are described in User Forms of the 4D Language Reference manual.
Note: You can set the Editable by user property using the Form Properties window specific to the Explorer (see Form Properties (Explorer)).
When the Editable by user property is checked, the form is locked. When you open a form with this property, a padlock icon appears in the toolbar and it is not possible to make any modifications. You must click on this icon to unlock the form — in this case, any user forms become obsolete and must be regenerated.
When the Editable by user property is checked, the Property List also has padlocks indicating the locked properties.
You can click on these icons to “open” the padlocks and thus make the corresponding properties editable in the user form editor  . You can also use the context menu available in the theme bar (64-bit versions only):
When the Save Geometry option is checked, if the window is opened using the Open form window command with the * parameter, several form parameters are automatically saved by 4D when the window is closed, regardless of how they were modified during the session:
- the current page,
- the position, size and visibility of each form object (including the size and visibility of list box columns).
Note: This option does not take into account objects generated using the OBJECT DUPLICATE command. In order for a user to recover their environment when using this command, the developer must repeat the sequence of creation, definition and positioning of the objects.
When this option is checked, the Save Value option is also available for certain objects. For more information and several examples of use, refer to Memorization of window geometry.
The Do not invert objects option disables the “right-to-left” mode for the form. The “right-to-left” mode (Windows only) causes the database form objects and titles to be inverted. It is used in the context of languages that are read from right to left (such as Arabic). For more information about activating this mode, refer to the “Right-to-left Languages” section in Interface page .
When the Do not invert objects option is checked for a form, the right-to-left mode is never applied to this form in Application mode, regardless of the database configuration. This option can be used, for example, to set “international” forms within a database configured in right-to-left mode. This option is found in the Property List, as well as in the Form Properties (Explorer) dialog box.
Note: This property can also be managed by programming using the FORM GET PARAMETER command.
A form is always displayed in a window. 4D lets you set the size of both the form and the window, as well as their respective behavior when resized.
These properties are interdependent and your application interface results from their interaction. Keep in mind that the result also depends on the resizing properties assigned to each form object (for more on this subject, refer to Resizing).
You set the form size properties using the “Form Size” theme of the Property List. The following choices are available:
- Size based on: Automatic Size: The size of the form will be that necessary to display all the objects, to which will be added the margin values entered in the Hor. margin and Vert. margin fields (in pixels).
- Size based on: Set size: The size of the form will be based on what you enter (in pixels) in the Width and Height fields (when you select the Set size option, the Hor. margin and Vert. margin fields change to Width and Height).
- Size based on: object: The size of the form will be based on the position of the selected form object. For example, if you choose an object that is placed in the bottom-right part of the area to be displayed, the form size will consist of a rectangle whose upper left corner will be the origin of the form and the lower right corner will correspond to that of the selected object, plus any margin values.
You can choose this option when you want to use active objects placed in an offscreen area (i.e., outside the bounding rectangle of the window) with an automatic size window. Thanks to this option, the presence of these objects will not modify the size of the window. - When you select the Automatic Size option or a size based on an object, you have the Hor. margin and Vert. margin fields. You can then enter values (in pixels) to set additional margins to be added to the edges of the form. These values also determine the top and right-hand margins of forms used in the Label editor.
Note: For output forms, only the Hor. margin or Width fields are available. - Dynamic adjustment: The Dynamic adjustment property is available in the “Form Size” theme for forms converted from a 4D version prior to version 2004, when the Automatic Size property is selected. This property modifies the resizing mode of forms. In previous versions of 4D, when a form had the Automatic Size property, the form size was calculated only at the moment when the form was opened. If any modifications were made subsequently using commands such as OBJECT MOVE, the size of the form was not adjusted. Henceforth, the form size is dynamically adjusted in this case. This principle is activated for new forms. On the other hand, for compatibility reasons, the forms of converted databases do not have this property by default. If you want the size of converted forms to be dynamically adjusted, you can check the Dynamic adjustment option.
When an input form is displayed in a custom application, you ordinarily open the form using the Open window or Open form window functions.
Open window lets you specify the top, left, bottom, and right coordinates of the window as well as the window type. In this case, the size of the window does not depend on that of the form. On the other hand, the resizing possibilities will depend on the options set in the “Form Size” theme and on the window type. Open form window creates a new window based on the sizing and resizing properties of the form passed as parameter.
You can set form window resizing in the Property List.The following options are available:
- With Constraints: This property is available for forms converted from previous 4D versions (prior to version 2004). It is used to reproduce the behavior of the prior “Resizable” form property: when this option is not checked, the mechanisms that handle object resizing and window size constraints are disabled. This way, the user can freely resize the form window but the objects it contains are neither resized nor moved. The minimum/maximum or fixed size properties as well as the resizing properties of the objects are ignored. This corresponds to the behavior of former versions of 4D and must only be used for compatibility reasons within specific interfaces. The behavior of current 4D databases corresponds to the checked option (standard mode).
- Fixed Width: If you check this option, the window width will be locked and it will not be possible for the user to resize it. If this option is not checked, the width of the form window can be modified. In this case, the Minimum Width and Maximum Width entry areas can be used to determine the resizing limits.
- Fixed Height: If you check this option, the window height will be locked and it will not be possible for the user to resize it. If this option is not checked, the height of the form window can be modified. In this case, the Minimum Height and Maximum Height entry areas can be used to determine the resizing limits.
As a general rule, it is necessary to prevent the user from hiding enterable areas and control buttons.
The platform interface property sets the appearance of a form according to the context of its execution. This property can also be set individually for each form object (see the “Platform” section in Setting object display properties).
Two interface properties are available: System and Printing. They are used as follows: When displayed on screen, a form must respect the current operating system interface (System). When it is set to be printed, the appearance of objects must be adapted (Printing), regardless of the platform.
- System: This property allows adapting the appearance of the form or object automatically depending on the current platform on which 4D is running:
- When the form is displayed under Mac OS X, the form or object has a Mac OS X look and feel,
- When the form is displayed under Windows, the form or object has the look and feel based on the current “Appearance” setting of the control panel.
- Printing: This property allows adapting the appearance of the form or object for printing: any object or graphic item (button, check box, tab, line, etc.) is drawn as a vector in order to produce a satisfactory result for printing. The same result is obtained regardless of the platform on which the form is displayed or printed.
This form property activates the textured look for the form when it is displayed using the Open form window command on Mac OS. This look is found throughout the Mac OS X interface:

If the form is displayed in a window that was not created by Open form window (for example in the Design mode), the property will not be taken into account. Under Mac OS, the metal look is previewed in the Form editor when the Textured option is checked and when the form limits are displayed. When the form is executed under Windows, this option has no effect.
Checking this option hides the grow box in a form window. This option is taken into account when you call the form using the DIALOG command for example.
The print properties are described in Printing a form.
When you create an application, you can create custom menus. Custom menus allow you to add menu commands for automating specific tasks in the database, such as, for example, creating a report.
Custom menus are created in the Menu Bar editor. Each menu bar that you create includes at least one menu and is assigned a unique ID number and name. For more information on creating menu bars, menus and menu commands, refer to the chapter Menus and menu bars.
To assign a menu bar to a form, select a menu bar from the “Associated Menu Bar” List in the Property List. The [...] button lets you access the menu bar editor directly (see Menus and menu bars). In the Application environment, a menu bar that is assigned to a form is added to the right of the current menu bar.
If the menu bar of the form is identical to the current menu bar, it is not added. The form menu bar will operate for both input and output forms.
- The Active Menu Bar option appears when you select a menu bar. If you want to use this form in a custom application, select the Active Menu Bar option. This option tells 4D not to disable the current menu bar. If this option is not selected, 4D disables the current menu bar and only permits access to the form’s menu bar.
Note: You can also associate a menu bar with a form in the Form Properties (Explorer) dialog box.
You can control access to a form by setting Access and Owner privileges for groups of users. A single group can be assigned for each privilege using the Access and Owner drop-down lists. For information about creating a password access system with users and groups, see the chapter Users and groups.
The Access drop-down list controls which group can use the form in the records display window or in custom applications. If a user that is not in this group attempts to use the form, 4D displays a message saying that the user’s password does not allow him or her to use the form.
The Owner drop-down list controls which group can edit the form in the Design environment. If a user who is not in this group attempts to open the form in the Design environment, 4D displays a message saying that the user does not have the access privileges needed to edit the form.
Users who are assigned to both groups can use the form in both the Design environment and in custom applications.
To set access privileges for a form:
- Display the form properties in the Property List.
- Use the Access and Owner drop-down lists to make the desired access privilege assignments.
The names of existing groups are displayed in each drop-down list.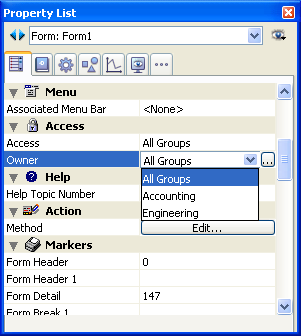
The [...] button can be used to access the Groups editor directly in the Tool Box of 4D.
You can also assign access groups to a form in the Form Properties (Explorer) dialog box.
4D allows you to associate a custom on-line help file with each database. The creation of help files is described in Appendix A: Assigning a custom help file.
Help files can be contextual, which means that they can display information related to the context from which they were called. To do so, you can associate a Help Topic Number to a form. Make sure you assign help topic numbers that match numbers defined in the help file. This is done in the “Help” theme of the Property List .
The Edit... button lets you access the Form method. This is covered in Editing methods.
This area lets you specify the precise location of markers on the vertical ruler of the form. Markers are mainly used in output forms. They control the information that is listed and set header, breaks, detail and footer areas of the form. For more information about the use of control markers, see Using output control lines.
Note: The label width triangle on the horizontal ruler controls the width of a label when you create a form for printing mailing labels using the PRINT LABEL command.
This area sets the events that can lead to the execution of the form method. When the form is used, only the events that you select will actually occur. If you do not select any events, the form method will never be called.
Your database will run faster if you deselect superfluous events.
For more information about form events, refer to the Form event command.
To select or deselect all events, hold down Ctrl (under Windows) or Command (under Mac OS) and click an event.

Product: 4D
Theme: Building forms
4D Design Reference ( 4D v16)
4D Design Reference ( 4D v16.1)
4D Design Reference ( 4D v16.3)


