
4D v16.3
Creating and modifying tables
- 4D Design Reference
-
- Creating a database structure
-
- Database basics
- 4D Database capabilities
- Structure editor
- Inspector palette
- Creating and modifying tables
- Table properties
- Primary key manager
- Creating and modifying fields
- 4D field types
- Field properties
- External data storage
- Rules for naming tables and fields
- Creating and modifying indexes
- Creating and modifying relations
- Types of relations
- Relation properties
- Exporting and importing structure definitions
 Creating and modifying tables
You can create tables at any time. 4D names the first table [Table_1] and then names additional tables sequentially, up to [Table_32767]. You can rename the tables to suit your purposes.
You can remove obsolete tables or tables created by mistake. This deletion can be permanent or not. Be careful, if the deletion is permanent, any data stored in the table are also deleted. You can also remove a table from the editors of the Application mode by making it invisible.
You can set triggers and attributes for each table as needed. These properties are described in Table properties.
You can create a new table either directly in the Structure window, or via a dialog box. Direct creation is faster; but creation using the dialog box lets you specify certain parameters of the table and cancel the operation when necessary. You can also create tables using copy-paste.
To create a new table directly:
- Right-click an empty area of the Structure editor window, then choose Add Table... from the context menu.
OR
In the add objects menu of the Structure editor tool bar, choose the Table option: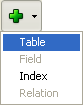
4D creates the table directly in the Structure editor. You can then change its name, add fields, etc.
Note: If you want to put the table in a specific folder, you will need to use the Home Page of the Explorer.
To create a new table using the “New table” dialog box:
- Choose New > Table... in the File menu (or click on the New button of the 4D tool bar).
OR
On the Tables Page of the Explorer, click on the add button .
.
The "New table" dialog box appears: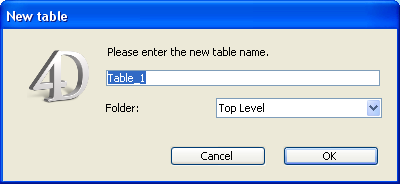
- (optional) Modify the name of the table you want to create.
For more information about naming rules, refer to GET REGISTERED CLIENTS. - (optional) Specify the folder in which you want to place the new table.
By default, the table is placed at the highest level of the folder hierarchy (“Top Level”). For more information about object folders, refer to the Home Page. - Click OK.
If you want to cancel the operation, click the Cancel button.
4D creates a new table image. It becomes the selected table image in the Structure editor window.
Note: Starting with 4D v14, any new table created in the database contains a primary key field by default. For more information about this, refer to Default primary key field.
To create a new table by copy-paste:
- Select the table(s) to be duplicated and choose the standard “copy” command (4D Edit menu, context menu or using the Ctrl+C/Command+C shortcut).
- Then choose the Paste command either in the Edit menu, in the context menu or using the Ctrl+V/Command+V shortcut.
The table is pasted with all its fields. It is renamed by default “Copy(X)_of_TableName,” where TableName is the original name of the table and X is the number of copies of the table.
You can rename tables at any time. If you have used the old table name in a method, 4th Dimension automatically changes it to the new name provided the method is closed. If the method is open, you must make the changes yourself. Each table name must be unique in the database.
You can rename a table directly in the Structure editor, in the Explorer, or using the Inspector palette.
To rename a table directly (Structure editor or Tables page of the Explorer):
- Click twice on the table name (if the table is already selected, click once).
It switches to editing mode: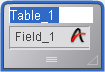
- Enter the new name and click outside of the table.
To rename a table using the Inspector palette of the Structure editor:
- Double-click on the table name.
OR
Right-click on the table image, then select Table Properties... in the context menu.
OR
In the Explorer, double-click on the table name on the Tables page.
4D displays the name and properties of the selected table in the Inspector palette. This palette also indicates the table number. If the Inspector palette is already open but is displaying the properties of another table or another object, just select the desired table image and the palette will then display its properties. - Enter the new name in the “Name” area.
The new name is applied immediately.
Note: To find out the rules for naming tables, refer to GET REGISTERED CLIENTS.
You can delete tables from your database.
This operation can be carried out via the SQL engine of 4D or via the Structure editor.
For more information about using SQL statements in 4D, refer to the 4D SQL Reference manual (MissingRef).
There are two ways of deleting tables in 4D: permanent deletion (the table and its data are actually removed from the database) and non-permanent deletion (the table is simply put into the Trash (see the Trash Page) and may be recovered subsequently).
To permanently delete one or more database tables from the Structure editor:
- Select the table(s) to be deleted then choose Clear from the 4D Edit menu.
OR
Choose Delete from the context menu of the table.
A warning dialog box will ask you to confirm the operation: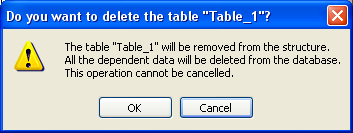
If you click OK, 4D will carry out the following operations:
- The table is permanently deleted from the structure. All the data associated with the table are deleted permanently from the data file.
- Any trigger method associated with the table is deleted.
- The table forms associated with the table are transformed into project forms and are placed in the Trash of the Explorer (see Trash Page).
Non-permanent deletion of a table consists in putting it in the Trash of the database (which can be accessed via the Explorer), just like the file deletion mechanisms implemented by Windows and Mac OS.
The table then no longer appears in the 4D editors and its contents become inaccessible but it can still be recovered so long as the Trash is not emptied.
To put one or more tables into the Trash from the Structure editor:
- Choose the Move to Trash command from the context menu of the table.
The table is immediately put into the Trash.
OR
Select the table(s) to be deleted then press the Delete or Backspace key.
In both cases, a confirmation dialog box appears. - If you click OK, the table is put into the Trash. It can be recovered at any time from the Trash Page.
When a table is deleted, the other tables of the database are not renumbered, so as to avoid endangering the stability of the database. It is therefore possible, for example, to have a database with three tables numbered 2, 4 and 5.
Note that the numbers of permanently deleted tables are reused when new tables are created subsequently.

Product: 4D
Theme: Creating a database structure
Supprimer table, Créer table, Numéro table
4D Design Reference ( 4D v16)
4D Design Reference ( 4D v16.1)
4D Design Reference ( 4D v16.3)


