
4D v16.3
Creating and modifying fields
- 4D Design Reference
-
- Creating a database structure
-
- Database basics
- 4D Database capabilities
- Structure editor
- Inspector palette
- Creating and modifying tables
- Table properties
- Primary key manager
- Creating and modifying fields
- 4D field types
- Field properties
- External data storage
- Rules for naming tables and fields
- Creating and modifying indexes
- Creating and modifying relations
- Types of relations
- Relation properties
- Exporting and importing structure definitions
 Creating and modifying fields
For each table, you need to create the fields that hold the data you want to store and manage.
When you create a field, you assign it a field type that describes the kind of information that will be stored in it. 4D uses the field type to perform different kinds of operations on the contents of the field. For example, if a field will contain a date, you will want to create it with a Date field type. Subsequently, 4D can compute date values, such as length of service or qualification for benefits. In addition, 4D can sort records in chronological order using the dates in this field. Field types are described in 4D field types.
In addition to the field type, each field in a table can possess various properties. These properties determine conditions for entering, displaying, or modifying data in the fields. They are described in Field properties.
After creating a field, you can always later change its type or properties, or even delete it.
You can create up to 32,767 fields in a table. You can create a new field using standard creation commands or by copy-paste.
To create a field:
- Right-click on a table, then select Append Field or Insert Field from the context menu.
OR
Double-click on one of the empty rows below the last field name of the table.
OR
Select a table then, in the add objects menu of the Structure editor tool bar, choose the Field option: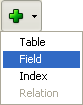
- (optional) To quickly create additional fields, you can hit the Carriage return as many times as necessary.
A field is then added to the table and 4D selects it. By default, the field is named Field_X where X corresponds to the current field number (if fields have been deleted, this number may not correspond to the actual number of fields in the table, see the "Number of deleted fields" section below).
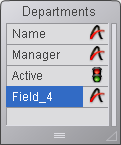
You can also change its names, set its properties, etc. (see the following paragraphs).
To create a field using copy-paste:
- Select the field(s) to be duplicated and choose the standard “copy” command (4D Edit menu, context menu or using the Ctrl+C/Command+C shortcut).
- Select the table where you want to add the new fields and then choose the Paste command either in the Edit menu, in the context menu or using the Ctrl+V/Command+V shortcut.
The field is duplicated with the same type and properties. If a field with the same name already exists in the destination table, it is renamed by default “Copy_of_FieldName,” where FieldName is the original name of the field. An additional number is added if you make several copies of the same field.
Note: Indexing properties are not kept when fields are created by copy-paste.
You can rename fields at any time; 4D will update the names of the fields wherever they are being used (forms, methods, files). Be careful, if methods were open in the Method editor when the field name is changed, they will need to be closed and reopened in order for the name of the field to be updated.
Each field name in a table must be unique.
You can rename a field directly in the Structure editor and in the Explorer, or using the Inspector palette.
To rename a field directly (Structure editor or Tables Page of the Explorer):
- Click twice on the field name (if the field is already selected, click once).
OR
(Structure editor only) Select the field to rename and hit the Carriage return.
It switches to editing mode. - Enter the new name and click outside of the field.
To rename a field using the Inspector palette of the Structure editor:
- Double-click on the field.
OR
Right-click on the field, then select Field Properties... from the context menu.
OR
In the Explorer, double-click on the field name on the Tables page.
4D displays the name and properties of the selected field in the Inspector palette. The palette also indicates the table and field numbers.
If the Inspector palette is already open but displaying the properties of another field or another object, select the desired field in order to display its properties in the palette. - Enter the new name in the “Name” area.
The new name is applied immediately.
To find out the rules for naming fields, refer to Rules for naming tables and fields.
4D lets you modify the order in which fields appear in the tables of the Structure editor. Changing the order of fields in tables can, for example, make analysis of the structure easier.
Note that reorganizing fields in the Structure editor does not effect their display in the other editors of the application. In fact, 4D always displays the fields in their order of creation (including when the Insert Field command is used) — except in the case of the Explorer, where objects are displayed by alphabetical order.
There are two ways to modify the order of the fields:
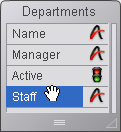
- Manually reorganize the contents of a table by simply dragging and dropping its fields. Simply press the Alt (Windows) or Option (Mac OS) key — the cursor changes into a hand — and move each field wherever you want it:
Custom sorting carried out in this way is memorized and can be applied again if necessary using the Custom command of the sort menu (see below). - Applying a sort criterion. You have several sort criteria available using the Sort sub-menu associated with the tools button of the editor:
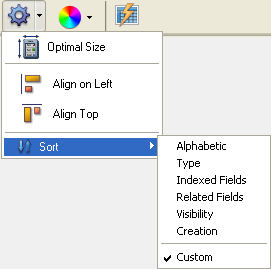
When you choose an option, it is applied to all the tables selected in the window. This menu is disabled when no table is selected.
The menu also indicates the criterion that is currently applied with a checkmark. Several checkmarks are displayed when different criteria are used in the selection of tables.
You can select a sort criteria from among the following:- Alphabetic: Displays the fields by alphanumeric order.
- Type: Displays the fields by type (with type names in alphabetical order).
- Indexed Fields: Displays the indexed fields at the top
- Related Fields: Displays the primary keys and then the foreign keys.
- Visibility: Displays visible fields at the top.
- Creation: Displays the fields in the creation order (default).
- Custom: No specific sorting is applied. This option restores the previous sort carried out manually by drag and drop. If no drag and drop has been carried out previously, this option will have no effect.
You can delete fields from your tables. However, this cannot be undone.
This operation can be carried out either via the SQL engine of 4D or via the Structure editor.
For more information about using SQL statements in 4D, please refer to the 4D SQL Reference manual.
To delete one or more fields in the database using the Structure editor:
- Select the field(s) to be deleted.
You can select fields from several different tables at the same time. - Choose Clear in the Edit menu of 4D.
OR
Choose Delete in the context menu of the table.
OR
Press the Delete or Backspace key.
A warning dialog box appears so that you can confirm the operation.
If you click on OK, the field(s) will be deleted from the structure. All the data associated with the field(s) are removed from the data file.
When a field is deleted, the other fields of the database are not renumbered, so as to avoid endangering the stability of the database. It is therefore possible, for example, to have a table with four fields numbered 1,4, 6 and 8.
Note that the numbers of permanently deleted fields are reused when new fields are created subsequently.

Product: 4D
Theme: Creating a database structure
UUID
4D Design Reference ( 4D v16)
4D Design Reference ( 4D v16.1)
4D Design Reference ( 4D v16.3)


