
4D v16.3
Structure editor
- 4D Design Reference
-
- Creating a database structure
-
- Database basics
- 4D Database capabilities
- Structure editor
- Inspector palette
- Creating and modifying tables
- Table properties
- Primary key manager
- Creating and modifying fields
- 4D field types
- Field properties
- External data storage
- Rules for naming tables and fields
- Creating and modifying indexes
- Creating and modifying relations
- Types of relations
- Relation properties
- Exporting and importing structure definitions
 Structure editor
You can access the Structure editor by choosing the Database Structure command in the Design menu or by clicking on the  button in the 4D toolbar.
You use the Structure editor to manage the database structure — the tables and their relations. It gives you control over such things as tables, table properties, fields, field properties, and table relations.
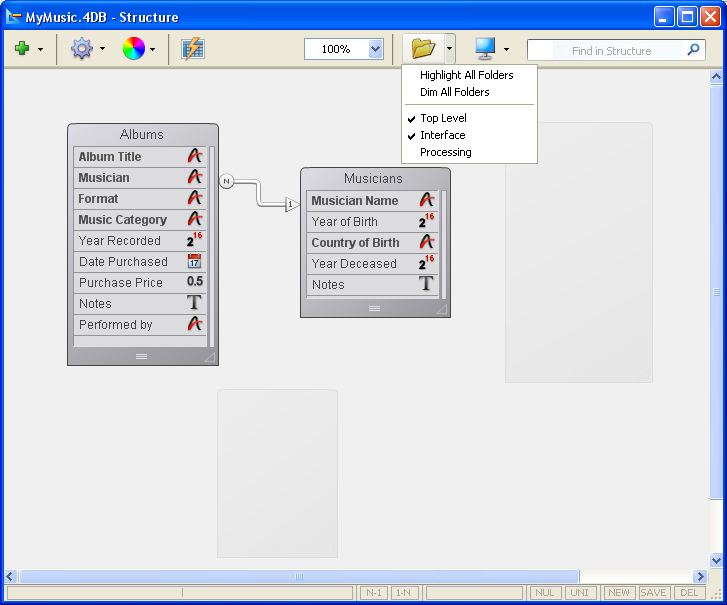
The Structure editor provides a graphic view of a database’s structure as well as a toolbar and context menus that you can use to carry out database design operations.
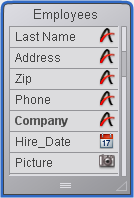
Each table is represented by a table image in the Structure editor. It shows the fields and their types, in the form of icons. An information bar displays the characteristics of tables and fields as the mouse moves over them.
A floating Inspector palette can be used to view and modify the properties of structure objects and of the structure editor itself. This window is described in the Inspector palette section.
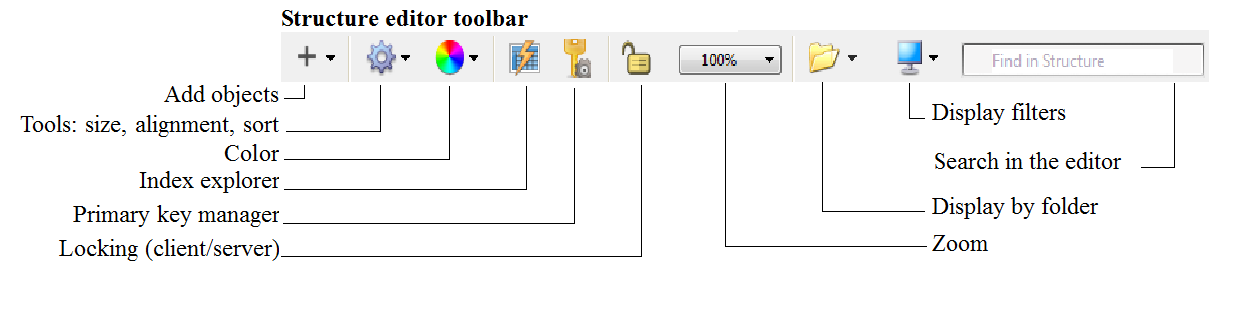
The structure editor has a toolbar containing functions like the addition of objects, as well as navigation and display options:
The lower part of the editor window is an information bar displaying data corresponding to the area the mouse is moving over: table, field or relation.


To work with the image of an object in the Structure editor, you will first need to select it. You can then specify its properties, move it, resize it, delete it, etc. It is also possible to select several objects of the same type simultaneously in order, for example, to display or modify their common properties in the Inspector palette. You can even select fields from different tables.
To select a table:
- Click the image of the table.
OR
Press [Tab] or Shift+[Tab] to select each table in the Structure editor successively.
The selected table is outlined in blue. Subsequent actions affect the selected table.
To select a field or relation:
- Click on the field or relation.
OR
When a table is selected, press the [upper arrow] or [lower arrow] keys to select each field of the table.
OR
When a table is selected, press the [Home] or [End] key to select the first or last field of the table.
To select several objects of the same type (tables, fields, relations):
- Use Shift+click to select several adjacent objects.
OR
Use Ctrl+click (Windows) or Command+click (Mac OS) to select several non-adjacent objects.
OR
Click in an empty area and draw a rectangle around the objects to be selected (selection of tables only).
OR
Choose the Select All command in the Edit menu or in the context menu of the editor (selection of tables only).
You can resize or move the table images in the Structure editor according to your requirements.
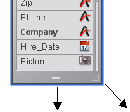
When you add fields to a table or when you reduce the size of a table, there may be more fields in the table than the image can display. When this happens, 4D automatically adds a cursor than you can use to scroll through the list of visible fields:
You can resize the table image in order, for example, to display more field names or to reorganize your screen. There are several possibilities available:
- Manual resizing: Simply click and drag the bottom of the table image or its lower right corner.
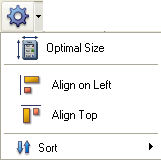
- Optimal Size: This automatically resizes the selected table(s) so that their size corresponds exactly to that of the fields they contain (no empty lines are displayed).
To apply the Optimal Size command to one or more tables, you can:- Select the Optimal Size command in the menu associated with the tool bar button of the editor (this command is not activated if there is no table selected).
- Select the Optimal Size command from the editor’s context menu (click on a table).
- Shift+double-click in the name area of the table to resize. If you repeat this combination, the following sequence is applied: original size -> optimal size - > collapse.
- Select the Optimal Size command in the menu associated with the tool bar button of the editor (this command is not activated if there is no table selected).
- Collapse: This function collapses selected table image(s) so that only their names are visible. This can be useful with large structures.
To apply the Collapse command to one or more tables, you can:- Select the Collapse command from the editor’s context menu (click in the title area of a table).
- Shift+double-click in the name area of the table to be resized. If you repeat this shortcut, the following sequence is applied: original size -> optimal size - > collapse.
Notes:
- A standard double-click on the table name area opens the Inspector.
- Alt (Windows) or Option (Mac OS) + double-click opens the trigger method of the table in the Method editor
- Ctrl (Windows) or Command (Mac OS) + double-click opens the Explorer on the Form page.
4D Server: If you resize a table image using 4D Server, the table is resized for all the users in the Design environment.
To move a table image manually:
- Click on the name of a table and drag it using the mouse cursor.
Drag the table name bar only. Dragging other parts of the table image may produce different effects, such as creating a new table relation or changing the size of the table image.
4D Server: If you move a table image when using 4D Server, the table appears in its new location for all users in the Design environment.
To align two or more tables:
- Select the tables to align and choose an alignment option in the tools menu.
These commands are only active when at least two tables are selected.
Specific scrolling functions facilitate navigation among large structures:
- The mouse wheel can be used to scroll the contents of the editor window vertically. This will also scroll through the fields of a table when the cursor is placed above it.
- Holding down Shift while using the mouse wheel scrolls the contents of the window horizontally.
- Pressing Shift activates the “hand” tool which can be used to drag the entire contents of window by clicking in the empty area.
You can modify the display scale of the database structure using the Zoom menu in the structure toolbar. 100% is the default value on opening of a database. Zoom action is focused on the selection if there is one.
The current zoom setting is specific to each user. It is memorized when the window is closed.
Note: An option in the Preferences can be used to configure the graphic rendering of the Structure editor during a zoom. For more information, refer to Structure Page .
The Display button in the toolbar of the Structure editor is associated with a menu and lets you choose the objects to be displayed in the structure according to their type:
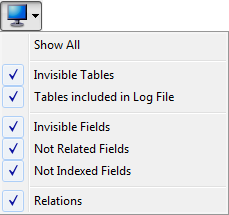
By default, all objects are displayed. This feature allows various representations or views — from the simplest to the most complete — and provides an analysis tool for the structure based on the level of information required. The choices are applied to all the tables and fields. They are saved per user and memorized when the window is closed. Hiding certain objects does not change the position of the tables.
- When several types of fields are checked, a logical OR operator is used to determine the objects to be displayed. For example, if the Invisible Fields and Not Indexed Fields options are checked, all the non-indexed fields (visible or not) and all the invisible fields (indexed or not) are displayed.
- Tables have priority over fields: if a table is not displayed, its fields are not displayed.
- If you add an object whose type is not displayed (table, field or relation), the object is displayed in the editor, you must select the corresponding option again in the menu associated with the Display button in order to hide it.
You can hide groups of tables in the Structure editor based on folders that are defined in the Explorer window on the Home Page. You configure the display of the tables using the Folders button in the toolbar of the Structure editor. 
The menu associated with the button displays the commands that manage the display as well as the list of folders specified in the database. A check will appear next to each folder displayed. You can modify the current display by selecting or deselecting a folder using this menu.
The Highlight All Folders/Dim All Folders commands can be used to display/hide all the tables in folders of the database.
Each click on this button will invert the display of the tables: highlighted tables are dimmed and vice versa.
When the tables are dimmed, by default, only their outlines appear in the Structure window. Only tables that are not dimmed remain entirely visible:
Note: You can set the appearance of dimmed tables (by folder) in the Structure editor to either Dimmed or Invisible using an option found on the Structure Page of the Preferences. It is necessary to close and reopen the Structure editor window in order for this preference to be taken into account.
The Structure editor window has specific properties that can be set using the Inspector.
To display the properties of the Structure editor window, you can either:
- Double-click (or click, if the window is already displayed) in an empty area of the window,
- Click with the right mouse button in an empty area of the window and choose the Structure Properties command from the context menu.
The Inspector palette displays the Structure properties:
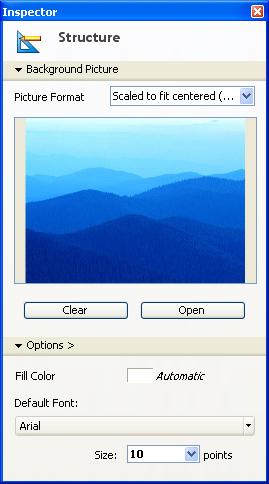
The following properties can be set:
- Background Picture: You can change the background picture used as well as its display format.
To change the picture, click on the Open... button or right-click in the preview area and choose Open... from the context menu; then select the file containing the picture to be displayed. You can use any picture format. The selected picture is displayed immediately in the preview area and in the editor window.
To change the display format of the picture, choose a value from the Picture Format menu. The formats provided are the standard picture display formats of 4D.
To delete a custom picture, click on the Clear button or right-click in the preview area and choose Clear from the context menu. - Fill Color: You can change the color used for the background of the editor window. To do this, click in the color selection area and choose a color from the selection menu.
- Default Font: To change the default font used for table and field names, choose a vaue from this menu. You can also use the Size menu to change the default font size.
4D lets you carry out searches in the Structure editor window. Searches can be among the following elements:
- table names and/or field names
- table numbers
To do a search, enter the character string or table number to be searched for in the Find in Structure area of the Structure editor. Entering a value in this area displays an options bar below it that can be used to specify the scope and type of search desired:

- The Find menu sets the scope of the search (Tables & fields or Tables only).
- The Options menu sets the type of search:
- Contains (default): searching for “le” will find “Table,” “Letter,” “Elements,” etc.
- Starts with: searching for “pa” will find “paper”, “paid” but not “repair.”
- Number: searching for “2” will find table number 2, 12, 20, 21, etc.
Searches are carried out in real time, as you enter the values. Tables and/or fields found by the search are “lit up.”
If nothing is found, the search area turns red. To exit the “find” mode, click on the  button in the search options bar or delete all the characters in the search area.

Product: 4D
Theme: Creating a database structure
4D Design Reference ( 4D v16)
4D Design Reference ( 4D v16.1)
4D Design Reference ( 4D v16.3)


