
4D v16.3
Field properties
- 4D Design Reference
-
- Creating a database structure
-
- Database basics
- 4D Database capabilities
- Structure editor
- Inspector palette
- Creating and modifying tables
- Table properties
- Primary key manager
- Creating and modifying fields
- 4D field types
- Field properties
- External data storage
- Rules for naming tables and fields
- Creating and modifying indexes
- Creating and modifying relations
- Types of relations
- Relation properties
- Exporting and importing structure definitions
 Field properties
In addition to its name and type (see 4D field types), field properties determine its appearance as well as its data entry, display, editing and data storage conditions. The properties of each field in a table can be set individually.
Field properties can be specified in the Inspector palette or, for certain ones, in the context menu that appears when you right-click on a field.
Note: You can modify the properties of a field for which data has already been entered in the database. Certain changes take existing data into account. For example, when you choose the Unique attribute, 4D displays a warning dialog box and does not allow this attribute to be enabled if the data of this field contains any duplicate values. However, if you modify data entry properties, this does not affect any existing data. For example, when you choose the Mandatory attribute, only entries made after this change will be checked; values that were already entered may contain blank fields.
The "Definition" area of the Inspector palette configures the basic field properties. Some properties are only available when certain types of fields are selected.
You can assign a color to each field. Colors can be used to distinguish fields according to their role or attributes. For example, you can use one color for unique fields and another for mandatory ones.
It is also possible to assign a color individually to each table (see Color of the table image) and to each relation (see the Definition section).
Note: The field color set in the Structure editor has no effect on the color of fields displayed in forms (see Background and border colors).
The color set for a field will be applied to the field name. To set the color of one or more fields, select them and choose a color using:
- The Color button
 in the tool bar of the Structure editor,
 - The Color command in the context menu of the fields,
- The Color option in the Inspector palette.
The Automatic option can be used to apply the standard original color of the field.
You can make a field invisible in the Application environment and for the plug-ins by selecting the Invisible property for this field. The Invisible attribute hides the field from the user. A field with this attribute does not appear in any standard 4D editors and dialog boxes that appear in the Application environment. In addition, it cannot be used by plug-ins. The following editors and dialog boxes in the Application environment are concerned:
- All query editors (see Searching records),
- The Order by editor,
- The Label editor,
- The Quick report editor,
- The Exporting and importing data dialog boxes,
- The Formula editor.
In each of these places, the user is unable to see or choose the field. For instance, the user cannot choose an invisible field for a report created with the Quick Report editor.
Note: When using the editors, users have the option of saving their specifications (e.g., the query or sort they created) to disk files. In this case, any fields specified that are subsequently declared invisible will still be used in the operation. In addition, users can type the names of invisible fields in the Formula editor.
Invisible fields are displayed in italics in the Structure editor window.
Use the Unique attribute when you want to be certain that each record has a different (unique) value in this field. The Unique attribute should be used for the field that uniquely identifies each record in the table. The Unique attribute is useful to validate fields that store Employee numbers, Social Security numbers, Purchase Order numbers, and so on.
The Unique attribute prevents duplication of empty values as well as actual entries. An empty field cannot be duplicated in another record.
The information bar of the Structure editor indicates whether the Unique property is checked for a field (see the Structure editor.
In 4D, fields with the Unique attribute must be indexed:
- A visual signal indicates that an index will be created (if it does not already exist) when you select the Unique attribute for a field:

- The editor prevents you from removing the index of a Unique field (None option or remove commands not available for indexes when such a field is selected):
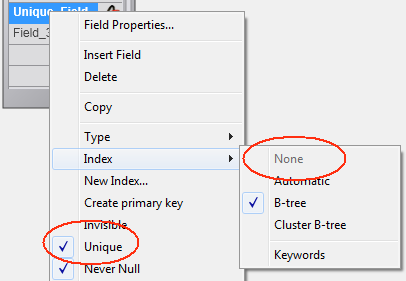
If you want to remove the index from a unique field, you need to remove the Unique attribute beforehand.
This option controls whether the field is exposed in the context of 4D Mobiles requests sent to the 4D database via REST. By default, all tables and all fields are exposed in 4D Mobile.
For security reasons, you may want to only expose certain fields of your database to 4D Mobile calls. For instance, if you may not want to expose the [Employees]Salary field.
If you do not want to expose a field, you can uncheck the Expose with 4D Mobile Service option for it.
Note: You can also set this option at the table level, see Table properties.
In order for a field to be accessible by means of 4D Mobile, its parent table must also be accessible. If the parent table is not exposed, none of its fields are accessible, regardless of their individual status. This means that you can enable or disable the exposure of a table in 4D Mobile temporarily without modifying the individual value of each field's exposure option.
This option can be used in the context of the "4D Mobile" functionality. For more information, refer to the 4D Mobile manual.
The Reject NULL value input property is used to prevent the storage of NULL values.
When this attribute is checked for a field, it will not be possible to store the NULL value in this field. If a field having this attribute receives a NULL value, an error will be generated.
This low-level property corresponds exactly to the NOT NULL attribute of SQL. Generally, if you want to be able to use NULL values in your 4D database, it is recommended to use exclusively the SQL language of 4D.
Note: In 4D, fields can also have the “Mandatory” attribute (see below). The two concepts are similar but their scope is different: the “Mandatory” attribute is a data entry control, whereas the “Reject NULL value input” attribute works at the level of the database engine.
This property make the processing of “blank” values and NULL values consisten for the field via the 4D language.
For compatibility reasons, NULL values stored in 4D database tables are automatically converted into default values when being manipulated via the 4D language. For example, in the case of the following statement:
myAlphavar:=[mytable]MyAlphafield... if the MyAlphafield field contains a NULL value, the myAlphavar variable will contain “” (empty string).
The default values depend on the data type:
- For Alpha and Text data types: “”
- For Real, Integer and Long Integer data types: 0
- For the Date data type: “00/00/00”
- For the Time data type: “00:00:00”
- For the Boolean data type: False
- For the Picture data type: Empty picture
- For the BLOB data type: Empty BLOB
On the other hand, this mechanism in principle does not apply to processing carried out at the level of the 4D database engine, such as queries. In fact, searching for a “blank” value (for example myvalue=0) will not find records storing the NULL value, and vice versa. When both types of values (default values and NULL) are present in the records for the same field, certain processing may be altered or require additional code. To avoid these inconveniences, the Map NULL values to blank values option can be used to standardize all the processing in the 4D language. This property can be used to extend the principle of using default values to all processing. Fields containing NULL values will be systematically considered as containing default values.
This property is taken into account at a very low level of the database engine. It acts more particularly on the Is field value Null command.
Note: The Alpha fields in UUID format that are not generated are not considered as NULL (see UUID format).
The “Autoincrement” property can be used to generate unique IDs for records. It can be used with fields of the Integer, Long Integer and Integer 64 bits types (see 4D field types).
A field with this property is automatically incremented each time a record is created in the table. The number assigned to the field matches that of the "internal counter" of the table, maintained by 4D. This internal counter can also be accessed using 4D commands Sequence number and Get database parameter and using the #N marker (see Default values).
The numbers assigned are permanent and are never reused, even when records are deleted. Numbers generated during a transaction that is cancelled are "lost”.
However, it is still possible to reset the internal counter of a table using the SET DATABASE PARAMETER command.
The “Autoincrement” property corresponds to the SQL AUTO_INCREMENT attribute and can be specified using this language (see example below). The AUTO INCREMENT label also appears in the SQL information area of the Inspector for fields having this attribute.
The following code can be used to generate an "id" field of the Integer type in the "animals" table:
 ARRAY TEXT($names;6)

 $names{1}:="dog"

 $names{2}:="cat"

 $names{3}:="penguin"

 $names{4}:="snake"

 $names{5}:="butterfly"

 $names{6}:="ostrich"

 Begin SQL

    CREATE TABLE animals(

    id INT NOT NULL AUTO_INCREMENT ,

    name VARCHAR(30)NOT NULL,

    PRIMARY KEY(id));

    INSERT INTO animals(name)VALUES(:$names);

 End SQL
The following code:
SELECT * FROM animals;... returns these values:
| id name |
| 1 dog |
| 2 cat |
| 3 penguin |
| 4 snake |
| 5 butterfly |
| 6 ostrich |
This menu of options is only available for Text, BLOB, Picture and Object type fields. You can set a storage location for the field data. The following options are available:
- In record: Data is stored with each record. Generally, you should not choose this option for fields containing voluminous data. However, it is selected by default for Text fields because this type of storage is required if you want to use "standard" B-Tree indexes. The index selection menu is hidden when Text data are stored outside of records.
- In data file: Data is stored in the data file, but outside of each record. This option is selected by default for BLOB, Picture and Object fields. You can optimize database functioning when working with voluminous data by storing texts, pictures, Blobs and objects outside of records.
- Outside data file: Data is stored in separate files, outside the .4DD file. This option is described in External data storage.
Compatibility note: This option is only taken into account for new records created subsequently in the table. When you set this option for a table where records have already been entered, they are not modified and the table will work in a mixed internal/external storage mode. If you want to extend this mode to the existing records as well, you need to compact the data using the Force updating of the records option (see Compact page).
As described in the previous section, for optimization purposes, by default the data of BLOB, Picture, Text and Object type fields are stored outside of records or outside of the data file.
In this configuration, it may be worthwhile, for performance reasons, to "force" data to be stored in the records when their size is limited. This functioning is particularly optimized when your application handles BLOB, Picture, text or object data of inconsistent sizes.
This setting is available via the Internal storage max size option. The value entered in this area represents the size in bytes below which the data of the field will be stored in the record. For example, if you enter 30 000 for a picture field, a 20 KB picture will be stored in the record and a 40 KB picture will be stored at the location defined in the settings (in the data file or outside it). By default, the value is 0: all the data of the field is stored outside of the records.
This property is available for Alpha type fields. It indicates that the field stores UUID identifiers. The stored data must conform to the UUID format (combination of 32 letters (A-F, a-f) and numbers (0-9)). To do this, you can use the Auto UUID property, the Generate UUID command, or any custom algorithm.
If you try to store a string that does not comply with the UUID format in this field, 4D converts it automatically. The same operation is also applied to the contents of existing non-Alpha fields that are transformed into UUID fields: when loading the records, the values are reformatted and then stored once again.
Fields with the UUID format property can be displayed in forms and remain enterable. Their contents appear in upper-case characters. You must pass through a variable if you want to display lower-case characters.
Notes:
- Fields with the UUID format cannot be associated with keyword indexes nor with choice lists.
- You can create a relation between two fields that both have the UUID format but you cannot link a standard Alpha field to a field that has the UUID format.
- An UUID field that is initialized (generated) and that has the NULL value returns an empty string. An UUID field that is not generated is not NULL and returns "000..." (the number of 0s is equal to the number of characters). The property is not taken into account by non-generated UUID fields (display of "000...").
This option is only active when you select the UUID format property.
You can use the Auto UUID property to generate a UUID number automatically in the field.
This number is calculated automatically in the following contexts:
- when a record is created,
- when a record is loaded whose UUID field contains a Null value. This occurs more particularly for records created and saved before the UUID field is added in the table, when Map NULL values to blank values option was unchecked.
Naturally, in all cases, the record must be saved in order for the automatically-generated UUID to be saved in the field.
Note: When data is imported, even with this property selected, 4D does not generate a new number but uses the imported values (and transforms them when necessary if the format is not valid). However, if the value of the imported field is empty, a UUID is automatically generated.
Compatibility note: This option has only been kept for compatibility reasons and does not have any effect by default. To be able to use it, you must enable QuickTime in your application (see Pictures).
This property is available for Text and Alpha fields. When you select this option, queries and sorts carried out in the data stored in the field do not take any style tags into account.
This option is related to the abilit of 4D to apply different styles within the same text area (rich text) in a form. For more information about this function, refer to GET DATA SOURCE LIST.
The setting of styles is done by inserting HTML tags in the text. These tags are interpreted when the text area is displayed.
Style tags are stored with the data. For example, if you write "week end" in a Text field, 4D stores "week <SPAN STYLE = "color: #D81E05">end</SPAN>". This operation is transparent for the user at the form level. However, for queries and sorts, a specific setting is necessary for 4D to ignore the style tags. For the word "week end", the query can find it only if you have selected the Queries and sorts on text without tags option for the field in the Structure editor.
Note: With this option, a query for thevalue among the data of thefield is the same as executing this statement within 4D:
QUERY BY FORMULA(OBJECT Get plain text(thefield)="thevalue")The Index property is available for all field types except for BLOBs and Pictures. The Keyword Index property is available for fields of the Alpha, Text and Picture types.
Using indexes helps accelerate processing and searches among the data.
Managing indexes is detailed in Creating and modifying indexes.
You can establish data entry controls for fields and enterable objects at the form level. Data entry controls restrict what the user can enter into the field or enterable object on a particular form.
When the Mandatory attribute is set for a field, the user must enter a value in that field during data entry. 4D does not accept a record that contains an empty mandatory field. You would set the Mandatory attribute for a field that contains essential information for your database. The field that uniquely identifies each record is a good candidate for the Mandatory attribute. Social Security numbers, invoice numbers, certain dates, or employee numbers might need to have the Mandatory attribute set to protect the integrity of the records.
You can also set this attribute for a field in a particular form. If you select the Mandatory attribute in the Structure editor, you cannot deselect it on a particular form. However, you can apply the Mandatory attribute on a form to a field that does not have this attribute in the Structure editor. For information about setting the Mandatory attribute for a field in a form, see the Enterable and Mandatory attributes and field properties section.
Note: In 4D, fields can also have the "Reject NULL value input" property (see above). The two concepts are similar but their scope is different: the “Mandatory” attribute is a data entry control, whereas the “Reject NULL value input” attribute works at the level of the database engine.
If this attribute is set for a field, 4D validates the value initially entered in the field, but does not allow the user to modify the value after the record has been saved. The user can edit an entry in such a field only during the initial creation of the record, before the record is validated. Once the user saves the record, the value in the field not editable. The value can then only be modified by a method or in the Design environment after you have first removed this option.
Use Can’t Modify for fields that must provide an audit trail such as Date Received, Date Paid, and so on. The Can’t Modify attribute is often used for the field that uniquely identifies each record in the table.
Note: This attribute only works on fields displayed in an input form in Page mode. In other cases (entry in list, entry in a subform in either List or Page mode), the value of the field can still be modified.
The user cannot enter values from the keyboard into a field that has the Display Only attribute set. You must use a default value for such a field or write a method that inserts a value in the field. A field with the Display Only attribute is useful for displaying values that you do not want database users to modify, such as calculated totals or a sequence number assigned by a method.
You can also make any field non-enterable on a particular form. For information about making a field non-enterable, see the Enterable and Mandatory attributes and field properties section.
This option is only available for Text type fields. When it is checked, the Text field is automatically configured, in forms created subsequently, so as to contain several lines of text. Its default characteristics are as follows:
- Height corresponding to several lines,
- Horizontal scrollbar,
- During execution, a carriage return causes a line break.
When this option is not checked, the default appearance of Text fields in forms is the same as that of Alpha fields: a single line’s height and no scrollbar; a carriage return will move you to the next field of the form.
It is possible to change the default field appearance at any time using the Form editor.
Use the Allow Choice List attribute if you want to display a choice list for entering information in the field. To use this attribute, you first need to create the choice list using the Lists editor (see Lists).
Use the Allow Choice List attribute when you want to standardize entries in the field and avoid misspellings. Use a choice list for a field that has a limited number of valid entries or a limited number of usual entries. Using a choice list does not necessarily prevent the user from typing a different value (one that does not appear in the choice list).
You can also assign a choice list to a field on a particular form. However, when you assign a choice list only on a form, the list is not displayed in other editors and dialog boxes, such as the Query editor. For information about using a choice list in a form, see the section Data entry controls and assistance.
Note: It is also possible to set choices lists of required values and excluded values at the form level.
When you check the Allow Choice List option, the associated scrolldown menu is enabled. You can then select an existing choice list that you want to assign to the field or you can click on [...] to directly access the Lists editor (see Lists).
You can provide users with additional information about a field by adding a help tip to the field. When a tip is entered in the Help Tips area, it appears next to the field whenever a user places the pointer over the field in any form in which the field is included. A Help Tip is displayed on all platforms.
When the user places the mouse pointer over the field, the tip appears below the field, as shown below:
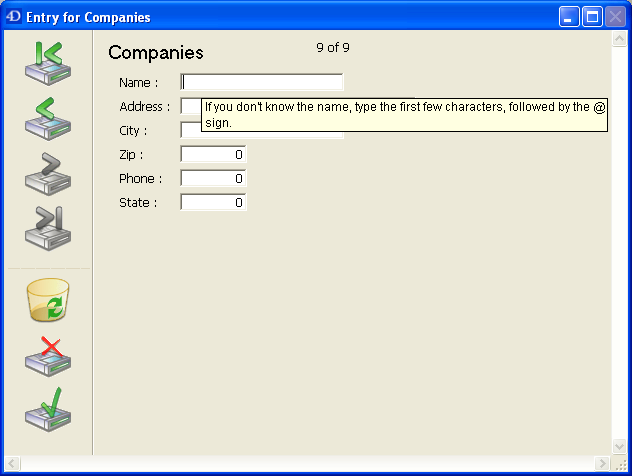
You can also use a help tip for a field in a particular form. If you assign a help tip only to a certain form, it will not appear in the other forms. For more information about using help tips with forms, refer to the Help messages section.
The Comments area of the Inspector palette can be used to store additional information about the field. These comments are available to all the developers.
Note that each table and relation has its own comments area.
The SQL area of the Inspector palette provides various useful information about the field from the perspective of its use via the SQL language.
This area indicates more particularly whether the name of the field respects the rules regarding SQL nomenclature (for example, unlike 4D, SQL does not allow a field name to contain spaces).
Note: SQL also defines a list of reserved words, including SQL functions and SQL keywords. You can view these reserved words in the Lists area of the Method editor.
For fields, the SQL information area also indicates their SQL attributes (type and properties).

Product: 4D
Theme: Creating a database structure
4D Design Reference ( 4D v16)
4D Design Reference ( 4D v16.1)
4D Design Reference ( 4D v16.3)


