
4D v16.3
Relation properties
- 4D Design Reference
-
- Creating a database structure
-
- Database basics
- 4D Database capabilities
- Structure editor
- Inspector palette
- Creating and modifying tables
- Table properties
- Primary key manager
- Creating and modifying fields
- 4D field types
- Field properties
- External data storage
- Rules for naming tables and fields
- Creating and modifying indexes
- Creating and modifying relations
- Types of relations
- Relation properties
- Exporting and importing structure definitions
 Relation properties
You always draw a relation from the Many table to the One table.
The related fields must have identical or compatible field types. You can use the following field types for the primary and foreign key fields:
- String (Alpha and Text),
- Number (Real, Integer, Long Integer, Integer 64 bits or Float),
- Time,
- Boolean,
- Date.
Primary key fields are usually indexed (not mandatory). The relation properties can be configured using the Inspector palette or, for certain ones, using the context menu that appears when you right-click on the relation.

The Definition area identifies the foreign and primary key fields.
- From: The “From” field is the foreign key of the Many table for this relation. In the context menu, this field is called the “source field.”
- To: The “To” field is the primary key field of the One table. In the context menu, this field is called the “destination field.” You draw the relation line from the foreign key field in the Many table to the primary key field in the One table.
- Color: This pop up menu lets you set the color of a relation as it will be displayed in the Structure editor. The color of a relation is not linked to its properties.
The color of a relation can also be set using the context menu for relations.
The Many to One options affect what happens when a record from the Many table is opened.
- Name: Entry area for naming Many-to-One relation (optional).
Note: As part of a 4D Mobile link, this name is used to create a corresponding relational attribute in the model on the Wakanda side (see Using Relations in the 4D Mobile manual). In this case, you must use a name that is compatible with JavaScript rules. - Manual/Automatic: This menu sets the operating mode for the relation linking the Many table to the One table. If you select the Automatic option, automatic functions will be enabled. For example, when a record from the [Employees] table is open in the Application environment, the corresponding company record is selected in the [Companies] table. This allows 4D to display information about the company the where the employee works if you want menu.
By default, the Manual option is selected. In this case, you must manage the loading and unloading of the related record of the One table using language routines.
For more information about this, refer to Automatic and manual relations.
The Auto Relate One property can also be set using the context menu for relations. - Auto Wildcard support: This check box has the effect of invisibly appending the wildcard character (@) to any value entered in the foreign key field of the Many table when the user tabs or clicks out of the field. If the user enters a partial value, 4D looks for a matching value in the related One table. If 4D finds only one match, it automatically completes the entry. If 4D finds more than one possible match, the user is presented with a list of values from which to choose.
- Prompt if related one does not exist: This check box forces 4D to display a dialog box that lets a user create the related One record if it does not exist. By default, when you enter a value in a related field from the Many table, 4D checks to see whether a matching record already exists in the related One table. If 4D cannot find a match, the following dialog box is displayed:

This dialog box allows the user to create a corresponding record in the One table while you are entering a record in the Many table. For instance, suppose that you have an Invoicing database that contains an [Invoices] table and a [Customers] table. If you enter an invoice in the [Invoices] table and the customer to whom the invoice belongs does not already have a record in the [Customers] table, 4D will ask you if you want to create the corresponding record in the [Customers] table when you validate the record in the [Invoices] table.
You can eliminate this dialog box by unchecking the Prompt if related one does not exist check box. Removing this dialog box is useful when you need to manage the creation of the related One record using a method. - Wildcard Choice List
The list of wildcard fields lets you select an additional field that will be displayed in the list of values (that appears when the user enters the wildcard @ in the related field during data entry). Normally, it is preferable to select the field that best identifies the record.
Here’s how this works during data entry: 4D allows the user to look up values in the One table when entering data into the foreign key field in the Many table. The user simply uses the standard wildcard character (@) in the related field. Doing so causes 4D to search for the corresponding entry in the related One table.
The wildcard character can be used in two ways: to complete a partial entry or to display a list of valid entries. When a list is displayed, the user can select the entry from the list. An additional field, the wildcard choice field, can be displayed with the related field.
For example, suppose the user is creating a record in the [Employees] table. Instead of typing Acme Unlimited in the Company field, the user can type Ac@ and then press Tab to move to the next field. Because @ is the 4D wildcard character, this entry means “this value starts with “Ac” and is followed by anything else.” 4D looks in the related table for the record which matches this entry. If it finds one, it completes the entry and selects the next field in the data entry order.
The figure below shows how this use of the wildcard works.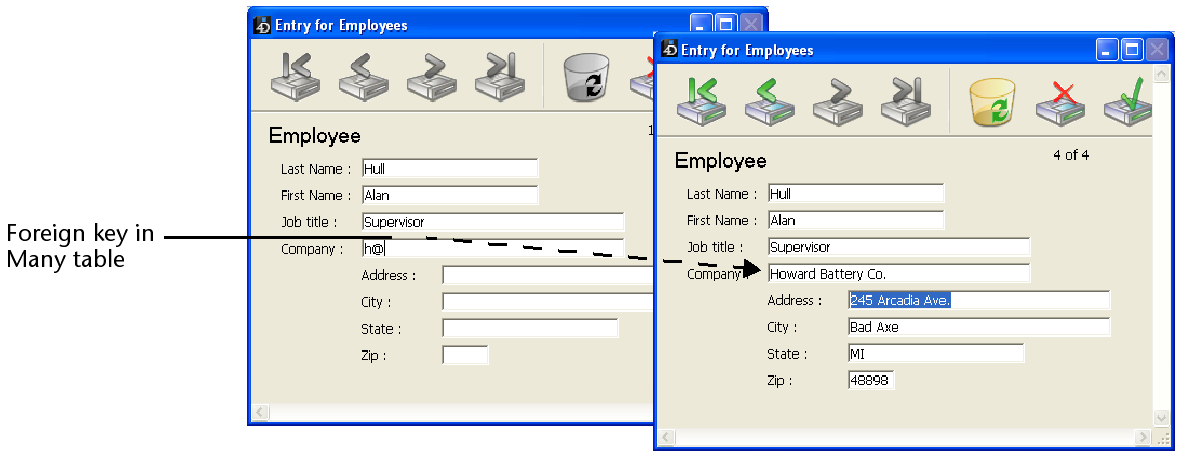
If 4D finds more than one entry that meets the requirement, it displays a list of entries so that the user can select the correct one. The figure below shows such a list being displayed: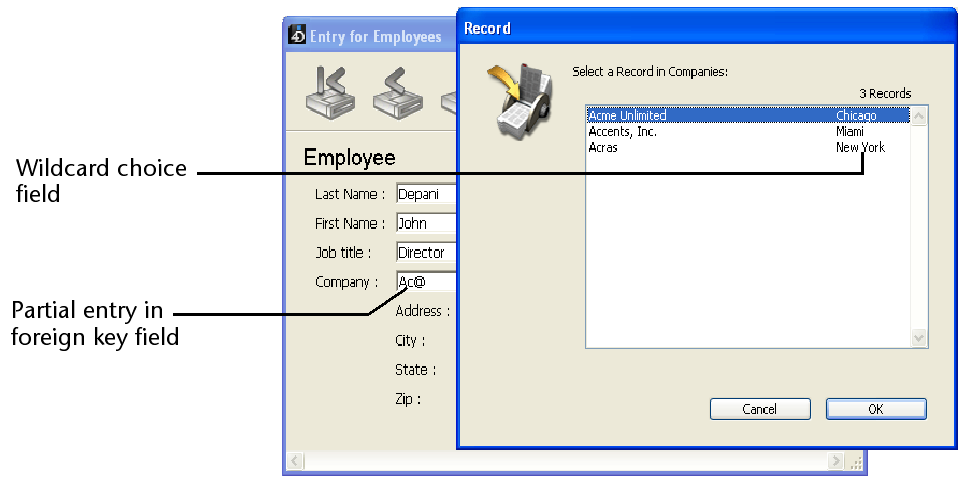
You can specify a second field for the list to help the user decide which company to select. The second field is the wildcard choice field you selected in the Inspector palette when you created the relation.
The figure above shows the list of companies displaying the city as well as the company name. This wildcard choice field assists the user who doesn’t know whether the company is named Accents, Inc. or Acme Unlimited, but remembers that the company is located in Chicago.
To see a list of all companies in the [Company] table, the user enters @ only. 4D then displays a list of all the companies so that the user can select the correct one. The figure below shows a complete list of companies being displayed: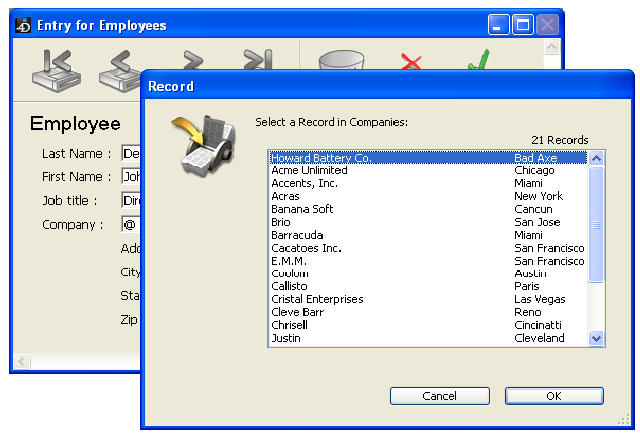
The record selection window can be resized.
To see the list of all the companies in the [Company] table, you can enter only the @ character. 4D then displays the complete list of all the companies of the table so that the user can select the correct one.
The One to Many options control automatic relations in the other direction.
- Name: Entry area for naming One-to-Many relation (optional).
Note: As part of a 4D Mobile link, this name is used to create a corresponding relational attribute in the model on the Wakanda side (see Using Relations in the 4D Mobile manual). In this case, you must use a name that is compatible with JavaScript rules. - Manual/Automatic: This menu sets the operating mode for the relation linking the One table to the Many table. If you select the Automatic option, automatic functions will be enabled. For example, when a record from the [Company] table is open in the Application environment, the related records of the [Employees] table are loaded. This allows 4D to display the employee records of this company in an included subform menu. By default, the Manual option is selected (no automatic functions). For more information about this, refer to Automatic and manual relations. The Auto One To Many property can also be set using the context menu for relations.
- Auto assign related value in subform: This option is used to automatically assign the value of the primary key field in the One table to the foreign key field in the Many table during data entry. This option is only useful when the Automatic option has been selected for the return relation.
This option affects data entry when an input form in a One table has a subform of a related Many table (for information on subforms, see the Subforms and widgets section). If Auto assign related value in subform is selected, a user can add records to the subform (i.e., the related Many table) and have the related value automatically assigned to the fields of the related table.
In the relation between the [Company] table and the [Employees] table, the [Company] table is the One table and the [Employees] table is a related Many table. Each company has one record in the [Company] table and several records in the [Employees] table. When the foreign key field of the Many table is displayed in the sub-form, you can see the effect of the option: the field value is automatically copied into the sub-form each time a sub-record is added.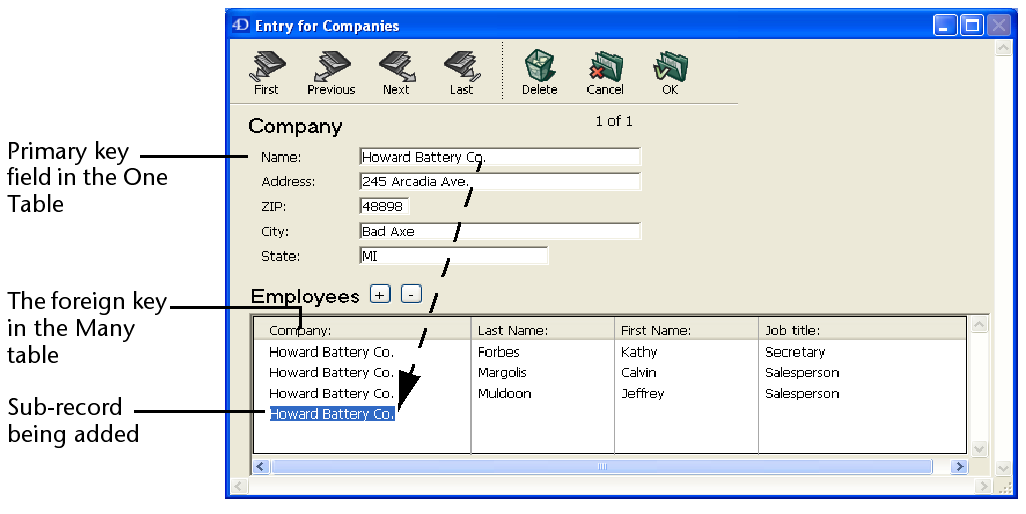
This option also works when the foreign key field of the Many table is not shown in the sub-form: the primary key field value is automatically copied “internally” into the foreign key field. You can make sure by passing to page mode.
When the Auto assign related value in subform option is not checked, the sub-records created are not automatically related to the appropriate record of the Many table. In this case, you must link the sub-record:- Either manually, if the key field is displayed: in the previous example, you simply need to enter “Howard Battery Co.” manually in the Company name field of each sub-record,
- Or by programming: you just need to execute a line of code of thetype when creating the sub-record.
[TableN]Field1:=[Table1]Field1
The Deletion Control options regulate record deletion in the Many table when a record is deleted in the One table. Normally, the user cannot delete records in a table unless it is the current table. This means, for example, that to delete records from the [Employees] table, it must first be made the current table. You make a table the current table by choosing it in the List of tables dialog box in the Design environment.
- Leave related many intact: Selecting this radio button allows the user to delete a record in the One table, leaving the corresponding records in the Many table intact. This leaves records in the Many table without any corresponding related record in the One table. The only effect is to render the information from the One table unavailable. No record from the One table is loaded when a record corresponding to the deleted record is loaded in the Many table.
- Delete related many: Selecting this radio button instructs 4D to automatically delete all related records in the Many table when the user deletes a record in the One table. This property ensures that no related Many records become “orphaned” when the corresponding related One record is deleted.
- Cannot delete if related many: Selecting this radio button instructs 4D to prohibit the user from deleting a record in the One table if there are related records in the Many table. This property ensures that no records are mistakenly deleted. Note that you can freely delete records from the Many table, no matter which choice is made.
The Delete related many and Cannot delete if related many radio buttons enforce what is called referential integrity in database theory. When referential integrity is in effect, 4D ensures that each record in a related Many table will always be associated with exactly one record in the related One table.
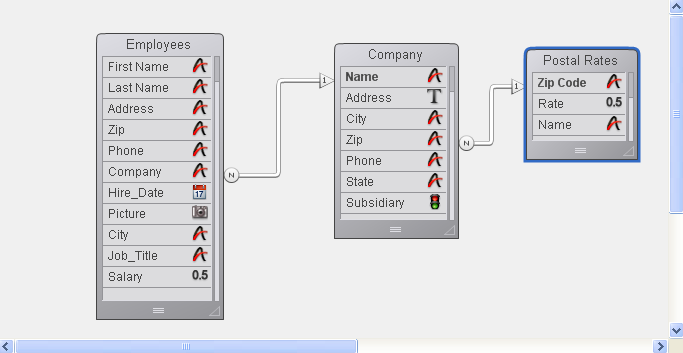
If you have several related tables, deletion control is activated for each relation as in a chain. For instance, suppose you have the structure shown below. If a Zip code is deleted from the [Postal Rates] table (a One table) and Delete related many has been selected for each relation, 4D first deletes the records for the corresponding companies in the [Company] table and then deletes the records of all the employees who work for those companies in the [Employees] table.
When confronted with contradictory Deletion Control settings, 4D does not allow the deletion to occur. For instance, if Delete related many is selected for the relation between the [Company] table and the [Postal Rates] table but Cannot delete if related many is selected for the relation between the [Employees] table and the [Company] table, no deletion will occur and the records in the [Company] and [Employees] tables will remain intact.
The SQL area of the Inspector palette provides information that is useful for working with the structure via the SQL language.
For relations, the area indicates FOREIGN KEY and REFERENCES properties.

Product: 4D
Theme: Creating a database structure
4D Design Reference ( 4D v16)
4D Design Reference ( 4D v16.1)
4D Design Reference ( 4D v16.3)


