
4D v16.3
Quick report editor
 Quick report editor
The Quick Report editor contains the following elements:
- Master Table: This menu is used to specify the master table that will be used as a basis for generating the report. The fields of this table are displayed in the Fields list and the related fields will be displayed in relation to this table.
- Fields list: This list lets you select the fields to be inserted into the report by double-clicking or by drag and drop. It displays either the list of fields found in the master table, the hierarchical list of tables and related fields, or the hierarchical list of all the tables and fields of the database. You choose the type of display in the Field selection list located just above the area. Indexed fields appear in bold. You can also display and select the fields of related tables.
Notes:- Only tables and fields which are not hidden appear in the Fields list of the Quick Report editor. For information about hiding tables and fields, refer to the "Invisible" paragraph in Table properties and Field properties.
- Object type fields are not supported by the Quick Report editor.
- All relations in automatic: This option is used to specify the way in which the Quick Report editor will make use of the relations between the different tables of the database.
On principle, the editor can only use automatic relations. By default, the option is not checked and only automatic relations can be used by the editor. If the All relations in automatic option is checked, the Quick Report editor considers the manual relations of the database as automatic relations and will thus enable access to all the data related to the database.
Notes to developers:- The All relations in automatic option causes all the relations to pass into automatic for the current process, even after the Quick Report editor has been closed. If you want to make sure that all the relations will be manual after using the Quick Report editor, execute the statement
SET AUTOMATIC RELATIONS(False;False)
- When the editor is called using the QR REPORT command, this option does not appear in order to allow the developer to manage the status of relations directly.
- The All relations in automatic option causes all the relations to pass into automatic for the current process, even after the Quick Report editor has been closed. If you want to make sure that all the relations will be manual after using the Quick Report editor, execute the statement
- Column dividers: These lines indicate the boundaries between columns of the report. They can be moved manually in order to enlarge or reduce the size of each column. Manual resizing deselects the Automatic Width option if it has been activated for the column concerned.
- Cells: A cell is the intersection of a row and a column.
- Scroll bars: You use the scroll bars to view parts of the quick report design that extend beyond the area of the quick report form.
- Sort list/Sort order:
- In List mode, this list displays the fields of the report on which the sort will be carried out, as well as the sort order and whether it will be ascending or descending. Each field inserted into this list causes a sub-total row to be added in the Quick Report area.
- In Cross-table mode, this area displays the sort order for each data source.
- Quick Report area: This area lets you build your report by inserting fields using drag and drop, double-clicking or via the context menu; you can also adjust the width of the columns added, or delete breaks or formulas, define the colors and borders of cells, etc.
List mode: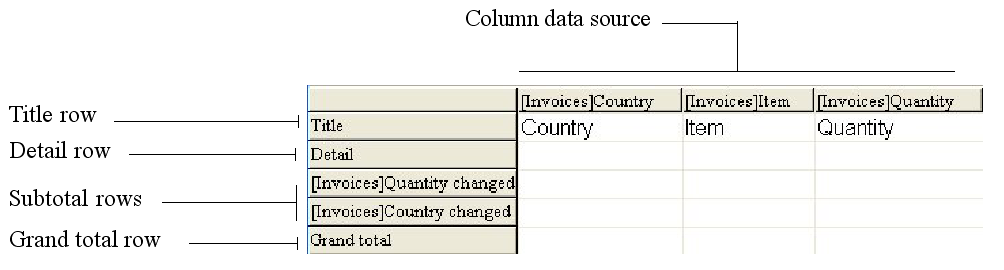
- Title row: This row displays the names of fields or formulas that have been inserted into the report. It is repeated for each page of the report. The Quick Report editor inserts field names by default, but you can modify the contents.
- Detail row: This row contains information drawn from each record and is repeated in the report for each record. You can associate a display format with it, depending on the type of data represented.
- Subtotal rows: These rows display intermediate calculations as well as the wording that is associated with them. A row is created for each sort order.
- Column data sources: These titles indicate the source of the data for each column.
Cross-table mode:
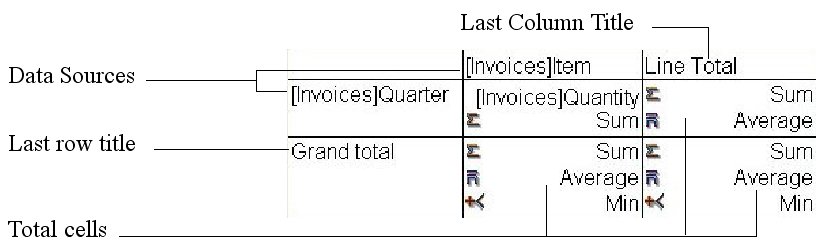
- Data Sources: These two cells will house fields that will be used for the two categories of the array. The center cell can also accept fields sources and calculations at the same time.
- Total cells: These cells are designed to house calculations on the column’s contents.
- Title cells: These cells house the titles for the last column or the last row. Their contents can be modified.
- Context menus: the editor has context menus that make it easy to access certain row, column, and cell operations. Instead of making menu selections or working with the Cell or Column properties areas, you can perform certain operations by displaying a Quick Report context menu.
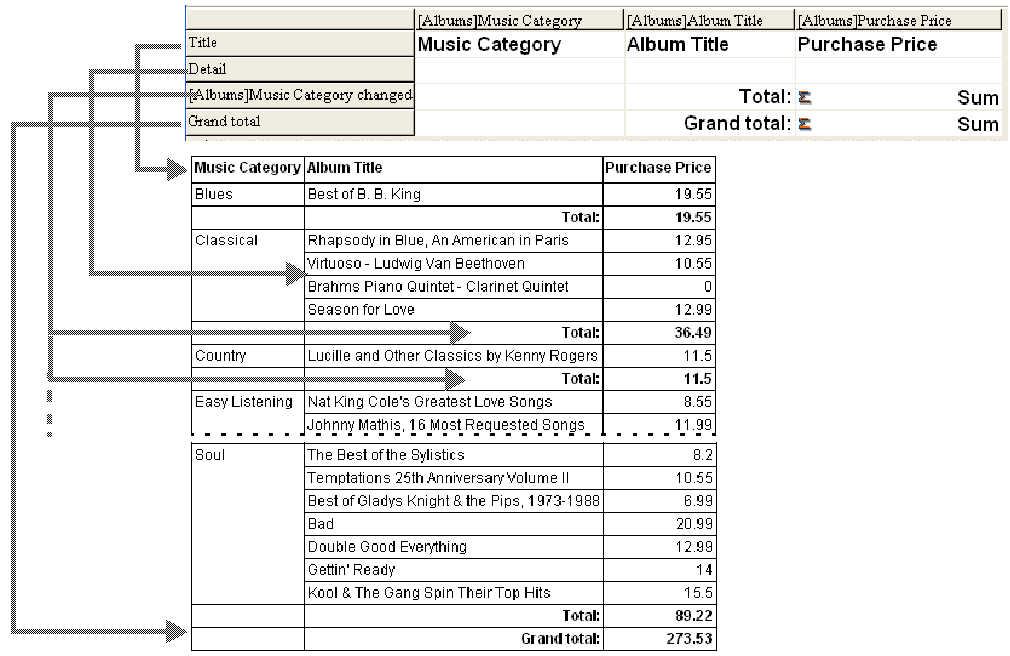
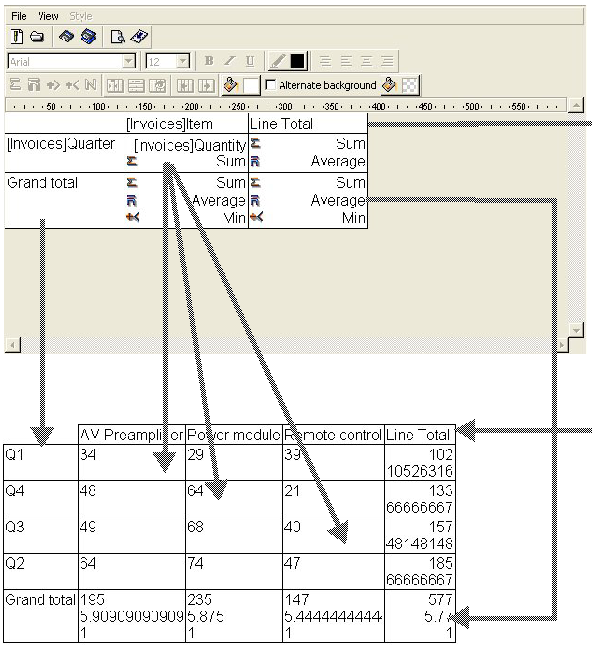
The following figures shows completed quick report designs and the relationship between the specifications in the design and the printed output:
List Report:
Cross-table Report:
You can add or modify text in the quick report form to label parts of the report. For example, if you requested summary calculations, you can label them by adding text to other cells in the Subtotal and Grand total rows. You can add and modify text as follows:
- Edit the text that 4D automatically adds to the Title row of the report.
- Insert text in empty cells of the Subtotal and Totals rows.
- Insert the value of a Subtotal field in the Subtotal rows,
- Specify the font, font size, justification, and style for any text that appears in the report.
To add text, click twice on an empty cell in the quick report form. A text insertion point appears in the cell. If you are entering a label for a summary calculation, select a cell in the same row as the cell containing the calculation icons. You cannot enter text into the same cell that contains summary calculations.
To modify text, double-click in a cell to get an insertion point and drag across the text in the cell you want to modify.
4D highlights the selected text.
In List mode, you create columns by dragging field names from the Fields list into the quick report area. If you want to add a field from a related table, expand the foreign key field in the hierarchical list of fields to display the fields in the related tables (if you have selected Related Tables or All Tables in the drop-down menu located just above the list). You can add fields from related tables, provided that the relationship is automatic. If you want to be able to use manual relations, check the All relations in automatic option: in this case, the editor changes all the relations of the database to automatic.
You can also insert an empty column into a quick report. After you insert the column, you can assign a field or a formula to it.
Note: You cannot add or edit a column in cross-table mode, since the report comes with all the columns needed.
To add a field:
- Drag the name of a field to the right of existing columns in the Quick Report area and release the mouse button.
OR
Double-click on the name of a field in the Fields list.
Note: If you drag and drop a field onto an existing column, it will be replaced by the new column.
4D creates a column for the field and places the field name in both the column header and the cell in the Header row.
By default, 4D prints the field names as column heads at the top of each page in the quick report.
To add or insert a column using a menu command:
- Select the Add... or Insert... command in the Columns menu of the editor.
OR
Right-click over an unused area of the Quick Report area, then select the Add... or Insert... command.
The standard 4D formula editor is displayed, allowing you to specify the data source of the new column (field or formula).
In List mode, as you specify fields for your quick report, you may want to remove some columns to place them elsewhere. Or, you might want to delete the column from the report.
To delete a selected column, choose Delete from the Columns menu or right-click on the header of the column to be deleted, then select the Delete command from the context menu.
4D removes the selected column of the report.
In List mode, you can replace a column in the quick report by dragging another field over it. You can also replace a field with a formula and vice versa.
To replace a column by a field:
- Drag a field from the Fields list to the column you want to replace.
The replacement is instantaneous. If the previous field was designated as the sort level, the field that replaces it will also be substituted in the sort order list.
- Select the column you want to replace and choose Edit... from the Columns menu.
OR
Right-click on the header of the column to be replaced, then select the Edit... command in the context menu.
The standard Formula editor of 4D appears, allowing you to designate the new data source of the column (field or formula).
When you print the quick report, 4D will print the results of the formula for each record that appears in the Detail row. For more information about adding a formula to a quick report, refer to Associating formulas with a quick report.
By default, the Quick Report editor sizes columns automatically, as reflected in the Automatic Width button. It sizes each column based on the maximum length of data displayed in the column and any labels typed into the column. The Quick Report editor sizes the columns when the report is printed.
This operation is enabled for a column when the Automatic Width attribute has been associated with it. You can set and view the activation of this option in the Columns menu, in the context menu of the columns or using the corresponding button in the Columns toolbar.
To view the widths of each column, preview the report on the screen. To do this, refer to Executing a quick report.
Because selecting the Automatic Width button or context menu item changes the width of a column based on the maximum width of data in the records being printed, selecting different records can change the size of the columns.
You can resize a column manually, which automatically causes the deselection of the Automatic Width option (where applicable). When a column is set manually, text in the column wraps within the specified area.
In List mode, as you specify fields for your quick report, you may want to move some columns to place them elsewhere. To do this, click the move icon in the "Columns" toolbar to move it to the right or to the left  or select Move right or Move left from the Columns menu to move the column as desired.
4D moves the selected column.

Product: 4D
Theme: Quick reports
C1
4D Design Reference ( 4D v16)
4D Design Reference ( 4D v16.1)
4D Design Reference ( 4D v16.3)


