
4D v16.3
Executing a quick report
 Executing a quick report
After you have completed your report design, you can “print” the quick report. You can print a quick report to a variety of output types:
- To disk, in a Text file,
- On the standard printer selected,
- To an HTML document.
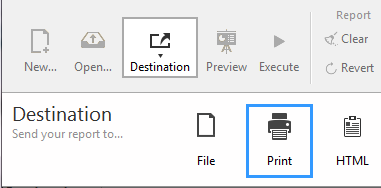
To select an output destination, click on the Destination button in the tool bar of the editor.

The destination selection window appears where you can choose one of the following: File, Print or HTML.
Notes:
- The options available (Options button) depend on the current destination.
- You can also use the Preview button at any time (available only with the "Print" destination) in order to preview the execution of your report.

This option saves your quick report to a disk file that you can open and modify with other applications, including text editors and spreadsheets. This option exports the records in the quick report to a text file.
When you select this destination, 4D automatically uses the column headings as the first “record” that is exported.
When you click on the Execute button, a standard save file dialog box appears. If you have specified a name and location on the Options page (see below), they are proposed by default. Enter a file name and click OK. After the report is printed to a file, 4D returns you to the Quick Report editor. Remember to change the output device if you want to send the quick report to a standard printer.
Note: This option does not benefit from the Preview function.
When the report destination is set to "File", the following options are available:

- Column delimiter and Line delimiter: These entry areas allow you to modify the character codes used by 4D to delimit, respectively, the columns and lines in the text file generated.
By default, 4D uses the character 9 (tab) for column delimiters and 13 (carriage return) for line delimiters. - Destination file: Used to set a name and destination for the file generated. The name and location entered will be proposed by default when the report is executed.
Once the location is set, you can preview it by clicking in the area: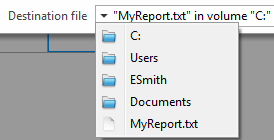
Note that this option does not generate an actual file; it just saves the path.
This option uses the printer you have chosen in your current print settings. If you are printing to a printer, you can preview the report before printing it.
When you click on the Execute button, 4D displays the standard print preview dialog box of your OS. You can hide this dialog box by checking the Don't display print setting option on the Options page (see below).
When the report destination is set to "Print", the following options are available:

- Page Setup...: Displays the print settings dialog box of your OS, where you can set the paper size, orientation and print margins.
- Don't display print setting: If this option is checked, when you click on the Execute button, the report is printed on the current printer without the print settings dialog box being displayed.
This option sends your quick report to an HTML file. When you choose this option, it uses the default HTML template unless it was changed programmatically. You can also build your own templates and load them using the Options page (see below).
When you select this destination, 4D automatically uses the column headings as the first “record” that is exported.
When you click on the Execute button, a standard save file dialog box appears. If a name and location are defined on the Options page (see below), they are proposed by default. Enter a file name and click OK. After the report is printed to an HTML file, 4D returns you to the Quick Report editor. Remember to change the output device if you want to send the quick report to a standard printer.
The character set used for generating HTML code is specified using the “Standard Set” parameter of the Database settings (see the Web/Options (II) page).
When the report destination is set to "HTML", the following options are available:

- HTML template: Sets the HTML template to use for generating the report. You can either:
- use the default template (Default option), or
- load a custom template by means of the Load... button.
The View... button lets you view the code of the selected template in a separate window.
For more information about custom HTML templates, please refer to the QR SET HTML TEMPLATE and QR Get HTML template commands. - Destination file: Used to set a name and destination for the HTML file generated. The name and location entered will be proposed by default when the report is executed.
Once the location is set, you can preview it in menu form by clicking in the area. Note that this option does not generate an actual file; it just saves the path.

Product: 4D
Theme: Quick reports (64-bit)
4D Design Reference ( 4D v16)
4D Design Reference ( 4D v16.1)
4D Design Reference ( 4D v16.3)


