
4D v16
Step-by-step Example
 Step-by-step Example

This section is intended to help familiarize you with Wakanda / 4D connector functionality by means of a step-by-step example. We are going to:
- create and configure a 4D database
- create a single-page Wakanda application
- display data from the 4D database in the Wakanda page.
To keep the example simple, we’re going to use a 4D application and a Wakanda application that are running on the same machine. Of course, you could also use a remote architecture.
- Launch your 4D or 4D Server application and create a new database.
You can name it "Emp4D", for example. - In the Structure editor, create an [Employees] table and add the following fields to it:
- Lastname (Text)
- Firstname (Text)
- Salary (Longint)
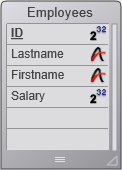
The "Expose with 4D Mobile Service" attribute is checked by default for the table and every field; do not change this setting. - Click on the Tables button and let 4D create default forms, then create a few employees:

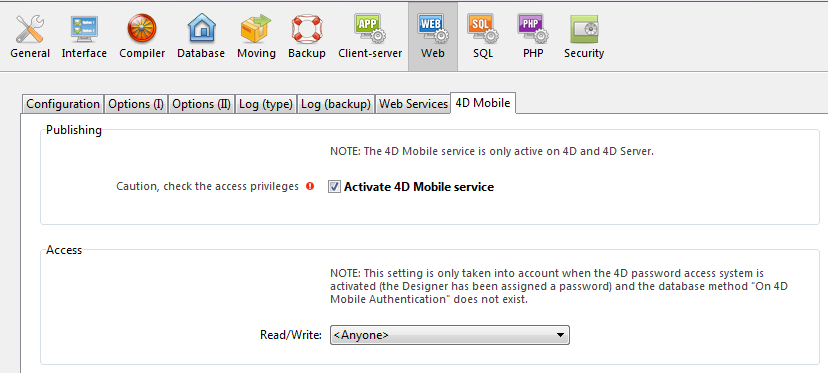
- Display the Web page of the Database Settings dialog box and click on the 4D Mobile tab.
- Check the "Activate 4D Mobile service" option then click on OK:
- Select Start Web Server in the Run menu:
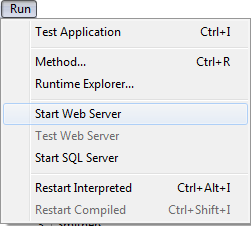
The 4D database is now ready to respond to 4D Mobile requests from Wakanda. Note that in order to simplify this example, we are not controlling 4D Mobile accesses. However, in a context of production or open architecture, it is indispensable to secure 4D Mobile (via REST) accesses (see the About 4D Mobile application security section).
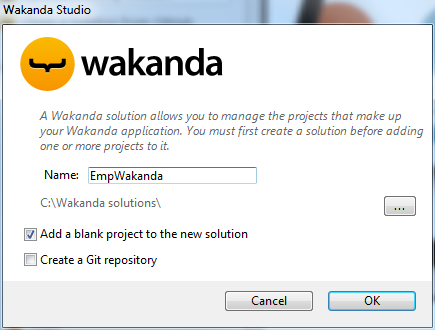
- Launch the "Wakanda Enterprise Studio" application and click on the Create a New Solution button:

- In the creation dialog box, enter, for example, "EmpWakanda" and click on OK:
The application project is created and its default elements are shown in the Wakanda Studio Explorer, on the left side of the window. - Right click on the PROJECT row and select the Connect to Remote Datastore... command in the contextual menu.
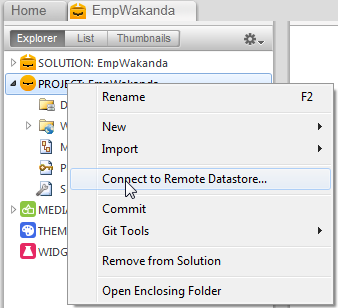
The connection dialog box appears: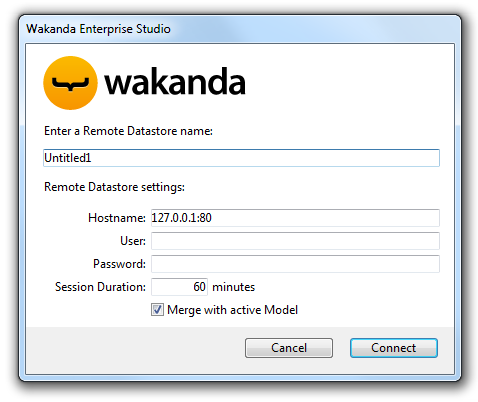
- Enter a name for the link, for instance "Emp4D":

This is the local name of the link, as it will appear in Wakanda Enterprise Studio. You can enter any name but to keep things simple we are using the name of the 4D database. - (optional) If your 4D Server is located on a different machine than the Wakanda Enterprise Studio, enter its hostname or its IP address as the Hostname parameter. Otherwise, you can just keep the local address "127.0.0.1:80" (or "localhost").
- Keep the other default parameters and click on the Connect button.
After a few moments, you can see that the "Emp4D" external model is listed in the files of the Wakanda application and the [Employees] table of the 4D application is listed in the datastore classes of the local model. External elements are indicated by a red arrow: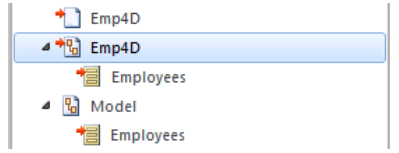
Note: The first Emp4D file contains the connection parameters.
If the table is not shown in the list at this time, check that:
- no third-party service or software (instant messenger, for instance) is in conflict with the publishing port of the 4D HTTP server (80 by default),
- on the 4D side, the 4D Web server is started, 4D Mobile services are activated and the table has been exposed,
- the address passed in the "Hostname" parameter is valid.
To check whether the 4D server is actually responding to REST requests, you can try the following URLs in your browser:
<address>/rest/$catalog/$all(returns all the tables exposed in 4D Mobile)
<address>/rest/my_table/my_method(returns the result of the method - if it returns a result)
Now we are going to associate a 4D table with a Wakanda widget by simple drag-and-drop, then launch the Wakanda Enterprise Server and view the data.
- Open the "WebFolder" folder in the Explorer and double-click on the Index page to open the GUI Designer of Wakanda.
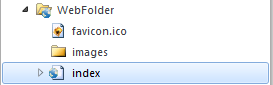
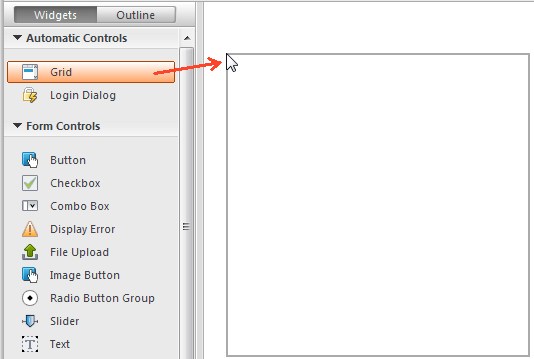
Note: The "WebFolder" contains elements intended for Web publication of your project. "Index" is the default page of the project. - In the list of Widgets, click on "Grid" and drop it in the work area:
- In the list of Datastore Classes for the model, click on "Employees" and drop it onto the grid that you just created:
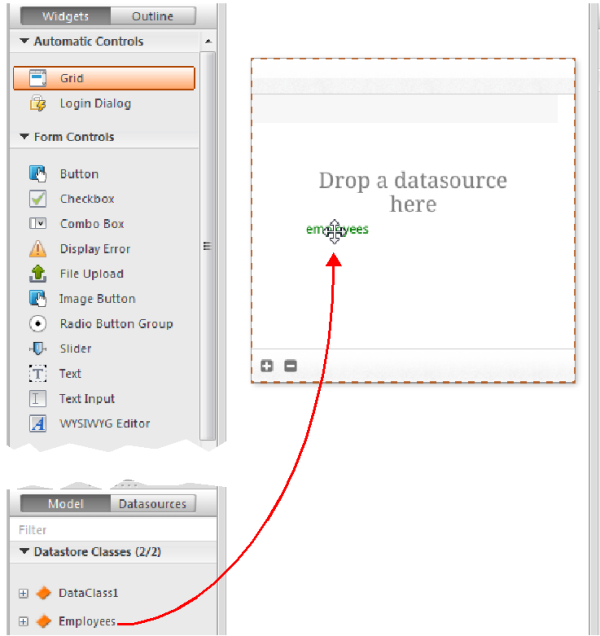
At this point, the editor automatically create a datasource for you based on the "Employees" class, which will manage the contents of the widget. This datasource is a JavaScript object managed by Wakanda, named "employees" by default, i.e. the class name with its first letter in lowercase.
The widget displays a preview of its contents. You can enlarge it to display all the fields of the datasource: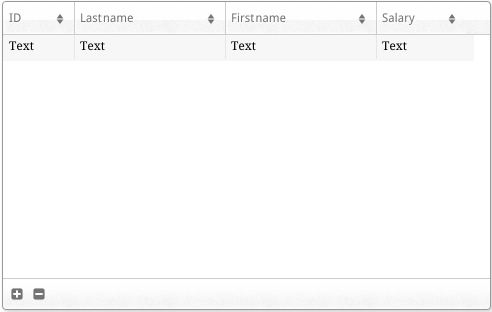
The association between the datasource and the widget is now established. - Click on the Save
 button in the tool bar of the editor.
Now we are going to display the data using a browser. - Click on the Run project button in the tool bar of the Wakanda Enterprise Studio:

This starts the Wakanda Enterprise Server and publishes the "EmpWakanda" application.
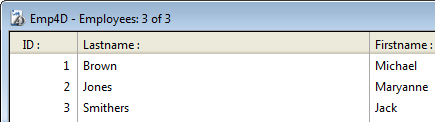
Thanks to the 4D Mobile link that we set up, the data of the 4D database is displayed in a window of your default browser: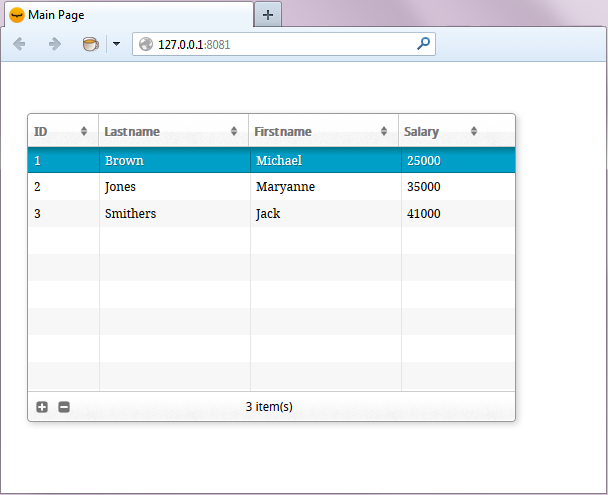
You can test the dynamic properties of the link by changing data on the Web side. For instance, here we changed Maryanne Jones’ last name to "Jackson" and this change was immediately reflected in 4D:
Now we are going to create a very simple project method on the 4D side and execute it from our Web page. This method will double all the salaries.
- On the 4D side, create a project method named DoubleSalary and enter the following code:
 FIRST RECORD([Employees])

 While(Not(End selection([Employees])))

    [Employees]salary:=[Employees]salary*2

    SAVE RECORD([Employees])

    NEXT RECORD([Employees])
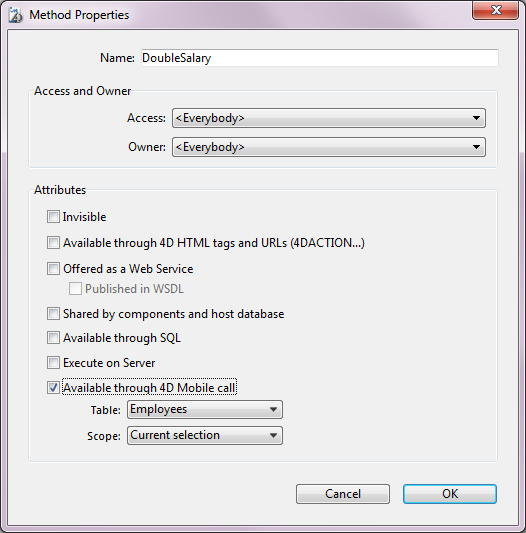
End while - Set the 4D Mobile call properties for the method and click on OK:
In Wakanda, class methods apply to one of the following contexts: the entity (record), the entity collection (selection) or the datastore class (all records). You will need to specify this context on the 4D side. - On the Wakanda Enterprise Studio side, return to the Index page in the GUI Designer and add a button from the list of widgets:
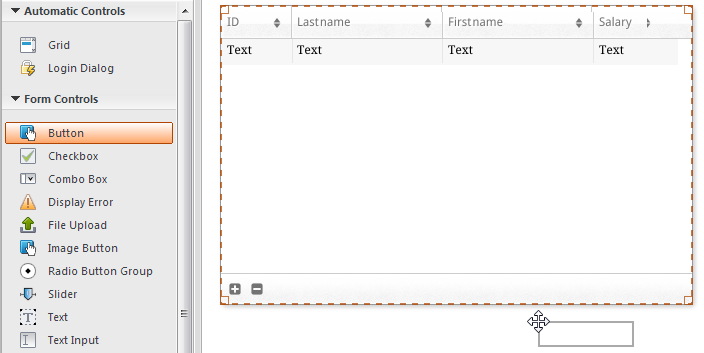
- Double-click on the button and name it, for instance, "Double salaries":

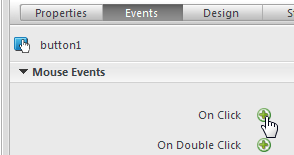
- Make sure that the "Double salaries" button is selected and then click on the Events button in the right-hand area of the GUI Designer.
- Click on the icon for adding the "On Click" event:
The code editor appears and you can enter the code to be executed when the button is clicked. We are just going to call the DoubleSalary method of 4D and then, in the callback function (onSuccess), cause all the records to be reloaded. - Enter the following code:
    sources.employees.DoubleSalary({
            onSuccess:function(event){
                sources.employees.allEntities();
            }});
In the code editor: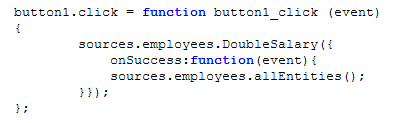
Note the lowercase "e" used for "employees"; we are using the datasource that was created automatically when the class was associated with the widget. - Click on the Save button in the tool bar of the editor.
We can test calling the 4D method but beforehand you must reload the model on the Wakanda Enterprise Server. - Click on the Reload Models
 button in the tool bar of Wakanda Enterprise Studio.
 - Refresh your browser page so that the Double salaries button appears and then click on this button:
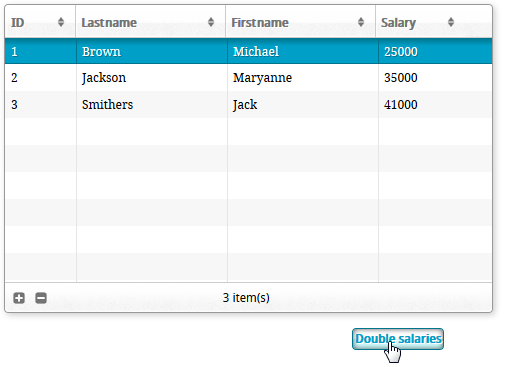
You can see that the salary values have all doubled: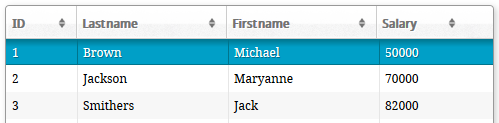
Note that this example is simply intended to show how to use the Wakanda / 4D connector. The simplified methods shown here cannot be used in a production context.

Product: 4D
Theme: Step-by-step Example
4D Mobile ( 4D v16)


