
4D v16.3
Overview
 Overview
Output forms are used for two purposes: listing records on screen and printing reports.
In certain cases, you can create a report more quickly using the Quick Report editor. However, the Form editor gives you more customized control over the final appearance of your report. For more information, refer to Quick reports.
Note: Only table forms can be used as output forms. Project forms are intended to be used as detail forms.
Output forms consists of several areas that have different properties:
- Header area: Contains the report title, column headers, and form management buttons or objects,
- Detail area: Contains the body of the report,
- Footer area: Contains buttons or summary calculations based on all the records in the report,
- Break area: Contains text or graphics that appear after the list of records and summary calculations based on all the records or subgroups of records.
When you create a List form using the Form Wizard, it automatically creates these areas for you. It places the form title (the table name) and the field names in the Header area as well as the control buttons (the exact contents of the Header area depends on the potins you selected in the Form Wizard). The fields you select are placed in a row in the Detail area. A small Break area is created but the Form Wizard puts nothing in it.
When you open the form in the Form editor, you can modify the size of each of these areas, modify the contents of any area, add objects to the Break area, and create additional Break areas for summary calculations.
The areas of the form that function as the Header, Detail, Break, and Footer areas are controlled by output control lines. By dragging the output control lines vertically, you can change the size of each area.
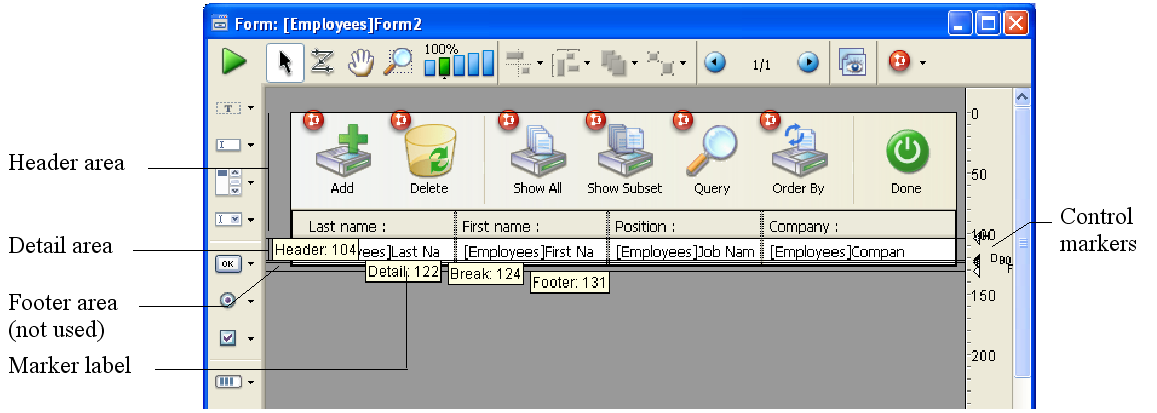
The following illustration shows an output form that was created using the Basic screen of the Form Wizard (XP template):
Note: You can choose to hide/display markers and their labels. For more information, refer to “Showing/hiding elements in the Form editor” in Form editor.
The horizontal lines divide the report into Header, Detail, Break, and Footer areas. The area from the top of the form to the Header line is the Header area. Similarly, the area between the Header and Detail lines is the Detail area, and the Footer area extends from the top of the Break line (labelled B0) to the Footer line. You adjust the sizes of each area by dragging the Header, Detail, Break, or Footer markers, or their labels, vertically.
When this form is used, it looks like this:
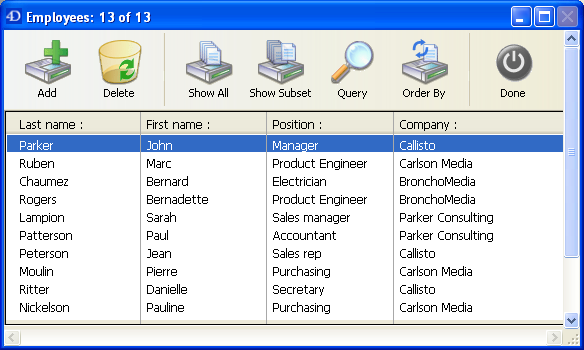
The Detail area expands dynamically as the window is resized, while the Header and Footer areas remain a fixed size.
In a form that lists records on screen, the Header and Footer areas can include clickable and non-enterable objects such as buttons, radio buttons, hierarchical lists, and so on. For more information, refer to the following section concerning output control lines.
In a printed report, a Header area often contains the date, the time, and a running title as well as column labels. Records appear in the Detail area. A calculated total may appear in the Break area. The Footer area contains the page number.
The following illustration identifies the different areas as they appear in a printed report:
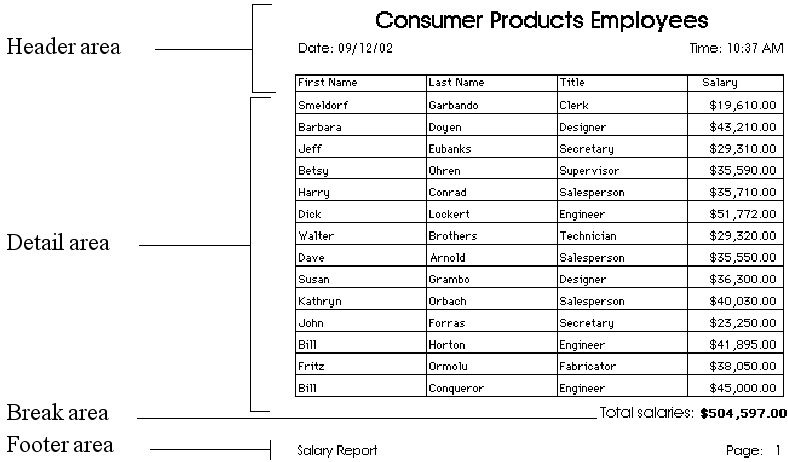
A report may have additional Break areas for subtotals and other calculations. A report may also have additional Header areas that appear within the body of the report. The additional Header areas are used to identify subgroups. For an example of a report with several Header and Break areas, see the section “Creating additional control lines” in Using output control lines.

Product: 4D
Theme: Output forms and reports
4D Design Reference ( 4D v16)
4D Design Reference ( 4D v16.1)
4D Design Reference ( 4D v16.3)


