
4D v16.3
Writing a method
 Writing a method
The 4D Method editor works much like a text editor. Writing a method is usually a combination of typing text, selecting components, and dragging items from the Explorer or other windows. You can also use various type-ahead functions to create methods faster.
You can scroll through the contents of methods which can include up to 32,000 lines of code or 2 GB of text.
The 4D Method editor provides basic syntax error-checking. Additional error-checking is performed when the method is executed.
In 4D versions prior to v15, the French version of the program provided a programming language in French, while all the other versions (English, German, etc.) contained a "universal" language, in English.
For example, command No. 53 was named STOCKER ENREGISTREMENT in French and SAVE RECORD in all the other languages. Local settings were also used for entering real numbers and dates.
This has been modified beginning with 4D v15: by default, 4D's method editor uses the international "English-US" mode, regardless of the 4D application language or the local system settings and command No. 53 is now named SAVE RECORD in the French version of 4D. Lists, type-ahead windows, on-line help, etc., display the names of the commands and constants in English. For more information about this setting, refer to the Introduction to the 4D Language section.
It still remains possible to restore the previous mode, based on local settings, using the "Use regional system settings" preference (see Methods Page). Of course, regardless of the setting used, the principles for writing code described in this section remain the same.
4D v15 Mode (default): 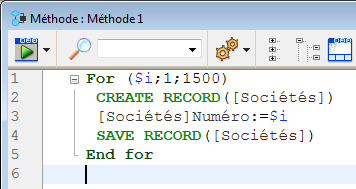
Local mode: 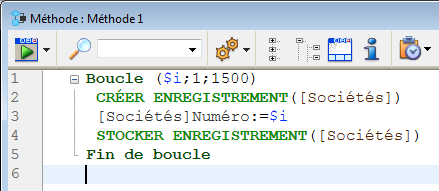
4D uses standard text editing techniques for typing and editing in the Method editor. As you type, the characters appear at the location of the insertion point. You end each line by pressing the Return key or Enter key.
Note: The Enter key on the numeric keypad behaves differently from the Enter key on the main keyboard. Use the Enter key on the numeric keypad to force 4D to check the syntax of the line of code without moving the insertion point to the next line.
The Method editor uses display conventions (style, color) for the syntax elements. You can modify these conventions (see the Method editor). As you type, when you validate your entry, 4D evaluates the text of the line and applies the appropriate display format. 4D also indents each line to its proper level in relation to the preceding line when programming structures (for example If, End if) are used.
You can use the arrow keys to move from line to line quickly. Using the arrow keys to move across several lines is quicker than clicking because the editor delays evaluating the line for errors.
Under Windows, the code editor includes an Input Method Editor (IME) to facilitate code editing on Japanese or Chinese systems.
The Method editor includes numerous navigation shortcuts. These shortcuts are listed in “Navigational keyboard shortcuts” section below.
4D allows you to use the drag-and-drop mechanism when writing methods. It is possible to drag and drop items from the Explorer, within the same method or between two methods.
- From the Explorer, you can drag and drop:
- Table names, field names, form names and project methods from the Home page.
- Table names and field names from the Tables page,
- Table names and form names from the Forms page,
- Project methods and form names from the Methods page,
- Constants from the Constants page,
- 4D commands from the Commands page.
When you insert a command by dragging it from the Commands Page of the Explorer, it appears with its syntax (which consists of all of its parameters) in the Method editor. Of course, you use the syntax that you need to adapt to your usage. This feature reminds you of the parameters that the command expects.
- Drag and drop within a method or between two different methods:
In the Method editor, the drag-and-drop mechanism is activated as soon as a portion of text is selected.
By default, the drag-and-drop mechanism moves the selected text. In order to copy it, hold down the Ctrl key (Windows) or the Option key (Mac OS) during the operation.
You can now write a single statement on several lines by terminating each line of the statement with a backslash "\" character. 4D will consider all the lines at once. For example, both of the following statements are equivalent:

You can automatically modify the case of selected characters using commands from the Case submenu in the Method menu or the context menu of the editor:
- Uppercase / Lowercase: Switch the selected characters to uppercase or lowercase.
- camelCase / CamelCase : Switch the selected characters to "camel case". This consists in changing each first letter of a group of attached words to uppercase. This type of notation is often used for variable nomenclatures. hireDate and PurchaseDate are examples of two variants of camel case notation.
When you apply one of these commands to a text selection, the spaces and "_" characters are removed and the first letter of each word becomes uppercase.
The Swap Expression function can be used to reverse the arguments of an expression assigning a value. For instance,
variable1:=variable2becomes
variable2:=variable1This function is extremely useful for reversing a set of assignments used to get or set properties, or to correct input errors. To use this function, select the line(s) to be modified, then choose the Swap Expression command in the Method menu, or in the context menu of the area. Within the selection, only the lines assigning a value will be modified.
In addition to the standard copy-paste operation, 4D proposes two additional functions that let you work with the contents of different clipboards:
- The program stores the last 10 “copy” or “cut” actions that were performed in the Method editor in memory during the current session. Each of the different contents saved in this way can be reused at any time. To do this, use the Clipboard History command of the Method editor context menu or the “Last Clipboard values” button of the toolbar:
The first few words of the copied or cut items are displayed. Selecting an item causes it to be inserted at the current location of the cursor. - Nine additional numbered clipboards are available and can be employed directly using the buttons of the Method editor toolbar or using keyboard shortcuts:

Copy selected text to a clipboard Paste contents of a clipboard at cursor location Windows Shift or Alt+click on clipboard icon Ctrl+click on clipboard icon Ctrl+clipboard number Mac OS Shift or Alt+click on clipboard icon Cmd+click on clipboard icon Cmd+Shift+clipboard number Cmd+clipboard number
Note that you must either use the keys of the numeric keypad or use the shortcuts required to access the number keys of the alphanumeric keyboard.
You can move the line where the cursor is directly without selecting it first using the Move Lines Up and Move Lines Down commands in the Method menu. You can also do this using the combination Alt/Option + Up Arrow or Down Arrow.
Colored bars instantly show you where lines of code were modified since the method was opened:

The change bars change colors to indicate whether or not the modifications were saved:
- yellow: row was modified and method has not yet been saved.
- green: row was modified and method has been saved.
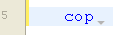
The Method editor has an autocomplete function. 4D automatically displays suggestions based on the first few characters typed.
In the example given below, typing the string “cop” causes the display of a blue triangle indicating that several suggestions are available:
Note: When the characters you enter correspond to a single possibility, this suggested value appears grayed out (and is inserted if you hit the Tab key):
 --->
---> 
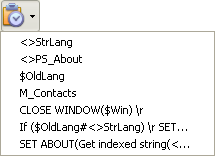
If there are several suggestions available, 4D displays them in a pop-up list when you hit the Tab key:
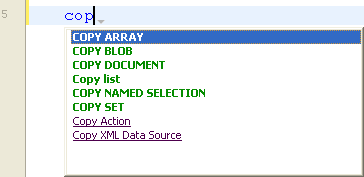
The list is in alphabetical order. Choose the value by double-clicking it or scroll the list using the arrow keys of the keyboard and then hit Enter, Carriage Return or Tab to insert the selected value.
By default, you can also insert a suggested value by hitting one of the following delimiter ( ; : = < [ { keys after selecting a value: the value inserted is then followed by the delimiter, ready for data entry.
 + ( key -->
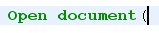
Note: You can disable the use of delimiters for inserting suggested values on the Methods Page of the User preferences.
You can press the Esc key to close the pop-up list or you can continue typing while it is open. The values suggested in the pop-up list are updated as additional characters are typed.
If the characters typed correspond to different types of objects, the list displays them in their current style. The following types of objects can be displayed:
- 4D commands
- SQL commands
- User methods
- Table names
- Field names
- Constants
- Local, process or interprocess variable, declared in the method
- Plug-in commands
- 4D keywords
- SQL keywords
- Macros (displayed between < >)
Note: For practical reasons, you can disable the automatic display of the list of suggestions for constants, local and interprocess variables and/or tables. These options are found on the Methods Page of the User preferences.
The Select Enclosing Block function is used to select the “enclosing block” of the code containing the insertion point. The enclosing block can be defined by:
- Quotation marks,
- Parentheses,
- A logical structure (If/Else/End if, While/End while, Repeat/Until Case of/End case), or,
- Braces.
If a block of text is already selected, the function selects the enclosing block of the next highest level and so on, until the entire method is selected.
Pressing Ctrl+Shift+B (Windows) or Command+Shift+B (Mac OS) enables you to reverse this operation and deselect the last enclosing block selected.
Note: If the insertion point is placed in an If or Else type structure, the enclosing block will be the one containing, respectively, the If or Else statement.
You can double-click to select individual "words". When the item name referenced (command, constant, method, etc.) contains spaces, you can select the whole name (including spaces) by using the Alt/Option + Double-click combination.
Standard keyboard shortcuts to navigate the code are available in 4D’s Method editor.
Note: Under Mac OS, substitute the Command key for the Ctrl key (Windows).
| Shortcut | Action |
| [Shift]+[right arrow] | Create and enlarge the selection, character by character, to the right, or Reduce the selection, character by character, from the left |
| [Shift]+[left arrow] | Reduce the selection, character by character, from the right or Create and enlarge the selection, character by character, to the left |
| [Shift]+[down arrow] | Create and enlarge a selection, line by line, from the top to the bottom |
| [Shift]+[up arrow] | Create and enlarge a selection, line by line, from the bottom to the top |
| [Ctrl]+[Shift]+[right arrow] | Create and enlarge the selection, word by word, from the right |
| [Ctrl]+[Shift]+[left arrow] | Reduce the selection, word for word, from the right, or create and enlarge the selection, word by word, from the left |
| [Ctrl]+[right arrow] | Move the insertion point, word by word, from left to right |
| [Ctrl]+[left arrow] | Move the insertion point, word by word, from right to left |
| [Home] | Place the insertion point at the beginning of the line |
| [End] | Place the insertion point at the end of the line |
| [Ctrl]+[Home] | Place the insertion point at the beginning of the method |
| [Ctrl]+Fin | Place the insertion point at the end of the method |
| [Shift]+[Home] | Select all the characters in the line that are to the left of the cursor |
| [Shift]+[End] | Select all the characters in the line that are to the right of the cursor |
| [PgUp] | Scroll the contents of the method, page by page, from the bottom to the top (doesn’t modify the insertion point) |
| [PgDn] | Scroll the contents of the method, page by page, from the top to the bottom (doesn’t modify the insertion point) |
4D automatically checks the method syntax to see if it is correct. If you enter text or select a component that is not syntactically correct, 4D displays a symbol to indicate the incorrect expression  . When you move the mouse over the symbol, a help tip displays the cause of the error:

When entering code, you can immediately check the syntax of the current line (without advancing to the next line) by pressing the Enter key on the numeric keypad. 4D evaluates the line, formats it, marks any errors, and places the insertion point at the end of the line. When a line of a method is marked as having improper syntax, check and fix the entry. If the line is now correct, 4D removes the error symbol. When you save or close the window, the entire method is validated. You can also force validation by pressing the Enter key.
When the method is validated, 4D checks for basic syntax errors and for the structure of the statements (If, End if and so on). 4D also checks for matching enclosing characters in the code such as parentheses or quotation marks. When you type an enclosing character, 4D indicates the match by framing the start/end characters with gray rectangles:

Note: If you click on an enclosing character in the code, 4D indicates its match with gray rectangles by default. You can modify the way 4D indicates matching enclosing characters or disable this feature by means of the "Matching parentheses" option on the Methods Page of the Preferences.
The Method editor can only check for obvious syntax errors (misspellings and the like). It does not check for errors that only occur during execution. Execution errors are caught by 4D when the method is executed. 4D provides a debugger (see Debugging) for handling and correcting these errors. The compiler also provides indispensable help for detecting errors. For more information about the compiler, refer to the Compilation chapter.
The Method editor provides various contextual information using help tips which appear when you move the mouse over an object.
- Errors: When you move the mouse over the symbol indicating an error to the left of the editing area, a help tip displays the cause of the error (see the "Checking and correcting syntax errors" section).
- 4D command documentation: When you move the mouse over a 4D command, a help tip provides the command syntax along with a brief description of how it works.

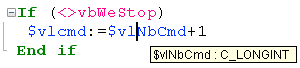
- Variable types : When you move the mouse over a variable, a help tip shows its type (if it has been explicitly defined in the method).
- Project methods: When you move the mouse over a project method, a help tip displays:
- either the comments specified in the Explorer, if any (see Using comments).
- or the first few lines of the method if it includes comments (lines beginning with //). It is common practice to insert documentation for the method as well as its parameters in the form of comments at the beginning of the method. You can get this information directly in the help tip, just make sure to first remove any comments found in the Explorer.
Comments at the beginning of a method:
Help tip in another method:
You can display the HTML documentation of a 4D language command at any time: to do so, select the complete command name or simply place the cursor in the name and press F1. The complete documentation of the command is displayed in a new window of your default browser.
4D looks for the on-line documentation of the command (on the 4D Doc Center site) or searches locally depending on the settings made in the application Preferences (see Documentation location).
Comments are inactive lines of code. These lines are not interpreted by the program (4D does not apply any particular style within comments) and are not executed when the method is called.
To create a comment, you just need to insert the // characters at the beginning of a line.
The length of comments is limited to the maximum size of a line, which is 32,000 characters.
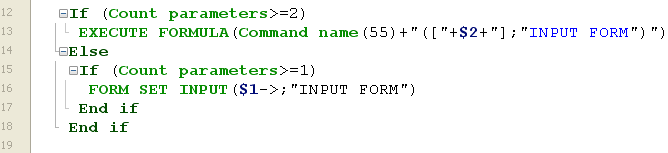
The Comment/Uncomment command, found in the Method menu as well as in the Method editor context menu, is used to mark a group of selected lines of code as comments, or, on the contrary, to remove the comment characters from a selection.
To use this command, select the code to be marked as commented, then select the Comment/Uncomment command:
 -->
--> 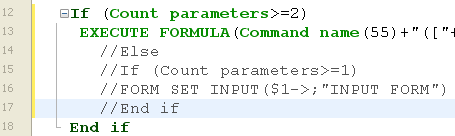
When the selection contains only active code, the Comment command is applied. When the selection includes both active code and commented lines, an additional pair of comment characters ( // ) is added to the latter; this way, they will retain their initial commented status if the line is subsequently “uncommented.” When the selection contains only commented lines, the Uncomment command is applied.
Note: The Comment/Uncomment command only operates with full lines — it cannot be used to comment only part of a line.
The Method editor allows you to use escape sequences (also called escape characters). An escape sequence is a sequence of characters that can be used to replace a “special” character.
The sequence consists of a backslash \, followed by a character. For instance, \t is an escape sequence for the Tab character. Escape sequences facilitate the entry of special characters: the previous example (\t) replaces the entry "Character(Tab)".
In 4D, the following escape sequences can be used:
| Escape sequence | Character replaced |
| \n | LF (Line feed) |
| \t | HT (Tab) |
| \r | CR (Carriage return) |
| \\ | \ (Backslash) |
| \" | " (Quotation marks) |
Note: It is possible to use either upper or lower case in escape sequences.
In the following example, the Carriage return character (escape sequence \r) is inserted in a statement in order to obtain the dialog box shown:
ALERT("The operation has been completed successfully.\rYou may now disconnect.")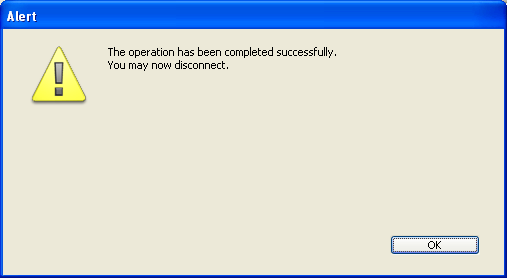
Warning: The \ (backslash) character is used as a separator in pathnames under Windows. In general, 4D will correctly interpret Windows pathnames entered in the Method editor by replacing the single backslash \ with a double backslash \\. For instance, C:\Folder will become C:\\Folder. However, if you write “C:\MyDocuments\New”, 4D will display “C:\\MyDocuments\New”. In this case, the second backslashþis interpreted incorrectly as \N (an existing escape sequence). You must therefore enter a double backslash \\ when you want to have a backslash in front of a character used in one of the escape sequences recognized by 4D.
Several functions in the Method editor make code easier to read and facilitate browsing among the statements.
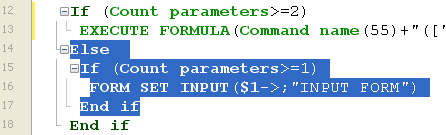
4D code located inside loops and conditions can now be collapsed or expanded, in order to facilitate the reading of methods:
- Expanded code:
- Collapsed code:

If you place the mouse over the expand button [...], a help tip appears, displaying the first lines of the hidden code.
A collapsed portion of code can be selected, copied, pasted or deleted. All the lines included therein will be copied, pasted or deleted respectively. When a portion of code is pasted, it is automatically expanded.
There are several ways to expand and collapse code:
- Click on the expand/collapse icons ([+] and [-] under Windows) or on the opening button [...]
- Use the commands of the Method>Collapse/Expand submenu:
- Collapse Selection / Expand Selection: collapses or expands all the code structures found in the text selection.
- Collapse Current Level / Expand Current Level: collapses or expands the code structure at the level where the cursor is located. These commands are also available in the context menu of the editor.
- Collapse All / Expand All: collapses or expands all the loops and conditions of a method. These commands are also available in the toolbar of the editor:
 .
.
Two commands make it easier to move around within code structures (e.g. If...Else...End if):
- Start Of Block: places the cursor at the start of the current structure, just before the initial keyword.
- End Of Block: places the cursor at the end of the current structure, just after the final keyword.
These commands are found in the Method menu as well as the context menu of the editor. You can also use the following shortcuts:
- Windows: Ctrl + up arrow or Ctrl + down arrow‚
- Mac OS: Command + up arrow or Command + down arrow.
4D lets you associate bookmarks with certain lines in your methods. You can then browse quickly within the code by passing from one bookmark to another using specific commands.

A bookmark moves along with its original row if additional rows are inserted in the method. Bookmarks are saved with the methods.
Bookmarks are managed using the Bookmarks submenu of the Method menu:
- Toggle: Associates a bookmark with the current line (where the cursor is located) if it does not already have one or removes the existing bookmark if it does. This function is also available using the Toggle Bookmark command of the editor’s context menu or using the Ctrl+F3 (Windows) or Command+F3 (Mac OS) keyboard shortcut.
- Remove All: Removes all bookmarks from the foreground window.
- Goto Next / Goto Previous: Enables browsing among bookmarks in the window. Selecting one of these commands places the cursor on the first character of the line associated with the bookmark concerned. You can also use the keyboard shortcuts F3 (go to next) or Shift+F3 (go to previous).
Note: You can use bookmarks as markers for lines that contain an item found by a search. In this case, 4D automatically adds the bookmarks. For more information, refer to Find and replace in methods.

Product: 4D
Theme: Editing methods
IME
4D Design Reference ( 4D v16)
4D Design Reference ( 4D v16.1)
4D Design Reference ( 4D v16.3)


