
4D v16.3
Printing records
 Printing records
You can print the records of your tables at any time. The records are printed via database forms.
In the Application environment, printing records is usually be handled by buttons or custom menus. The records are printed using dedicated forms. The commands of the Printing theme can be used to set up custom printing processes.
In the Design environment, 4D lets you print one or more records and choose the form to be used. You can print a list of records (a report) or records in page mode.
4D prints the records in the current selection. Set the current selection to the subset of records you want to print. If you want the report to list the records in a particular order, sort the current selection before printing the report. If you want to print a single record in page mode, double-click it to open it.
To print records:
- In the record display window, select the records to be printed.
- (Optional) Sort the records.
This step is mandatory if you are printing records in a report with breaks. In this case, you must sort the records on at least one level more than the number of break levels of the report. For more information about this point, refer to Forms for printed reports. - Choose Print... from the File menu.
The Print Form dialog box appears.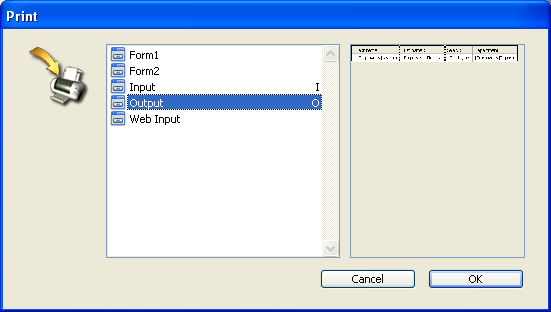
- Choose the form you want to use.
When you click on a form, a preview appears in the preview area. - Click OK.
4D displays the Page Setup dialog box for your selected printer. Choose any desired options and click OK. 4D displays the Print dialog box for the printer you selected in the Print Manager. To preview the report on the screen, check the Print preview check box.
If you check this option, the report is displayed on screen, one page at a time. The figure below shows a report previewed on screen under Windows: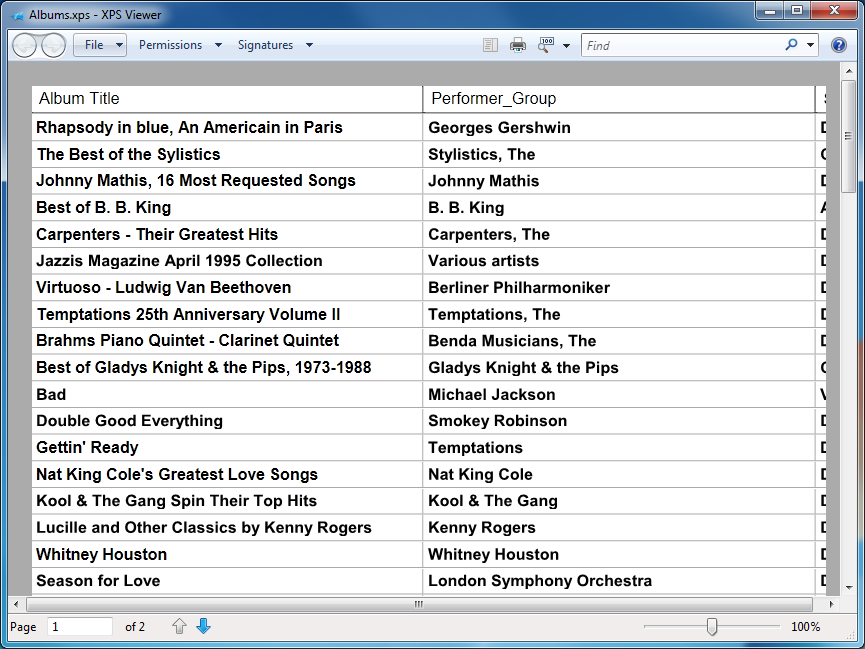
Note: Under Mac OS, 4D uses the PDF format PDF, which is natively implemented in the system to generate previews. Under Windows, starting with version 13, 4D generates print previews as XPS documents. For more information, refer to the following section.
When a page of the report is being previewed, you can do the following:
- View a close-up of the report by clicking the Zoom button. To exit zoom mode, click again on the zoom button
- When you use Zoom, you can move around the page by dragging the hand pointer.
- View the next page or previous page by clicking the Next Page or Previous Page buttons. These buttons are dimmed when the report consists of a single page
- Cancel printing by clicking the Stop button.
- Print the page being previewed by clicking the Print button.
If you did not check the Print preview check box, the report will be sent to the printer immediately.
Since version 13, 4D generates print previews as XPS documents. The XPS (XML Paper Specification) format is an open specification for a page description language that was initially developed by Microsoft and then standardized by Ecma International. Now widespread among Windows applications, it provides an accurate on-screen representation of printed documents and is independent from the hardware configuration.
To generate XPS preview documents, 4D calls an XPS driver. This driver is integrated into Windows starting with Windows Vista but you can also get it under Windows XP SP2 or Windows Server 2003 by installing the .NET framework.
The preview takes place in an XPS driver that is available natively or using Internet Explorer, depending on your version of Windows.
The table below summarizes the availability of the XPS driver and viewer for the different Windows versions:
| Windows Versions | XPS driver | XPS viewer |
| Windows XP (SP2) or Windows Server 2003 | No | No |
| Windows XP (SP2) or Windows Server 2003 + .NET 3.0 framework | Yes | Yes with IE |
| Windows Vista | Yes | Yes with IE(*) |
| Windows 7 and higher | Yes | Yes(reader.exe) |
(*) The viewer is also available separately.
In 4D, XPS preview is used for:
- all 4D forms and objects, in both Design and Application mode,
- the label and Quick report editors.
When a print preview is generated, 4D redirects printing to a temporary XPS file and launches the application associated with .XPS files.
Note: If this application is not the XPS viewer (as is the case, for example, with Google Chrome), 4D forces Internet Explorer to run.
Temporary XPS files are saved in the local user folder: ...:\Users\{UserName}\AppData\Local\Temp\4D\PrintPreview\FolderNumber\NumUUID\
To avoid overloading this folder, only the last 100 XPS documents are kept. If the user does not have appropriate access rights, the -9799 error is returned. Note that Windows may empty the "Temp" folder on startup.
The viewer opens the document automatically but does not allow you to name it right away; that is why the UUID subfolder is created in the numbered folder in order to contain the XPS document. The document is named permanently when printing is finished. By default, the name of the window where printing was launched is used. You can change this name by calling the SET WINDOW TITLE or SET PRINT OPTION(Spooler document name option; "xx") command before printing.
Two commands improve control over the preview option: Get print preview and Is in print preview).

Product: 4D
Theme: Managing records
4D Design Reference ( 4D v16)
4D Design Reference ( 4D v16.1)
4D Design Reference ( 4D v16.3)


