
4D v16.3
Creating a label design
- 4D Design Reference
-
- Label editor
-
- Description of the label editor
- Creating a label design
- Creating a label sheet
 Creating a label design
This paragraph describes the possibilities offered by the label editor to create your own label design. For a complete description of each item, refer to the previous section. You can use the editor to create both the individual labels and the label sheet separately and in any order, according to your priorities:
- if your labels must have a specific size, you can start by setting their size on the "Layout" page and then specify their contents,
- if your labels need to have a certain look with specific contents, you can start by specifying them on the "Label" page and then adapt the label sheet to these labels.
Note: For all the functions described below to be available, you must have selected the No form option in the "Form to use" menu on the "Labels" page of the editor (for more information about this option, refer to the Label Page).
You can modify the format of a label design that appears in the construction area. This parameter is set on the "Layout" page. Refer to Creating a label sheet.
To insert fields in your label design:
- Go to the "Label" page.
- Drag the first field you want to insert in the label from the Fields list to the Label Preview area.
If the field is in a related table, expand the related field to display the fields in the related table. Your field is added to the Label Preview area. Selection handles indicate that it is selected . - Continue dragging fields to the Label Preview area.
When designing labels, you may want to concatenate several fields. For example, in an address label, the First Name and Last Name fields can be concatenated on the first row of the label. You can also concatenate fields vertically.
The advantage of concatenating fields is that 4D manages the spacing between the them.
To concatenate several fields:
- Drag the first field to the Label Preview area.
- Drop a second field onto the first one.
OR
Hold down Shift and drop another field on the first one.- When you concatenate two fields by simply dragging and dropping them, the separator used is the one defined in 4D’s resources. By default, the Space character is used. A “+” between field names in a field object indicates that the fields are concatenated on a single line. When 4D prints the label, it will insert a space between the fields on the same line.
- If you concatenate two fields by dragging and dropping the second field while holding down the Shift key, the Carriage return is used as the separator. When the labels are being printed, if the second field is empty, its position is deleted and is replaced by the next field. If a field contains some text with Carriage returns, they are taken into account.
For example, this feature allows you to create address labels by using many concatenated fields ([Clients]Address1, [Clients]Address2, etc.) without generating an empty line when a field is blank.
You can automatically resize a group of concatenated fields so that it corresponds to the number of lines that it contains. To do so, Ctrl+click (Windows) or Command+click (Mac OS) on the lower right handle of the group.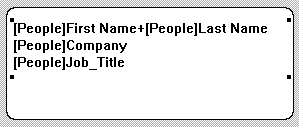
To remove an a concatenated field:
- Select the line containing one or more concatenated fields.
- Press Backspace.
The last field in the row is removed.
You can create and insert graphic elements into your design using the label editor, in order to improve its appearance or to include additional information in each record. You can add three types of graphic elements:
- static text,
- lines, circles or any geometric shape drawn in the editor,
- pictures pasted from the clipboard.
You can insert static text into your label design in order, for example, to label the fields used:
- Enter (or paste) the text in the Static Text area.
- Click the arrow
 located above the area.
The static text object is added to the Label Preview area in the bottom left corner. - Click on the text then reposition it by dragging and aligning it with other objects.
The preview area includes a toolbar that you can use to create geometrical shapes. For example, you can create a frame for the contents of your label.
You can also create rectangles, ovals and lines.
To draw a graphic element, click on one of the tools above the preview area and then draw the object..
You can also use a constraint to draw circles, square or straight lines by holding down Shift while you draw the object.
Note: If you want to draw a frame around a field inserted in the label, you can use the following shortcut: select the field and press Ctrl+1 under Windows or Command+1 under Mac OS. A frame is created at a distance of 1 pixel from the field. Press Ctrl+2 or Command+2 to create a frame 2 pixels from the field, and so on.
You can paste a picture from the clipboard into your label design, for example to add a logo. You just need to select the preview area and then paste the picture using the standard Ctrl+V (Windows) or Command+V (Mac OS) shortcut.
The  button lets you duplicate the selected object(s). You can duplicate fields and/or graphic elements.
If you want to apply styles or changes to one or more objects in your label, you need to first select them. There are several ways to select fields or graphic elements.
- To select several non-adjacent objects, click on the first object and then hold down Shift while you click on the other objects you want to select.
- To select adjacent objects, click in the preview area and slide the cursor so as to draw a selection rectangle. Any objects touched by the rectangle being drawn are selected.
If you hold down Alt under Windows or Option under Mac OS while you draw the rectangle, only those objects inside the rectangle are selected.
You can modify the elements in the label editor after they have been inserted into the preview area. All the elements in the area can be resized, moved, aligned, distributed or placed on another layer. These changes can be applied both to fields and to graphic elements.
You can more one or several objects that have been placed in the preview area using the mouse or using the following keys:
- the arrow keys of the keyboard move the selection of objects in 1-pixel steps.
- Ctrl (under Windows) or Command (under Mac OS) + the arrow keys of the keyboard move an object in 10-pixel steps.
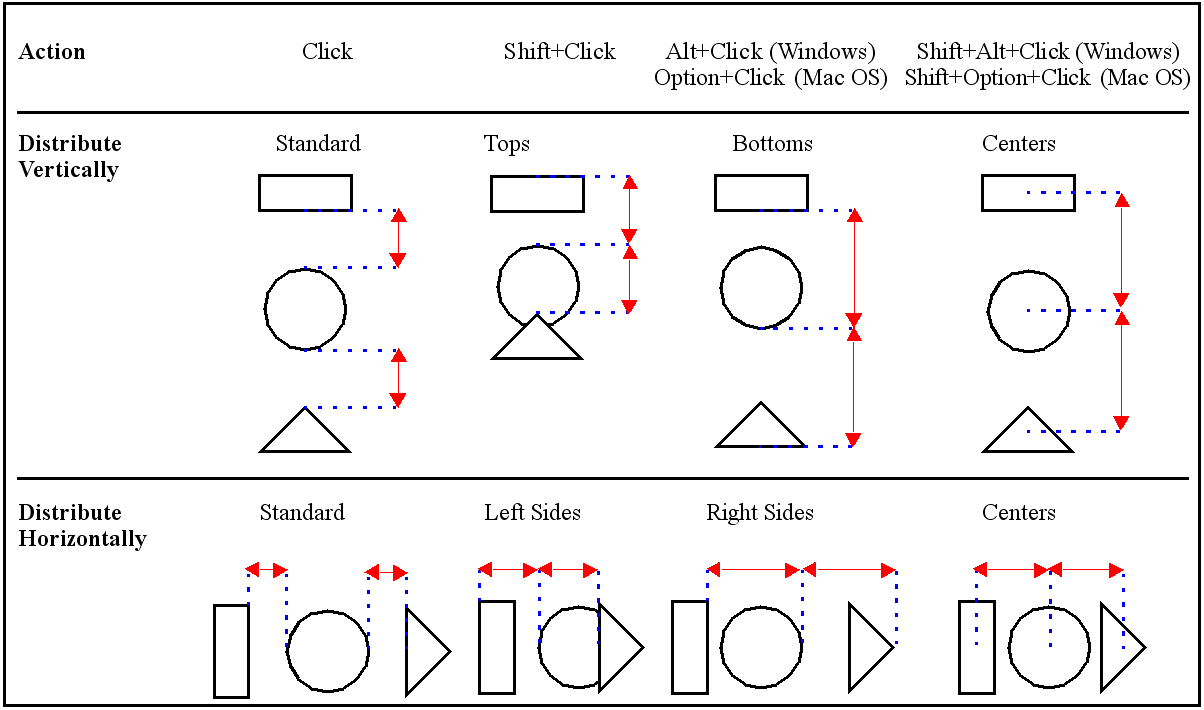
The alignment tools let you align objects to each other. When you align one object to another, you can align it to the top, bottom, side, or horizontal or vertical center of the other object.

“Distributing” items means automatically setting identical horizontal or vertical gaps between at least three objects. This is particularly useful when many objects are present. The gap obtained is an average of all the existing spaces in the selection.
By default, a constant interval is set on based on the edges of the selected objects. You can also distribute objects based on their tops, bottoms or centers as shown in the following diagram:
You may want to create a design that uses objects in different layers. For example, you may want to place a shaded rectangle behind the fields on a label. The Label editor provides the Move to Back and Move to Front tools that let you layer objects on the label.
Clicking the Move to Front or Move to Back tools moves the selected objects to the top or bottom layer:

If you want to move the object only one layer toward the front or back, hold down the Shift key when you click Move to Front or Move to Back.
You can modify the contents of the objects placed in the preview area. For example, you can change the color or patterns of objects, as well as the font or size of Text objects.
Note: The contents of pictures pasted from the clipboard cannot be changed. For example, you cannot mdify their color. Only items created in the editor itself can be modified.
You can resize any object on the label by selecting it and dragging a selection handle or using the following keys:
- Alt (under Windows) or Option (under Mac OS) + arrow keys of the keyboard to reduce or enlarge an object in 1-pixel steps.
- Alt+Ctrl (under Windows) or Option+Command (sous Mac OS) + arrow keys of the keyboard to reduce or enlarge an object in 10-pixel steps.
Using the functions in the "Object Look" area, you can modify the background/foreground colors or borders of objects:
- You set foreground and background colors for the selected objects using the Background and Foreground picture menus. If the object is a field or static text, the foreground color controls the color of the text and the background color controls the color of the object’s rectangle. If you have selected an object that has been drawn in the editor, the foreground color is applied to the borders and any patterns, while the background color is applied to the "white" background of the object.
Note: To apply a foreground or background color only to the border of an object, hold down the Shift key while making the selection. - The Fill picture menu controls the fill pattern for the selected object. The Border picture menu controls the fill pattern for the border. These functions have no effect on a field or static text.
- The Line Width pop-up menu controls the width of a line or the width of the border of a two-dimensional object.
When you add an object to the label, it takes on the Object Look attributes of the most recently created object. If you want to assign the default Object Look attributes to this object (or any object), select the object and click Default Look. The foreground and background colors, fill patterns, and border width are reset to the default settings.
You can use the “Text” and “Style” areas to define the look of the selected text: font and size, alignment, format. These parameters apply to fields and static text.
- You use the Font and Size menus to set these parameters for the selected text. They display the fonts and sizes avaialble in your operating system. You can also enter a font size manually.
- You use the Alignment menu to set the alignment of the titles with respect to the selection frame surrounding them.
- You can assign a display format to the selected field using the Format combo box. In this case, when the label is printed, the values of the records are formatted according to this parameter.
The applicable formats are related to the type of field selected. You can also create your own format in the entry area of the combo box. For more information about display formats, refer to Display formats. - You use the Style area to apply standard style options to the selected text.

Product: 4D
Theme: Label editor
4D Design Reference ( 4D v16)
4D Design Reference ( 4D v16.1)
4D Design Reference ( 4D v16.3)


