
4D v16.3
Description of the label editor
- 4D Design Reference
-
- Label editor
-
- Description of the label editor
- Creating a label design
- Creating a label sheet
 Description of the label editor
4D’s Label editor provides a convenient way to print a wide variety of labels. With it, you can do the following:
- Design labels for mailings, file folders and file cards, and for many other needs,
- Create and insert decorative items in label templates,
- Specify the font, font size, and style to be used for the labels,
- Specify the number of labels across and down on each page,
- Specify the how many labels to print per record,
- Specify the label page margins,
- Designate a method to execute when printing each label or record,
- Load and save label designs,
- Print labels.
Labels can also be created using the Form editor. Use the Form editor to design specialized labels that include variables or take advantage of the drawing tools available in the Form editor. For more information about using the Form editor to create labels, refer to Creating labels.
You use the Label editor to create, format, and print labels. The Label editor contains settings for designing labels and positioning the labels on label paper. For example, when producing mailing labels, you might want a label design that includes the person’s first and last name on the first line, the street address on the second line, and so on. As part of the design, the Label editor enables you to specify the number of labels on the page and the margins of the label paper so that the label text is centered within the labels.
When you create a satisfactory label design, you can save it to disk so that you can reuse it.
To open the Label editor:
- In the Design environment, choose Labels... from the Tools menu or from the menu associated with the “Tools” button in the 4D tool bar.
OR - In the Application environment, use the PRINT LABEL command.
The Label editor consists of two pages, the Label page and the Layout page, each identified by a tab at the top of the dialog box. You use the Label page to specify the contents of the label and the Layout page to define the size and position of the labels on the page.
- Label: This page contains functions for building and designing your label template. You can also designate a form that can be used to build your labels.
- Layout: This page contains function for setting out the labels on the page and printing them. You can do this yourself or let the program calculate how many labels can "fit" on a page. You can also associate a method with your page of labels.
The Label page contains several areas with settings for designing and formatting labels.
It contains the following elements:
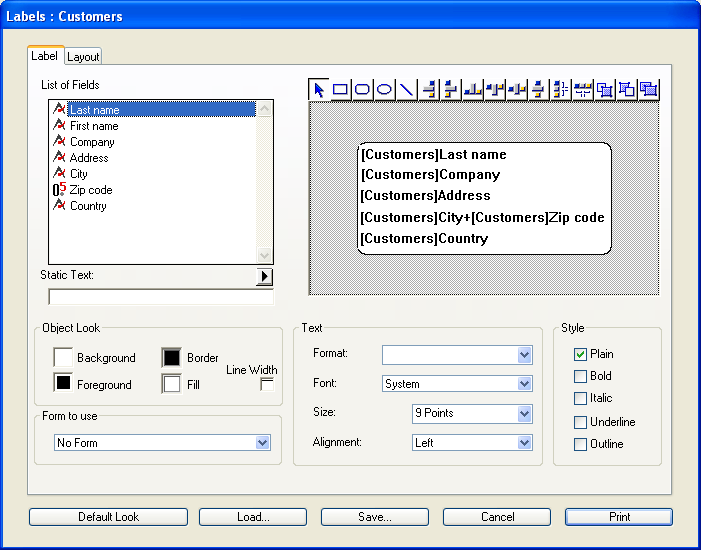
- Fields list: This area displays the names of the fields in the current table in a hierarchical list. If this table is related to other tables, the foreign key fields have a plus sign (on Windows) or an arrow (on Macintosh). You can display fields from the related table by expanding the related fields. The fields in the related table are indented.
To use a field from this list in the label template, you just drag it onto the label preview area to the right of the list.
Notes:- Only tables and fields which are visible appear in the Label editor. For information about making tables and fields invisible, refer to the “Invisible” paragraph in Table properties and Field properties.
- Object type fields are not supported by the Label editor.
- Static Text entry area: This area allows you to add static text objects to the label. You click on the arrow button above the area to insert the text entered into the preview area. You can position it in this area using the mouse.
- Label preview area: You use this area to design your label zone by placing and positioning all the items that you want to include in your label. The white rectangle represents a single label (its size is configured on the "Layout" tab). You can drag fields onto the label or insert static text from the "Static Text" area. You can also concatenate two fields (for example, First Name and Last Name) by dropping the second field onto the first one. They are automatically separated by a space.
The toolbar above this area contains tools for drawing, selecting, aligning, distributing, layering, and duplicating objects. You can also paste in items from the clipboard.
- Object Look, Text and Style: These three areas contain options you can use to configure the appearance of the items placed in the preview area. The "Object Look" area has controls that let you specify foreground and background colors, fill patterns, and borders for individual objects on the label. The "Text" and “Style” areas include controls that allow you to specify the font, font size, display format, and style of the text, and so on. You can apply these parameters to fields or static text.
- Form to Use drop-down list: This drop-down list lets you bypass the Label editor and use a form to print the labels. If you are using the Label editor to create the label, choose No Form (default) from this list. If you want to use a form, choose it from this list. 4D will then ignore any other label specifications in the Label editor and print the labels according to the design of the specified form. As with any print job, it executes any form or object methods associated with the form. See the Using the Label editor paragraph for more information about designing forms for labels.
If you want to create your labels using the editor itself, you can choose the No Form option.
- Default Look button: This button applies the default set of Object Look attributes to the selected object. Any parameters set in the "Object" area are reset to their default values.
Compatibility note: The label editor only supports ASCII characters. If you need to use a more extended character set, you have to print labels using the current output form.
The Layout page contains controls for printing labels based on the requirements of the printer you selected in the Print Manager (Chooser on Macintosh), so that it can format the page accurately.
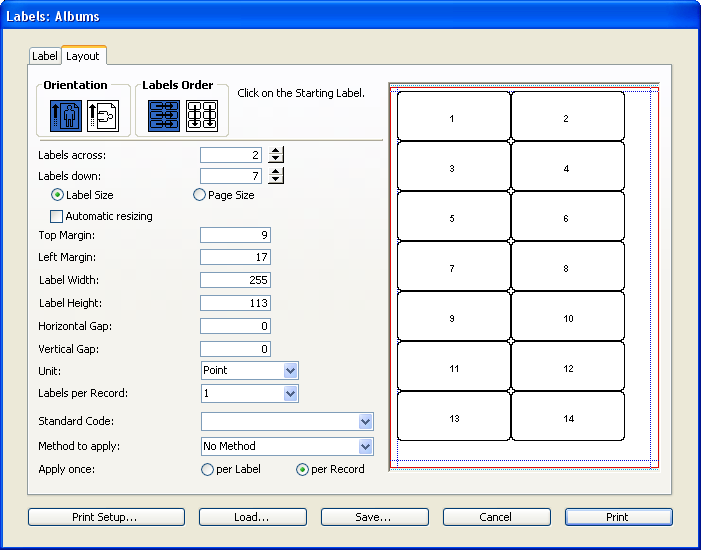
- Print Setup button: This button lets you set the format of the page on which the sheet of labels will be printed. When you click this button, the setup dialog box for the printer selected in your system appears.
Note: The sheet created by the editor is based on the logical page of the printer, i.e. the physical page less the margins that cannot be used on each side of the sheet. The physical margins of the page are shown by blue lines in the preview area.
- Orientation and Labels Order buttons: These buttons enable you to specify the page orientation and the order in which information is assigned to labels. Keep in mind that the orientation of the sheet is independent from that of the page. If you modify this parameter, be sure to change the configuration of the page accordingly in the standard print setup dialog box.
- Labels across and Labels down boxes: These boxes are used to control the size of labels by specifying the number of labels that appear on your label paper.
- Area for setting label size: This area includes various options for setting the size of the labels with respect to the different margins to be applied.
- The Unit drop-down list changes the units in which you specify your label and label page measurements. You can use pixels, millimeters, centimeters, or inches.
- The Label Size and Page Size radio buttons are used to select the label or the page for setting label and page dimensions. If you click Label Size, you can enter the Label Width and Label Height in the appropriate areas — except when the "Automatic resizing" box is checked (see following paragraph). If you click Page Size, you can enter values for the Right Margin and Bottom Margin. These margins are symbolized by blue lines in the preview area.
- Checking the Automatic resizing option means that 4D automatically calculates the size of the labels (i.e. the Label Width and Label Height parameters) according to the values set in all the other parameters. When this option is checked, the label size is adjusted each time you modify a page parameter. The Label Width and Label Height parameters can no longer be set manually.
- The Top Margin and Bottom Margin areas set the corresponding margins for the label sheet. These margins are symbolized by blue lines in the preview area.
- The Horizontal Gap and Vertical Gap parameters control the amount of space between label rows and columns.
- Labels per record drop-down list: This control lets you print more than one copy of each label. If you print more than one copy, 4D prints the copies consecutively rather than making copies of the label pages.
- Standard Code drop-down list: This control lets you specify the label, page dimensions, and margins by choosing a standard commercial label paper from the drop-down list.
- Method to apply and Apply Once: These parameters let you trigger a specific method that will be run at print time. For example, you can execute a method that posts the date and time that each label was printed. The menu next to the Method to apply option includes all the project methods of the database.
The Apply Once radio buttons are used to specify whether to run the method once per label or once per record. This control has meaning only if you are printing more than one copy of each label and you are also executing a method at print time
- Layout preview area: This area provides a reduced view of how an entire page of labels will look, based on the dimensions you enter in the Label editor. The page preview also reflects the paper size selected in the Print Setup dialog box. You can also select the first label on the page to be printed. The red border indicates the size of the physical page and the blue border indicates the size of the printable area.
4D lets you save each label design as a file that you can open from the Label editor. By saving label designs, you can maintain a library of labels that you can use according to your needs.
Label designs store the parameters set on the Label and Layout pages.
- To save a label design, click the Save button in the editor and indicate the name and location of the design to be created.
- To load a label design, click the Load button in the editor and designate the design to load in the open-file dialog box (4D replaces the current label design with the design you selected).
Label files on Windows are denoted by the file extension .4LB.

Product: 4D
Theme: Label editor
4D Design Reference ( 4D v16)
4D Design Reference ( 4D v16.1)
4D Design Reference ( 4D v16.3)


