
4D v16.3
Importing data from files
 Importing data from files
You can import data from files in XML, 4D, SYLK, DIFF, DBF, Text, or Fixed Length Text formats (see File formats). If you are importing data that has been exported from another application, see that application’s documentation for information about exporting the data in one of these formats. If the other application uses a different format for exporting data, you may need to modify the file in advance using a text editor or word processor.
If you are importing data from another application running on the same platform as your database, first export the data using the other application. Note the order in which the fields were exported, the format the application uses to save the data, and, if the Text format was used, the delimiters used by the application. When importing the data, you must match these settings.
You do not need to build your entire table structure before you import data. You can create the required tables directly from the Import dialog box.
You have the option of selecting the fields for which data will be imported in the Import dialog box or specifying an input form that contains the fields for which data will be imported.
In the Design environment, you import data by the intermediary of the Import dialog box. In the Application environment, you can also display this dialog box (IMPORT DATA command) or directly import files via the commands of the Import and Export theme.
To import data in the Design environment:
- Choose Import > From File... from the File menu of 4D.
4D displays an open-file dialog box. You can select the type of file to be imported — Text, SYLK, DIF, DBF, 4IE or XML. For more information about file types, refer to the File formats section. - Select the file to import and click Open.
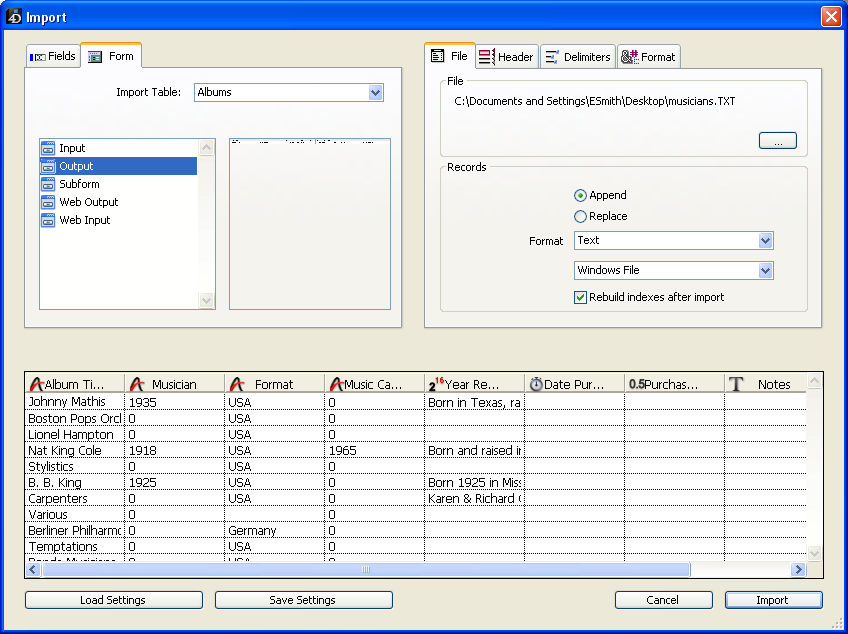
The Import dialog box appears: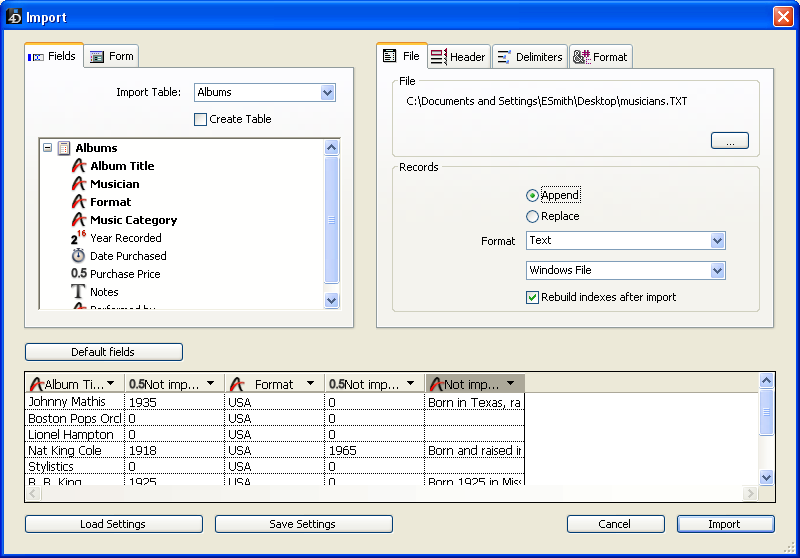
The File area shows the pathname of the file to be imported. If you want to import another file, click the [...] button to choose the file. - In the Table and Field Selection Area, choose the table and the fields into which you want to import the data.
You can choose one of the following options:- Import data into an existing table and fields.
Select a table from the Import Table drop-down list (by default the first table is selected). The hierarchical list allows you to view and select the fields into which you want to import data. - Create a new table for the data import.
Check the Create Table check box. 4D will then create a new table into which it will import the data. 4D determines the number of fields and the type of each field according to the data being imported.
If you want to change the name of the new table or a field, double-click on it in the Table and Field Selection area so that it becomes editable or by checking the Column Titles as Field Name option in the Headers tab (see Header page).
You can also change the data type for the new fields by clicking on the field’s title bar in the Preview Area: a pop-up menu displays the different types available: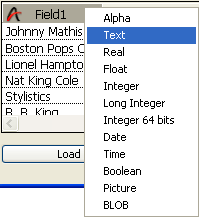
The table is created only during the import. If you cancel the import or deselect the option, the database structure remains unmodified.
Note: With the Password Access System, you can deactivate the Create Table option to prevent users from creating a new table in the database from the Import Data dialog box. To do so, use the Database Settings dialog box to create an access group that has access to the Design environment (of course, the 4D password access system must first be activated). Users not included in this access group are not allowed to select the Create Table option in the Import dialog box. - Import data using a form.
This option is discussed in detail in Importing data using a form.
- Import data into an existing table and fields.
- If necessary, in the Preview Area, use the pop-up menus in the header area to select the fields into which each column in the import file will be imported.
Note: This feature is not available if you checked the Create Table option or import data using a form.
The title bar for each column indicates the name of the field into which the column will be imported and its data type. If necessary, use the pop-up menu to select a different field.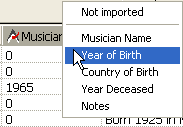
To assign a field to a column, you can also select the column and double-click on the field name in the hierarchical list of fields.
You can also select the Not imported option. In this case, the column of data is not imported.- Default fields
This button allows you to “intelligently” assign columns from the import file to the fields in the table according to their type and not according to the order in which they appear. The data type of each column is estimated and it is assigned to a compatible field. The interpretation is done in the following manner:Estimated Field Type 4D Type All numbers Real (Number) True/False Boolean Date in one of 4D formats Date Time Time Other Alpha
If no compatible field is found, the column is not imported. If you want to import the column, you must assign a field to it manually in the Preview Area using the column’s pop-up menu in the header area. - Number of characters for the Fixed Length Text file format: When importing a Fixed Length Text file, the Preview Area displays the number of characters for each column below the field’s data type icon. The number of characters assigned to each column is based on the first row of data. You can change the distribution of characters among the columns by dragging the column dividers in the header area or entering values in the field length areas, but you can’t add characters to the row.
- Default fields
- (Optional) Set the options of the “Records” area.
These options are described in Records area. - (Optional) Choose any other import options using the Header, Delimiters, Filling, XML, and/or Format pages.
These options are described in Import options. - If you want to save your settings, click the Save Settings button.
This point is described in Saving and loading import and export settings. - Click the Import button to begin importing the text file.
4D displays a progress indicator as it imports the data into your database.
4D offers you various import options that are accessible through tabs in the import dialog box. The number of tabs as well as their contents vary and depend on the type of file used and the options selected.
The options of the “Records” area (File page) specify the main characteristics of the operation:
- Append or Replace: The records imported can replace the current selection (Replace radio button) or be added to the existing data and form a new selection (Append radio button).
- Format, Character Set and Destination Platform: options for formatting the import file (see the File formats section)
- Rebuild indexes after import: When this option is checked (by default), the indexes of the fields into which data is imported are rebuilt after the import. This mechanism can accelerate imports of large volumes of data. If the import concerns a quantity of data that is smaller than that already contained in the field, it may be useful to deselect this option before the import. In this case, the index is updated gradually and not rebuilt in its entirety.
This page is available only for imports from Text and Fixed Length Text files.
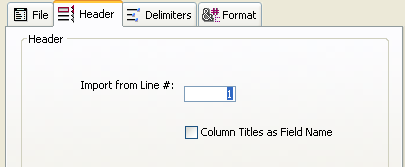
- Import from line #: This option allows you to specify the first line in the text file that will be imported. Use this feature to tell 4D to skip over header information — such as titles or field names — in the import file. It is particularly useful when the import file starts with unformatted lines (title, date, etc.) because the import columns are calculated according to the format of the first line.
- Column Titles as Field Name: This option tells 4D to use the column titles as field names if you have selected the Create Table option.
This page allows you to specify the field, record, and file delimiters used in Text and Fixed Length Text files. This options are preconfigured according to the platform specified in the "Destination Platform" menu of Records area.
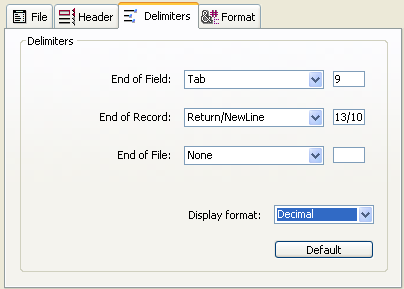
Delimiters are discussed in detail in the Field, record, and file delimiters section. To change the default delimiters, use the drop-down lists containing the values most frequently used for each delimiter. You can also enter a delimiter into the entry areas on the right.
The drop-down list at the bottom of the page allows you to view the delimiters in different formats: Character, Decimal (default format), and Hexadecimal. Please note that, if you use unprintable characters as delimiters (such as Tab, Linefeed, and Return), the Character option will not show anything.
Note: The delimiters are reset to their default values if you click the Default button or if the type of the document is modified on the File page.
This page is available for XML files only. It allows you to configure the parsing mode of the imported XML contents.
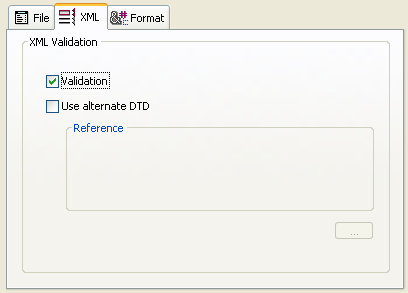
At the time of data import, 4D interprets the contents of the XML document in order to extract the information. By default, this operation is carried out without any specific validation. The XML document is assumed to be “well-formed,” meaning that its structure is correct and its interpretation is unambiguous.
You can, however, request “validation” of the document at the time of import: to do this, check the Validation option. In this case, 4D parses the contents of the document based on its DTD (Document Type Definition) and checks that it corresponds to this definition. Import is only carried out if the document is validated.
Note: For more information on the DTD, refer to XML page.
If the DTD of the imported document is not included in the document itself, but is in a separate file, or if you want to use another DTD to validate the document, check the Use alternate DTD option and indicate the file containing the DTD using the [...] button.
Once the import is completed, the dialog box is closed and the table into which the data were imported becomes the current table.
This page is available for Text, Fixed Length Text and XML files. It allows you to set the formats for imported Boolean fields.
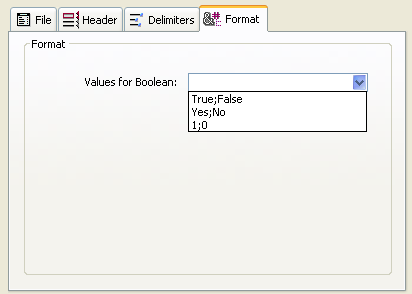
The syntax to use is True_Value;False_Value. For example, if you import a column into a Boolean field whose values are “Black” (for true) and “White” (for false), you can enter Black;White. The combo-box displays the most commonly used Boolean formats. You can enter any format that is not in the combo-box.
This page appears only for Fixed Length Text files. It allows you to specify the fill characters to use for each data type. The default fill character is the space.
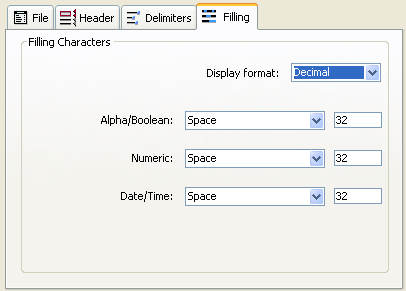
For more information about the Fixed Length Text file format, refer to the File formats section.
Different fill characters can be used for three data types: Alpha/Boolean (Boolean fields are imported as alphas), Numeric and Date/Time. Normally, the space is used to pad fixed format fields. The drop-down lists contain other choices. The entry areas to the right display the selected fill character. If you wish to use other characters, enter them directly in the entry areas.
The menu at the top of the page allows you to view the fill characters in different formats: Character, Decimal (default format), and Hexadecimal. An unprintable fill character will not appear if you use the Character format menu.
If you want to import a text file into a form, click the Form tab located at the top of the Table and Field Selection Area. The advantage of using a form is that the form and object methods associated with it are executed as each record is imported. This allows you to process data while importing data (i.e., without writing a custom import routine).
You can use forms that contain enterable variables and fields, but not buttons. The form method and the methods associated with variables and fields will be executed when each record is imported. Note, however, that the effects of these methods are not shown in the Preview area.
If you use a form for the import, please keep the following considerations in mind:
- The methods are executed in the On Validate form event.
- The entry order of the form determines the order in which the columns of data are imported. You should make sure that the entry order of the form matches the order of the columns in the text file.
- If there are fewer fields and variables on the form than columns in the text file, the extra columns will be ignored.
- A form used for import should not contain buttons. Also, subform objects are ignored.
Note for 4D Server: It is not possible to import data using a form that includes methods in a stored procedure on the server. In fact, since form events are not managed on the server, the associated methods will not be called.

Product: 4D
Theme: Exporting and importing data
4D Design Reference ( 4D v16)
4D Design Reference ( 4D v16.1)
4D Design Reference ( 4D v16.3)


