4D v16.3
Home Page
 Home Page
The Home page lets you set up and use “folders” of objects in the 4D Explorer.
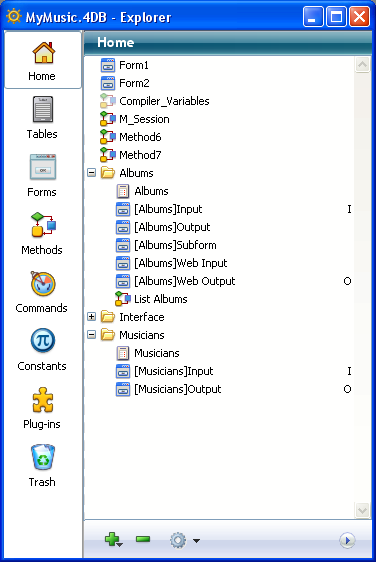
In keeping with folders used in the Windows and Mac OS operating systems, 4D folders group together different objects according to custom criteria (in particular by function) and not only by type. For example, you can group objects related to handling e-mails in your database in a folder named “E-mail.”.
Table, Form and Method objects can be placed in folders. You can also create sub-folders on several different levels.
All customized database objects (i.e. tables, forms, project methods) are always displayed on the Home page. Note that they remain listed on the other pages of the Explorer as well.
On this page, you can add folders or subfolders, rename, move and reorganize folders and objects. You can also create tables, forms and project methods directly. As on the other pages of the Explorer, you can open a table, a form or a project method in a window of the corresponding editor by double-clicking its name, or insert it using drag-and-drop. You can also rename or delete folders and objects and you can assign a folder to each object when it is created.
From this page, you also drag different types of objects (methods, forms, and so on) to database editors or to other databases in Design mode. The drag and drop options that are available for each type of object are described in the corresponding sections of this theme. Drag and drop between databases is described in Drag and drop of objects.
4D Server: All client machines connected to the same database share the same folder configuration. Once a change is made by a client machine on the Home page (move, addition, etc.), it is automatically and instantaneously made on all connected client machines.
Folders are useful for organizing databases by functionality or customized criteria (dates, languages, etc.). Accessing different objects from the Explorer is thus made easier. Folders are also accessible in the form of hierarchical lists in the 4D Method editor. This makes calling appropriate objects easier when writing methods:
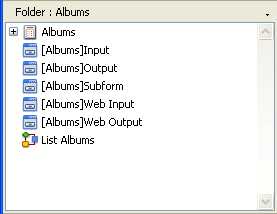
You can also use folders to filter the display of the tables in the Structure editor (see Highlight/dim tables by folder).
By default, all the objects are placed at the top level. You can add folders or subfolders at any time in the Explorer Home page. To do so, use the New>Folder command from the options menu of the page or from the context menu (right-click):
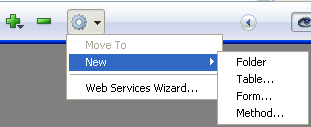
You can also use the menu that appears when you click the add icon (+) located at the bottom of the area.
The folder or subfolder is immediately created and its default name is “Folder_+folder number.” You can modify this name as desired; however, the name of the folder or subfolder must be unique (regardless of the hierarchy level) and it must not exceed 31 characters.
- To create a folder, make sure that no item is selected when you add the new folder.
- To create a subfolder, select the folder where you want to add a subfolder before creating the new folder.
Afterwards, you can easily change a folder to a subfolder and vice-versa using drag-and-drop or move commands.
The New> command of the Home page let you create not only folders, but tables, forms and project methods as well. When you choose this type of subcommand, you go directly to the dialog box used for creating the desired objects.
The context menu and the options menu of the Home page provide additional functions depending on the type of object selected. The options available for each type of object are described in the corresponding sections of this theme.
The Delete command deletes the selection. If the selection contains a folder or subfolder, all the items contained in them are deleted.

This command can be used with any type of item (folders, subfolders, tables, forms and project methods) and with multiple selections. Deleted objects disappear from lists and application editors.
Deleted items are placed in the Trash of the Explorer. For more information on how the Explorer Trash works, please refer to Trash Page.
To delete one or more objects from the Explorer Home page, it is also possible to select them then choose the Move To>Trash command in the context menu (right-click) or using the options menu of the page.
The Move To command of the context menu on the Home page lets you modify the contents of a folder without having to expand the destination folder beforehand.
To do this, right-click with the mouse on the object, folder or selection so that the context menu appears. In this menu, the hierarchical Move To command lists all the existing folders and subfolders as possible destinations:
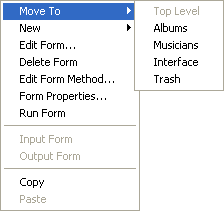
Select the folder where you want to place the selection. If you choose Top Level, the selection is placed at the first level of the list, and not in any folder (this item is dimmed when you want to move an object that is already at the first level).If you choose Trash, the selection is deleted (see the previous section).
You can place a new object directly in a folder when it is created. The “Folder” menu, located in the dialog box for creating tables, forms and project methods, lets you set the folder where the object must be created. By default, objects are created at the first level (Top Level) or in the last folder selected in the Explorer (if applicable). The folder selection menu is found, for example, in the dialog box for creating tables as shown here:
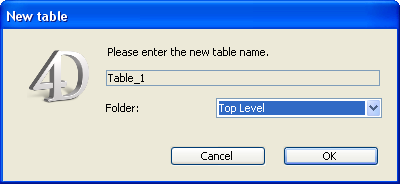
Of course, once you have created objects on the Home page of the Explorer, you can always move them to a different folder.
When a folder is selected in the Explorer, the preview area of the window displays several items of information:

- Folder: Folder name: Number of objects inside the folder
- Table(s): Number of tables found in the folder
- Form(s): Number of forms found in the folder
- Project Method(s): Number of project methods found in the folder
- Folder(s): Number of folders (subfolders) found in the folder
If an object type is not found in a folder, it does not appear in the preview area. If a folder is empty, the area only displays Folder: Folder name. When several folders and/or objects are selected, the information displayed concerns the current item, i.e., the last item that you clicked.
Product: 4D
Theme: Explorer
4D Design Reference ( 4D v16)
4D Design Reference ( 4D v16.1)
4D Design Reference ( 4D v16.3)


