
4D v16.3
Entry areas
 Entry areas

Adds an enterable String type variable named "Variable". You can use the Property list to modify its type or other properties.
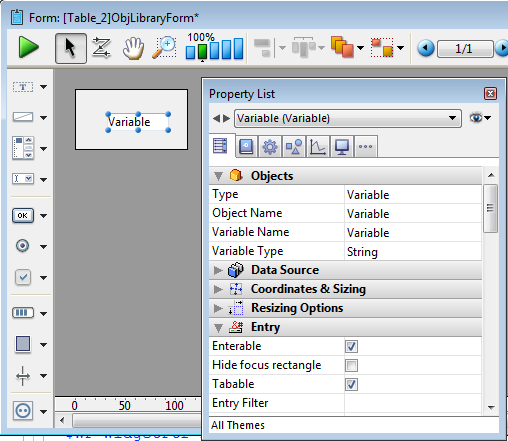
For more information about using variables in forms, refer to Get list item font.

Adds a styled text area (variable) where you can set the character font and define its size and color. This area can be resized and has a vertical scroll bar and a context menu. You can modify these default features using the Property list.

For more information about using variables in forms, refer to Get list item font.

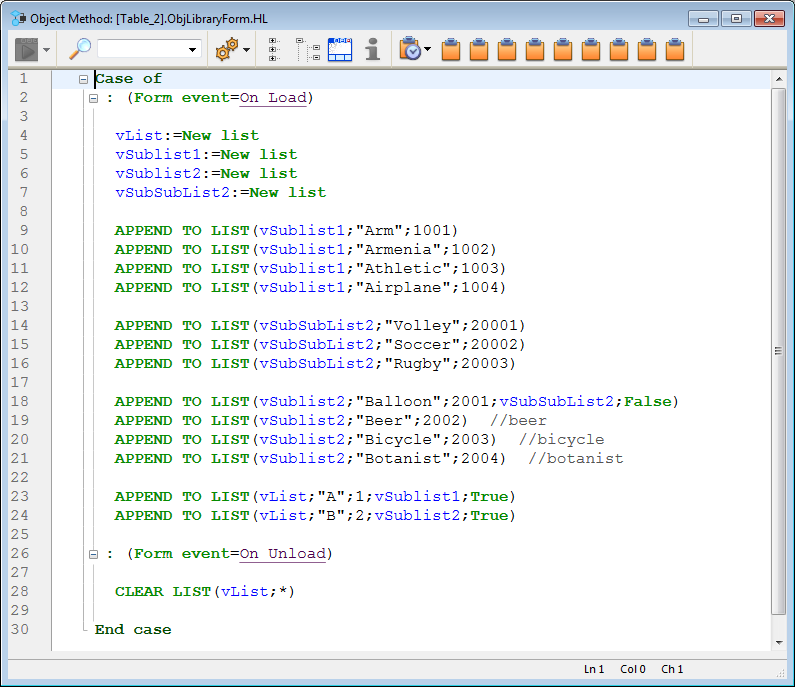
Adds a hierarchical list that includes sample code in its object method used to implement a basic multi-level hierarchy. You can use the Property list to modify its properties.
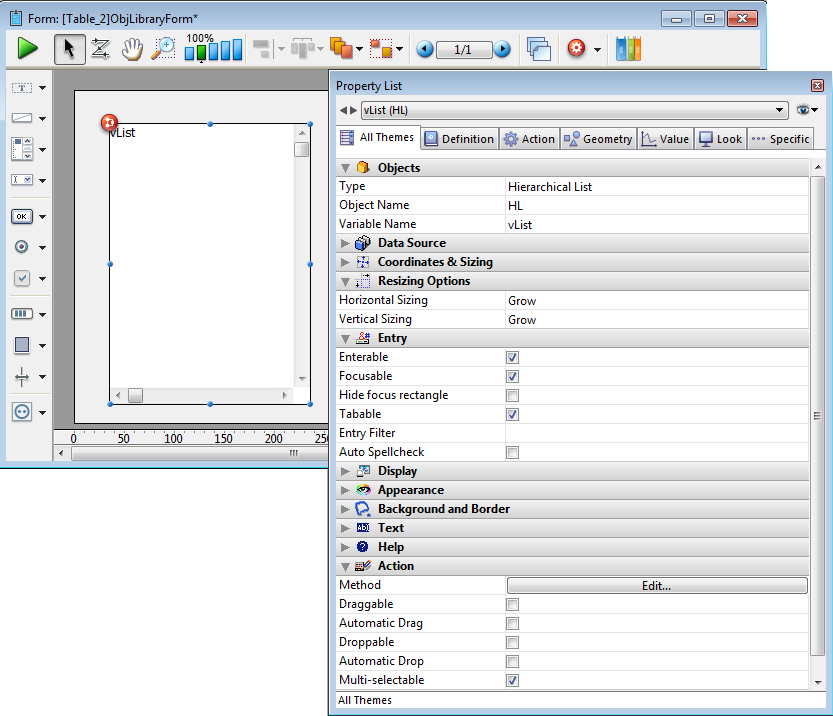
By modifying the sample code in the object method, you can customize the existing hierarchy to meet your specific needs.
Here is how the list appears in the form with its default sample code:

For more information about using hierarchical lists in forms, refer to Hierarchical Pop-up Menus and Hierarchical Lists.

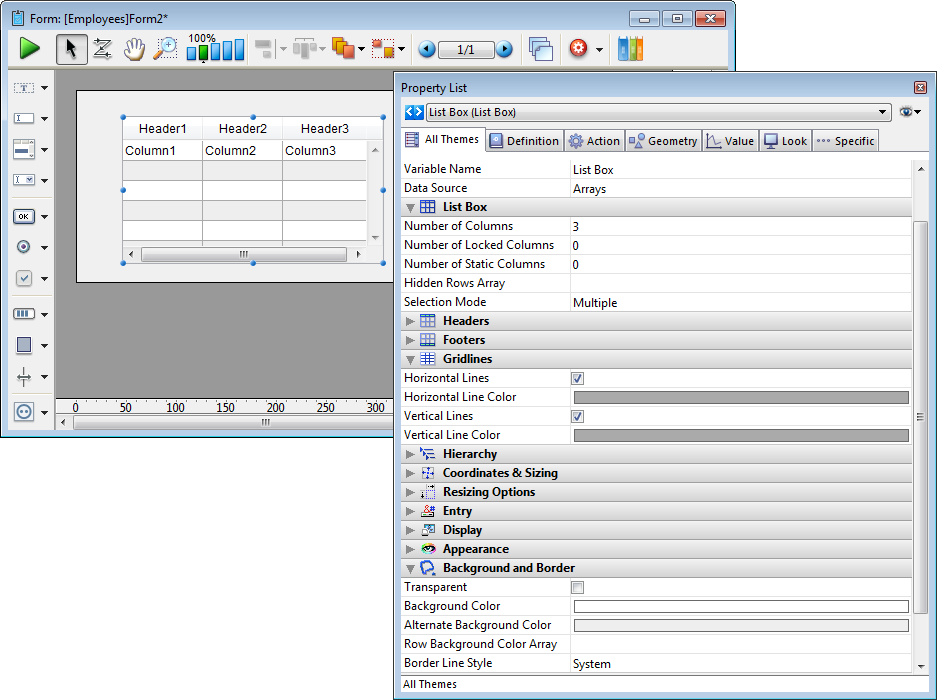
Adds a three-column list box object that you can use to display arrays of data. You use the Property list to specify the data source and define the options desired.
For more information about using list boxes in forms, refer to the Overview section for list boxes.

Adds a scrollable area which consists of a single-column list box whose headers and footers are not displayed. This area is not enterable by default but you can configure it using the Property list.
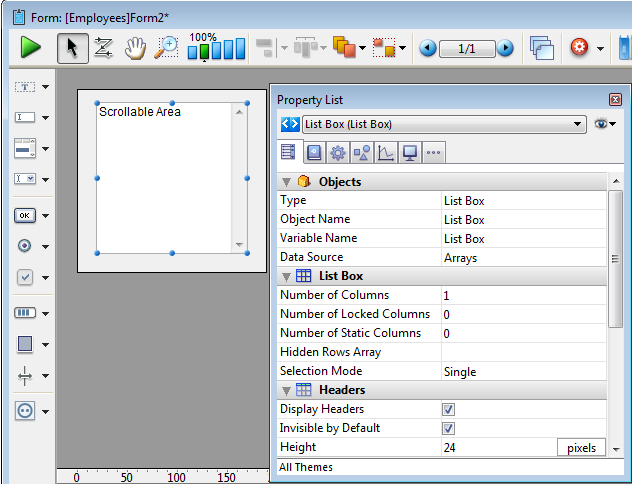
For more information about using scrollable areas in forms, refer to the Overview section for list boxes.

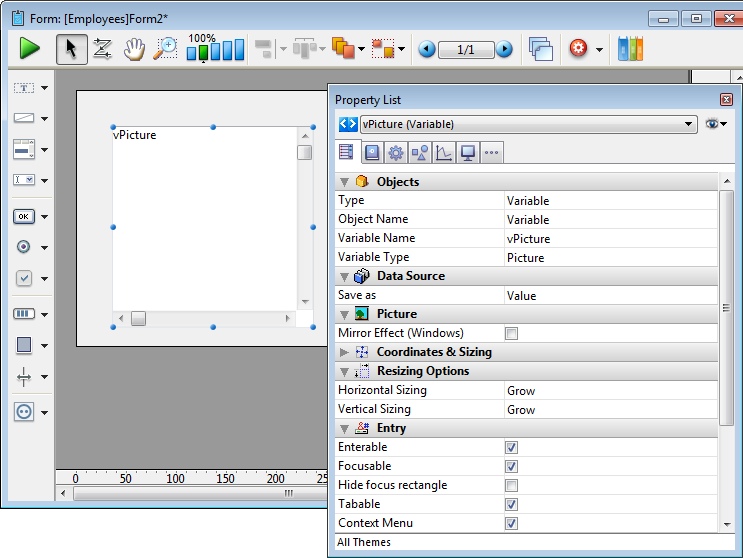
Adds a picture area which can be configured using the Property list, for example to add a context menu or include a display format.
For more information about using picture variables in forms, refer to .

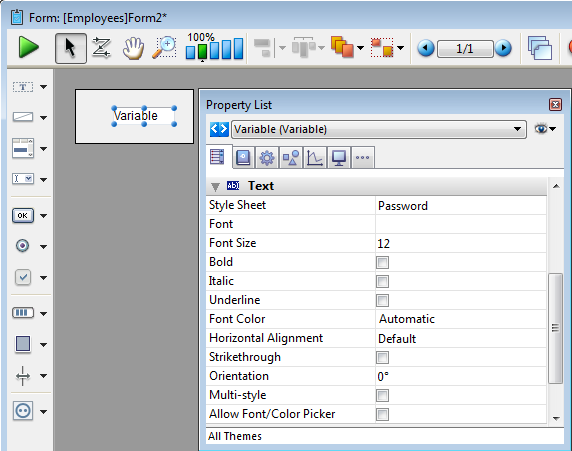
Adds an enterable String variable associated with a “Password” style sheet, which displays entered characters as asterisks. You can use the Property list to modify its properties.
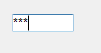
When you enter text in a password area in a form, only asterisks are displayed:
For more information about using variables in forms, refer to Get list item font. You can also refer to the Style sheets section for more information.

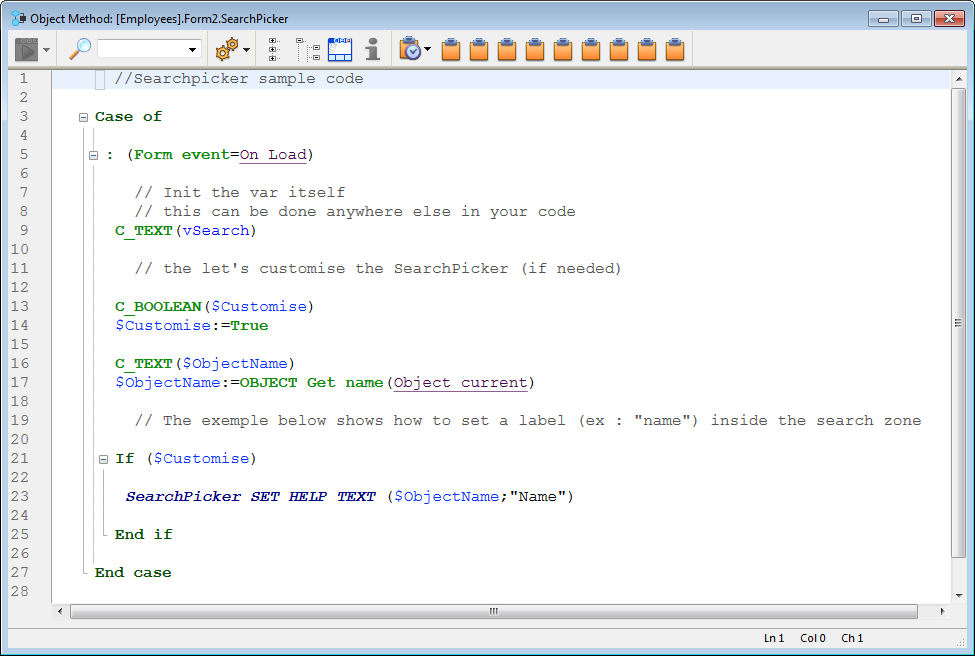
Adds a SearchPicker area that includes customizable sample code in its object method. You can use the Property list to modify its properties.

You can modify the sample code in the object method in order to customize the label displayed in this area by means of the SearchPicker SET HELP TEXT command.
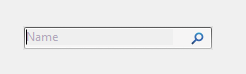
Here is the search area in a form:
For more information, refer to the Overview of the SearchPicker widget.

Adds a rich text area along with a set of menus and buttons to manage font styles and references.
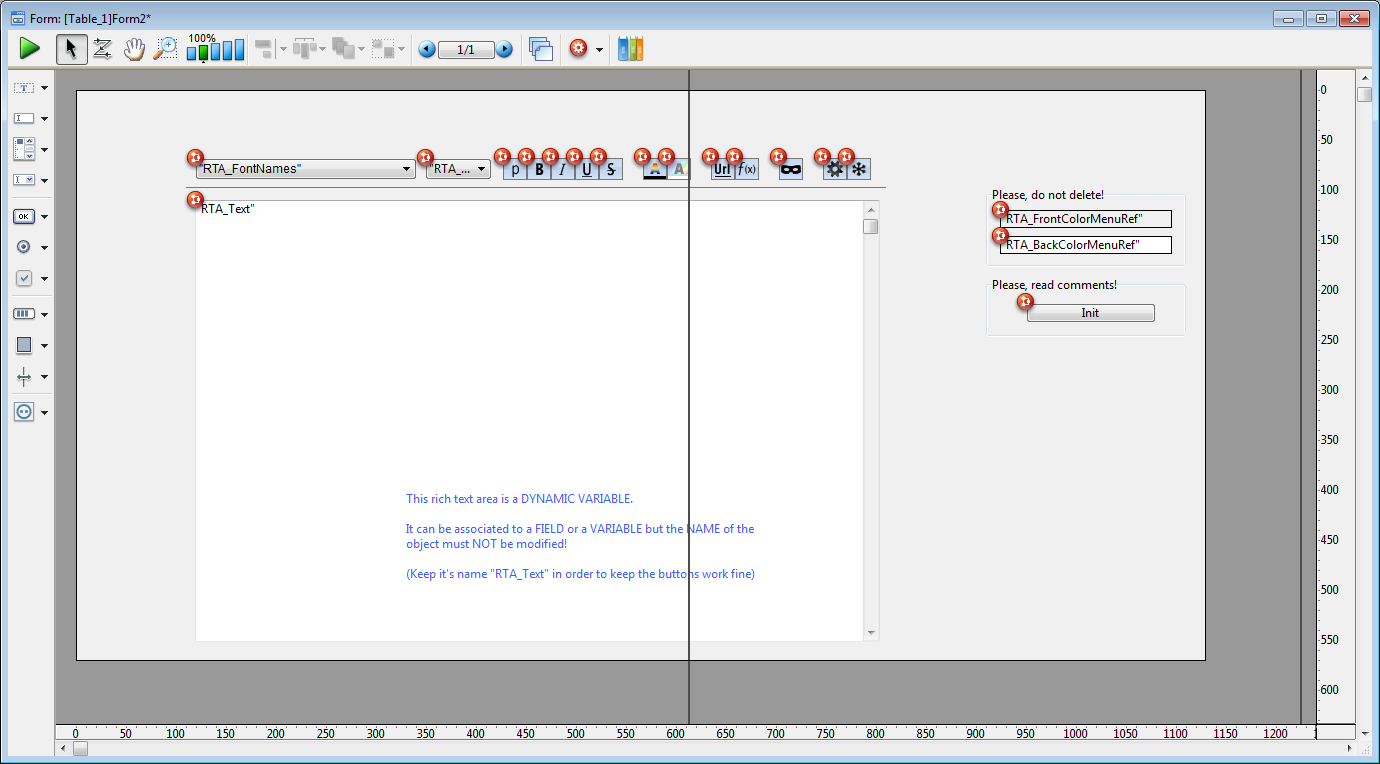
This rich text area consists of a dynamic variable named “RTA_Text”. In order for the menus and buttons of this area to work properly, it is important that you Do Not modify this name.
Note: In order for the XLIFF references to be copied into your database, you will need to restart it after dropping this area onto a form.
There are two offscreen variables used to save the font color and background color menu references. When they are present, the menus will be built "On Load" and released "On Unload".
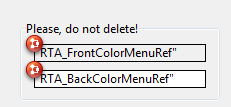
Note: If these variables are deleted (not recommended), these menus will have to be created (and deleted) each time a user clicks on the font color or background color buttons.
There is also an offscreen button labeled "Init" whose purpose is to copy certain resources from the 4D application into your database.
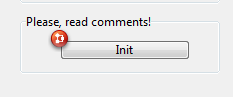
These resources are used inside the buttons and in the color menu. They only need to be copied once and this button should be deleted once its script has been executed.
When the form is in user mode, the rich text area appears as follows:
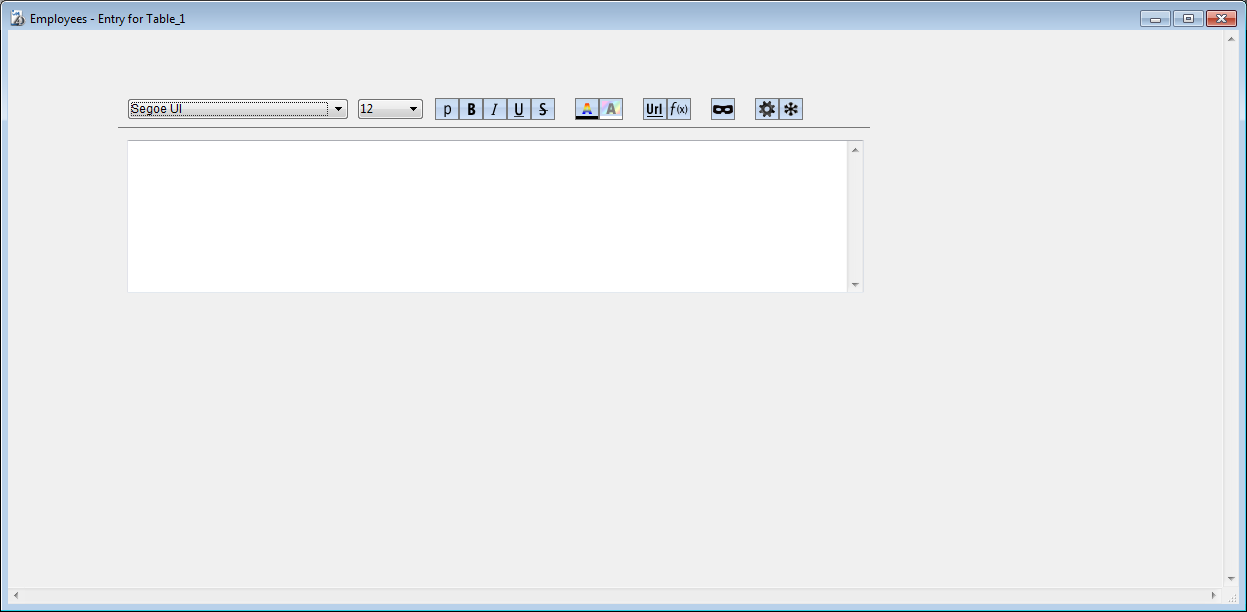
The following menus and buttons are included by default with the rich text area:
 | Use these drop-down menus to select the font and its size. |
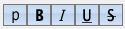 | Plain, Bold, Italics, Underline and Strikethrough style buttons. |
 | Buttons to set font color and background color, respectively. |
 | Buttons to insert a URL or an Expression (respectively). |
 | Button to display expressions as references (strings) instead of values. |
 | Use these buttons to compute or freeze, respectively, the expressions in the text. |

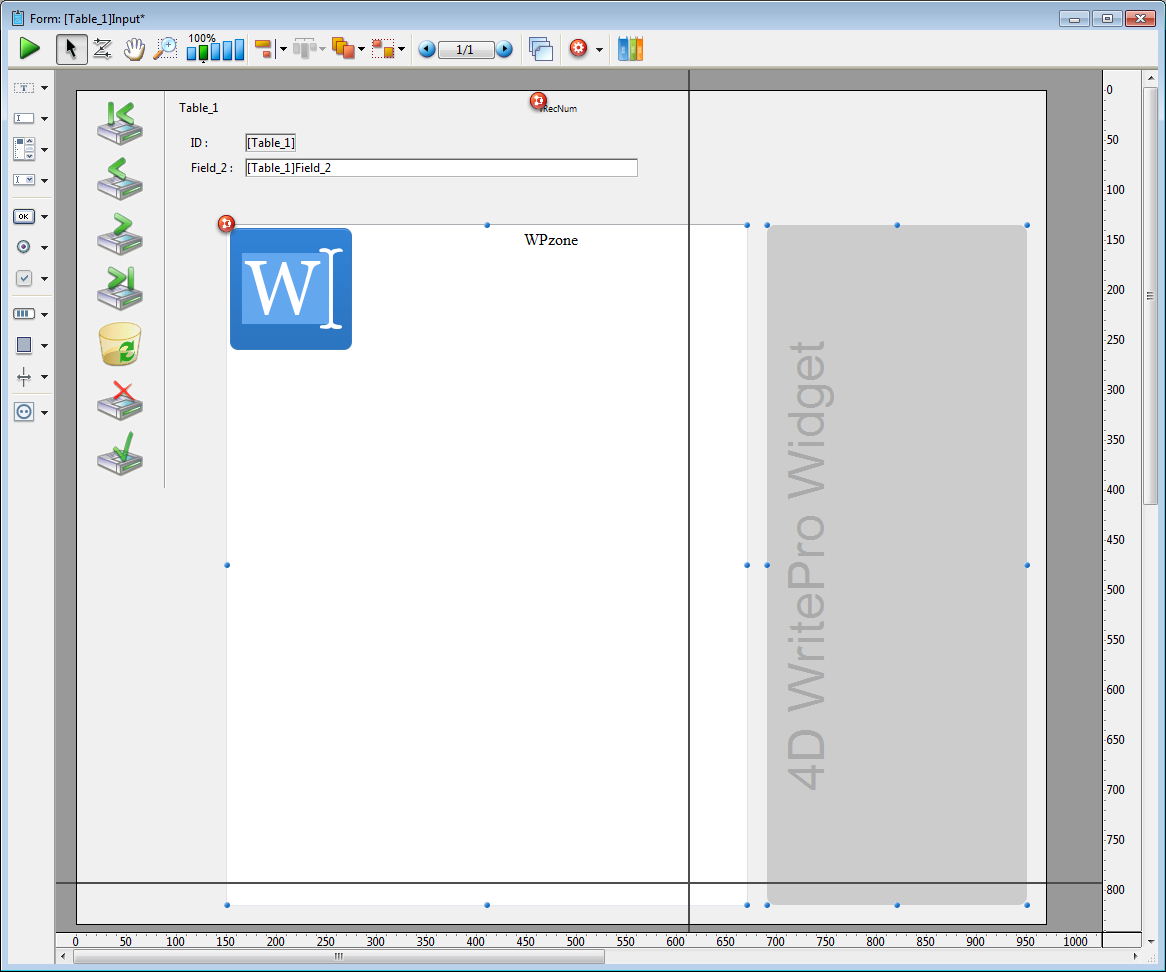
Dropping this object onto a form automatically inserts a preconfigured 4D Write Pro area with an associated 4D Write Pro Widget subform containing control panels to manage the area's contents:
Note: For more information on 4D Write Pro, please refer to the 4D Write Pro Reference dedicated manual.
In user mode, by default this panel is displayed with a toolbar containing 8 icons. Selecting each icon in the toolbar displays a different control panel (detailed below):
 | Font Style |
 | Margins & Alignments |
 | Tabulations |
 | Units & Sizes |
 | Frames |
 | Background |
 | Database & Information |
 | Bookmarks |
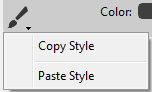
In addition, there is a Copy/Paste button  (bottom left corner of most panels) with a dynamic context menu that adapts to the panel contents. For example, on the Font Style panel, after you have copied a selection of styled text, the menu automatically includes a "Paste Style" item:
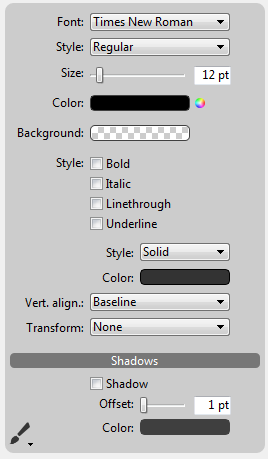
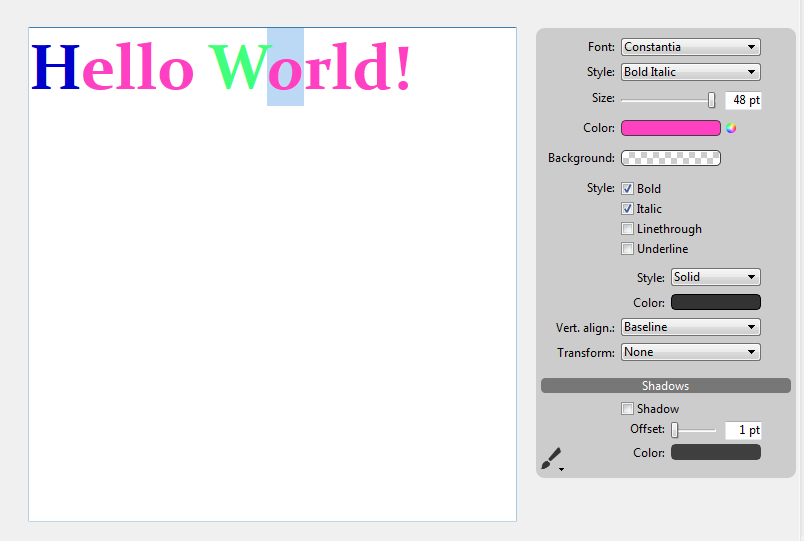
This panel manages standard font styles and properties for the text of the 4D Write Pro area.
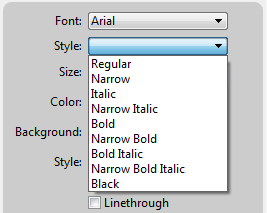
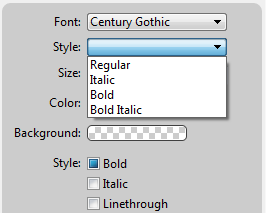
Items available in the Style menu vary based on the font selected:
Note: Font size is always in points regardless of the unit set for the document.
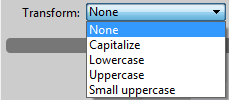
The Vert. align. menu changes text to superscript or subscript and the Transform menu switches between different cases:
The Copy/Paste button copies the style applied to the selected text. This button's menu automatically adds a "Paste Style" item after you have copied a selection of text so that you can re-apply its style elsewhere. Note that this mechanism only works when copying a selection of text with a uniform style applied throughout.
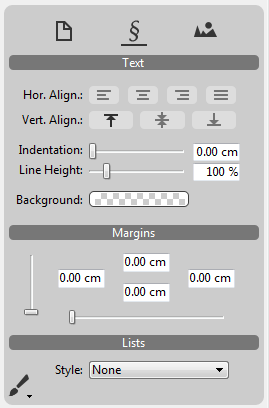
This panel manages standard text alignment properties and sets the margins for the 4D Write Pro area.
In addition to general settings applied to the entire document, text alignment and margins can be set independently for each paragraph and/or for each picture in the text. Use the icons at the top of the panel to configure these settings separately for the desired area ( for the document as a whole,
  for an individual paragraph and
  for a picture placed in the text).
The Copy/Paste button can be used to copy and paste the text settings and/or margins of the selected text.
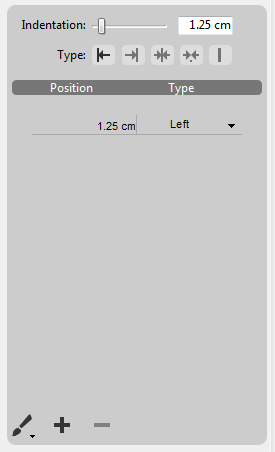
This panel manages tab stops for paragraphs in the 4D Write Pro area. Any Indentation value set, either using the slider or by entering a value directly in the area, is used by default as the offset distance between any subsequent tabs added. When you choose a Type using one of the buttons, this type is applied to all existing tab stops for the paragraph.
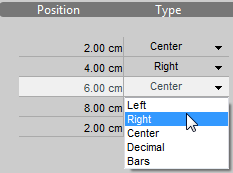
You can change individual tab stops manually in the list by entering a new Position value directly in the cell and/or choosing a new Type from the drop-down menu:
Note: Changing the Indentation or Type using the controls at the top of the panel will override any manual changes made to individual tabs in the list of tabs.
Clicking on the  button adds a new default tab stop to the paragraph. You can delete a tab stop by selecting it in the list and clicking the
  button.
Tab stops are applied to the current paragraph or a selection of paragraphs. You can also use the Copy/Paste button to copy and paste tab stop settings.
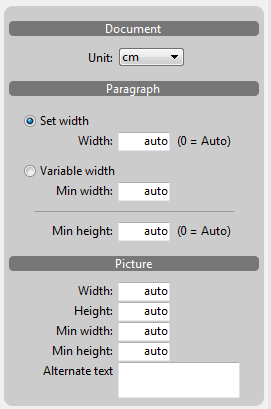
This panel sets the standard units used for the 4D Write Pro document and specifies the sizes applied to its paragraphs and any pictures it includes.
Units are set for the document as a whole. Note: Regardless of the unit set for the document, the font size (see the panel), as well as the line width and radius for frames (see the panel) are always in points.
Paragraphs can have a fixed or variable width and pictures can be set with a fixed size or a minimum width and/or height. When a size is set to "auto", it is based on the contents of the element.
The Alternate text area allows you to specify an alternate message that will appear when the picture cannot be displayed.
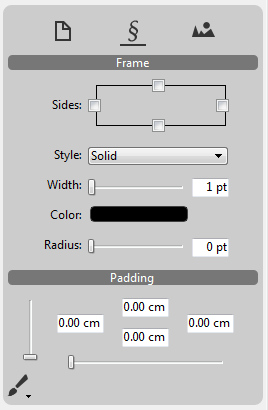
This panel manages frames and padding in the 4D Write Pro area.
Frames can be set for the document as a whole and/or for individual paragraphs, or for pictures found in the text. You use the icons at the top of the panel to configure these settings separately for the desired area: i.e., for the document, for an individual paragraph and for a picture placed in the text.
Note: The Double, Groove, Ridge, Inset frame styles may not be clearly visible at the default width (1 pt).
The Radius setting applies rounded corners to frames. Note: This setting cannot be defined for Groove, Ridge or Inset frame styles.
The Copy/Paste button copies and pastes the frame as well as any padding from one paragraph (or picture) to another.
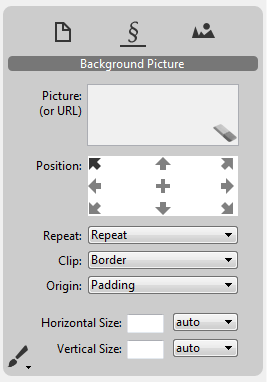
This panel manages background pictures for the 4D Write Pro area. You can drag and drop pictures or URLs directly onto the Picture area. In addition, a right-click in the Picture area displays a drop-down list where several background patterns are available by default. You can set the position and size of each picture or pattern used and define custom settings. You can use the  icon to remove an existing picture or pattern.
Background pictures can be set at the document level () and/or for individual paragraphs (). You can also set a background picture for a picture included in the text ().
The Copy/Paste button copies and pastes the background picture along with its settings from one paragraph (or picture) to another.
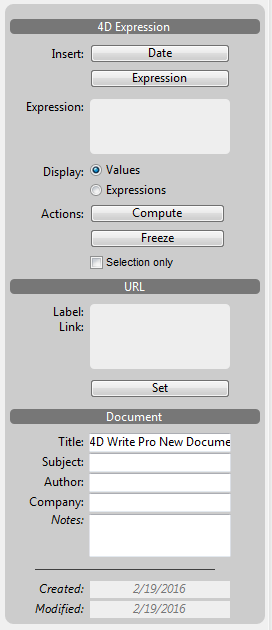
This panel inserts and manages 4D expressions and URLs in the 4D Write Pro area and includes an area for entering useful information about the document.
The following controls are available:
- Date: inserts the current date at the current location.
- Expression (button): opens the Formula Editor so that you can create or load an existing 4D expression which will be inserted at the current location.
- Expression (area): displays the reference of the selected 4D expression. You can insert special expressions related to document attributes or page attributes. For more information, see Inserting document and page expressions.
- Display Values/Expressions: toggles between displaying 4D expressions as references or their current values.
- Compute: updates the values of the 4D expressions in the document.
- Freeze: transforms current 4D expressions into plain text (cannot be undone).
- Selection only: check to limit the action of the Compute and Freeze buttons to the text selected in the 4D Write Pro area. When this box is not checked, these actions will apply throughout the document.
- Label/Link: displays the link address and the label for the URL selected.
- Set: displays a dialog box so that you can enter or modify a URL (both the link address and its label).
Document
Information entered in this section is stored with the document but not displayed elsewhere. By default, the "Title" is "4D Write Pro New Document". The "Created" and "Modified" areas in the Document section cannot be modified.
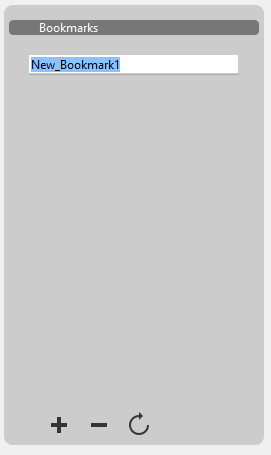
This panel manages bookmarks for documents in the 4D Write Pro area. Bookmarks are dynamic references to specific ranges in this document; if the range associated with a bookmark is moved, extended or reduced, the bookmark continues to reference the same range within the document.
To create a bookmark, select the range of text you want to bookmark and then click on the button at the bottom of the panel: a "New_Bookmark1" label appears in the list. You can rename a bookmark at any time; clicking on a bookmark that is highlighted in the list switches its label to editing mode. Bookmark names must be comprised of standard alphanumeric characters.
You can also reset bookmark ranges without renaming them: just select the bookmark you want to redefine in the list, then highlight the new range of text you want to bookmark and click the  button. This new range automatically replaces the one that was previously associated with the selected bookmark.
The list displays bookmarks in the same order they appear in the document. You can delete a bookmark by selecting it in the list and clicking the button.
By default, the 4D Write Pro form object includes a 4D Write Pro Widget subform containing a full set of control panels. The default control panel is the "WP_Palette" detail form. However, you can also use these control panels individually by selecting the appropriate Detail Form in the Property List of the Form editor:
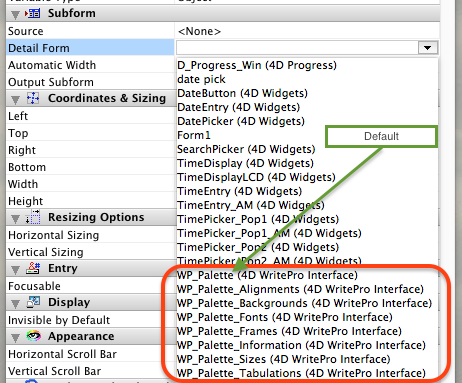
For instance, if you select "WP_Palette_Fonts" as the detail form, you will get something like this in your form:
The interface of the control panels can be changed to use different skins and fonts. You just need to modify the object method of the associated 4D Write Pro area.
Make sure that the 4D Write Pro area object variable contains the following mandatory attributes (they are automatically included in the default object method):
- selection: used by 4D Write Pro commands such as WP GET ATTRIBUTES and WP SET ATTRIBUTES
- areaName: used by ST commands.
In addition, an optional third attribute (named "skin") can be added to customize the appearance of the control panel. The value of this optional attribute is an object (named $WP_skin in the following example) which can contain the following (optional) attributes:
- skinName: values can be "black", "dark", "grey", "light", "white" or "night"
- backgroundColor: e.g. 0x00A0A0A0
- separatorColor: e.g. 0x00D04060
- fontColor: e.g. 0x002080C0
- separatorFontColor: e.g. 0x00803000
- font: font family, e.g. "Times"
- fontSize: e.g. 12
- scrollbar*: True or False
*The scrollbar can only be used and enabled when the 4D Write Pro form object can be resized vertically (Vertical Sizing property set to Grow)
For more information about 4D Write Pro attributes, refer to 4D Write Pro Attributes.
Example of code for customizing the interface of the widget control panels:
 C_OBJECT($WP_skin)


 OB SET($WP_skin;"skinName";$skinName) // can be "black","dark", "grey", "light", "white", "night".

 OB SET($WP_skin;"backgroundColor";0x00A0A0A0) //sets background color for control panel

 OB SET($WP_skin;"separatorColor";0x00D04060) //sets background color of separator areas

 OB SET($WP_skin;"fontColor";0x002080C0) //sets font color for control panel text

 OB SET($WP_skin;"separatorFontColor";0x00803000) //sets font color for separator area text


 OB SET($WP_skin;"font";"Times") // sets font used

 OB SET($WP_skin;"fontSize";13) // sets size of font used


 OB SET($WP_skin;"scrollbar";True)


  // Then you just need to assign this custom skin to the 4D Write Pro object

 OB SET($WP_object;"skin";$WP_skin)
Product: 4D
Theme: Library objects
4D Design Reference ( 4D v16)
4D Design Reference ( 4D v16.1)
4D Design Reference ( 4D v16.3)


