
4D v16.3
Display formats
 Display formats
The display formats provided by 4D give you many choices for screen display and printing. Display formats can be applied to both fields and enterable or non-enterable areas (variables). The format you use to display the contents of a field does not affect the actual value stored by 4D.
The display format for a field can be different in each form. For example, you may want to show a value without dollar signs in an input form and display it with dollar signs in an output form. You set display formats in the “Display” theme of the Property List.
Combo-box can be used to display, select or enter a format a combo-box. The [...] button provides access to filter and format settings window (see Formats and Filters editor).
Different formats appear in the selection combo-box depending on the type of field or variable you select.
Note: You set the type of a variable using the Variable Type property in the “Objects” theme of the Property List.
The built-in formats for the type set are always displayed. Any display formats that were added using the Formats and Filters editor of the tool box appear at the start of the list, preceded by a vertical bar | (see Formats and Filters editor).
Note: In the Form editor, you can show the display format for objects instead of their labels by selecting the Show Format command in the Object menu.
Date formats control the way dates appear when displayed or printed. For data entry, you enter dates in the MM/DD/YYYY format, regardless of the display format you have chosen.
Note: Unlike Alpha and Number formats, display formats for dates must only be selected among the 4D built-in formats.
The table below shows choices available:
| Choice | Example |
| System date short | 3/25/99 |
| System date abbreviated (1) | Wed, Mar 25, 1999 |
| System date long | Wednesday, March 25, 1999 |
| Internal date short special | 03/25/99 but 04/25/2032 (2) |
| Internal date long | March 25, 1999 |
| Internal date abbreviated (1) | Mar 25, 1999 |
| Internal date short | 03/25/1999 |
| ISO Date Time(3) | 1999-03-25T00:00:00 |
(1) To avoid ambiguity and in accordance with current practice, the abbreviated date formats now display “jun” for June “jul” for July (instead of “jui” for both as previously). This particularity only applies to French versions of 4D.
(2) The year is displayed using two digits when it belongs to the interval (1930;2029) otherwise it will be displayed using four digits. This is by default but it can be modified using the SET DEFAULT CENTURY command.
(3) The ISO Date Time format corresponds to the XML date and time representation standard (ISO8601). It is mainly intended to be used when importing/exporting data in XML format and in Web Services.
Note: Regardless of the display format, if the year is entered with two digits then 4D assumes the century to be the 21st if the year belongs to the interval (00;29) and the 20th if it belongs to the interval (30;99). This is the default setting but it can be modified using the SET DEFAULT CENTURY command.
By default, a null date is usually displayed as “00/00/00.” The Blank if null option of the Property List (“Display” theme) displays an empty area if the date is null or contains the SQL NULL attribute.
Time formats control the way times appear when displayed or printed. For data entry, you enter times in the 24-hour HH:MM:SS format or the 12-hour HH:MM:SS AM/PM format, regardless of the display format you have chosen.
Note: Unlike Alpha and Number display formats, the Time display format must only be selected in the Format pop-up menu.
The table below shows the Time field display formats and gives examples:
| Format | Comments | Example for 04:30:25 |
| HH:MM:SS | 04:30:25 | |
| HH:MM | 04:30 | |
| Hour Min Sec | 4 hours 30 minutes 25 seconds | |
| Hour Min | 4 hours 30 minutes | |
| HH:MM AM/PM | 4:30 a.m. | |
| MM SS | Time expressed as a duration from 00:00:00 | 270:25 |
| Min Sec | Time expressed as a duration from 00:00:00 | 270 Minutes 25 Seconds |
| ISO Date Time | Corresponds to the XML standard for representing time-related data. It is mainly intended to be used when importing/exporting data in XML format | 0000-00-00T04:30:25 |
| System time short | Standard time format defined in the system | 04:30:25 |
| System time long abbreviated | Mac OS only: Abbreviated time format defined in the system. Under Windows, this format is the same as the System time short format | 4•30•25 AM |
| System time long | Mac OS only: Long time format defined in the system. Under Windows, this format is the same as the System time short format | 4:30:25 AM HNEC |
By default, a null time is displayed for example as “00:00:00” (the display depends on the format applied to the object). The Blank if null option of the Property List (“Display” theme) can be used to display an empty area if the time is null or contains the SQL NULL attribute.
Preliminary Note: Number fields include the Integer, Long integer, Integer 64 bits, Real and Float types.
Number formats control the way numbers appear when displayed or printed. For data entry, you enter only the numbers (including a decimal point or minus sign if necessary), regardless of the display format you have chosen.
4D provides various default number formats in the Property List ("Display" theme). You can choose the format from the pop-up menu or type it and/or modify it in the combo box of the Property List. You can also select a custom format name set in the Filters and formats editor of the tool box. In this case, the format cannot be modified in the object properties. You can access the editor by clicking on the [...] button to the right of the format combo box.
Custom format (and filter) names appear at the beginning of the list of numeric and alphanumeric formats, preceded by a vertical bar (|).
In each of the number display formats, the number sign (#), zero (0), caret (^), and asterisk (*) are used as placeholders. You create your own number formats by using one placeholder for each digit you expect to display.
For example, if you want to display three-digit numbers, you could use the format ###. If the user enters more digits than the format allows, 4D displays <<< in the field to indicate that more digits were entered than the number of digits specified in the display format.
If the user enters a negative number, the leftmost character is displayed as a minus sign (unless a negative display format has been specified). If ##0 is the format, minus 26 is displayed as –26 and minus 260 is displayed as <<< because the minus sign occupies a placeholder and there are only three placeholders.
Note: No matter what the display format, 4D accepts and stores the number entered in the field. No information is lost.
Each placeholder character has a different effect on the display of leading or trailing zeros. A leading zero is a zero that starts a number before the decimal point; a trailing zero is a zero that ends a number after the decimal point.
Suppose you use the format ##0 to display three digits. If the user enters nothing in the field, the field displays 0. If the user enters 26, the field displays 26.
The table below explains the effect of each placeholder on leading and trailing zeros:
| Placeholder | Effect for leading or trailing zero |
| # | Displays nothing |
| 0 | Displays 0 |
| ^ | Displays a space (1) |
| * | Displays an asterisk |
(1) The caret (^) generates a space character that occupies the same width as a digit in most fonts.
The numeric display formats (except for scientific notations) are automatically based on regional system parameters. 4D replaces the “.” and “,” characters by, respectively, the decimal separator and the thousand separator defined in the operating system. The period and comma are thus considered as placeholder characters, following the example of 0 or #.
Compatibility notes:
- In versions of 4D prior to v11, numeric display formats do not take the regional parameters of the system into account. In converted databases, a compatibility option lets you control this functioning (see the Compatibility page).
- Under Windows, starting with version 14, when using the decimal separator key of the numeric keypad, 4D makes a distinction depending on the type of field where the cursor is located:
- in a Real type field, using this key will insert the decimal separator defined in the system,
- in any other type of field, this key inserts the character associated with the key, usually a period (.) or comma (,).
You can use one decimal point in a number display format. If you want the decimal to display regardless of whether the user types it in, it must be placed between zeros.
You can use any other characters in the format. When used alone, or placed before or after placeholders, the characters always appear. For example, if you use the following format:
$##0
a dollar sign always appears because it is placed before the placeholders.
If characters are placed between placeholders, they appear only if digits are displayed on both sides. For example, if you define the format:
###.##0
a comma appears only if the user enters at least four digits.
Spaces are treated as characters in number display formats.
A number display format can have up to three parts allowing you to specify display formats for positive, negative, and zero values. You specify the three parts by separating them with semicolons as shown below:
Positive;Negative;Zero
You do not have to specify all three parts of the format. If you use just one part, 4D uses it for all numbers, placing a minus sign in front of negative numbers.
If you use two parts, 4D uses the first part for positive numbers and zero and the second part for negative numbers. If you use three parts, the first is for positive numbers, the second for negative numbers, and the third for zero.
Note: The third part (zero) is not interpreted and does not accept replacement characters. If you enter ###;###;# the zero value will be displayed “#”. In other words, what you actually enter is what will be displayed for the zero value.
Here is an example of a number display format that shows dollar signs and commas, places negative values in parentheses, and does not display zeros:
$###,##0.00;($###,##0.00);
Notice that the presence of the second semicolon instructs 4D to use nothing to display zero. The following format is similar except that the absence of the second semicolon instructs 4D to use the positive number format for zero:
$###,##0.00;($###,##0.00)
In this case, the display for zero would be $0.00.
If you want to display numbers in scientific notation, use the ampersand (&) followed by a number to specify the number of digits you want to display. For example, the format:
&3
would display 759.62 as:
7.60e+2
The scientific notation format is the only format that will automatically round the displayed number. Note in the example above that the number is rounded up to 7.60e+2 instead of truncating to 7.59e+2.
You can display a number in hexadecimal using the following display formats:
- &x: This format displays hexadecimal numbers using the “0xFFFF” format.
- &$: This format displays hexadecimal numbers using the “$FFFF” format.
The &xml format will make a number compliant with XML standard rules. In particular, the decimal separator character will be a period "." in all cases, regardless of the system settings.
You can display a number as a time (with a time format) by using “&/” followed by a digit. Time is determined by calculating the number of seconds since midnight that the value represents. The digit in the format corresponds to the order in which the time format appears in the Format drop-down menu.
For example, the format:
&/5
corresponds to the 5th time format in the pop-up menu, specifically the AM/PM time. A number field with this format would display 25000 as:
6:56 AM
The following table shows how different formats affect the display of numbers. The three columns — Positive, Negative, and Zero — each show how 1,234.50, –1,234.50, and 0 would be displayed.
| Format Entered | Positive | Negative | Zero |
| ### | <<< | <<< | |
| #### | 1234 | <<<< | |
| ####### | 1234 | -1234 | |
| #####.## | 1234.5 | -1234.5 | |
| ####0.00 | 1234.50 | -1234.50 | 0.00 |
| #####0 | 1234 | -1234 | 0 |
| +#####0;–#####0;0 | +1234 | -1234 | 0 |
| #####0DB;#####0CR;0 | 1234DB | 1234CR | 0 |
| #####0;(#####0) | 1234 | (1234) | 0 |
| ###,##0 | 1,234 | -1,234 | 0 |
| ##,##0.00 | 1,234.50 | -1,234.50 | 0.00 |
| ^^^^^^^ | 1234 | -1234 | |
| ^^^^^^0 | 1234 | -1234 | 0 |
| ^^^,^^0 | 1,234 | -1,234 | 0 |
| ^^,^^0.00 | 1,234.50 | -1,234.50 | 0.00 |
| ******* | ***1234 | **-1234 | ******* |
| ******0 | ***1234 | **-1234 | ******0 |
| ***,**0 | **1,234 | *-1,234 | ******0 |
| **,**0.00 | *1,234.50 | -1,234.50 | *****0.00 |
| $*,**0.00;–$*,**0.00 | $1,234.50 | -$1,234.50 | $****0.00 |
| $^^^^0 | $ 1234 | $–1234 | $ 0 |
| $^^^0;–$^^^0 | $1234 | –$1234 | $ 0 |
| $^^^0 ;($^^^0) | $1234 | ($1234) | $ 0 |
| $^,^^0.00 ;($^,^^0.00) | $1,234.50 | ($1,234.50) | $ 0.00 |
| &2 | 1.2e+3 | -1.2e+3 | 0.0e+0 |
| &5 | 1.23450e+3 | -1.23450e+3 | 0.00000 |
| &xml | 1234.5 | -1234.5 | 0 |
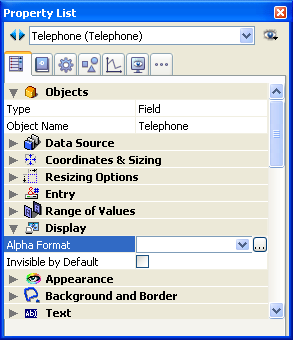
Alpha formats control the way the alphanumeric fields and variables appear when displayed or printed. Here is a list of formats provided for alphanumeric fields:
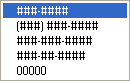
By default, alphanumeric formats are available in the Property List ("Display" theme). You can choose a format from this list or type it and/or modify it in the combo box. The Format pop-up menu contains formats for some of the most common alpha fields that require formats: US telephone numbers (local and long distance), Social Security numbers, and zip codes. You can also select a custom format name set in the Filters and formats editor of the tool box. In this case, the format cannot be modified in the object properties. You can access the editor by clicking on the [...] button to the right of the formats combo box.
Any custom formats or filters that you have created are automatically added to the beginning of the alpha and number format lists, preceded by a vertical bar (|).
The number sign (#) is the placeholder for an alphanumeric display format. You can include the appropriate dashes, hyphens, spaces, and any other punctuation marks that you want to display. You use the actual punctuation marks you want and the number sign for each character you want to display.
For example, consider a part number with a format such as:
RB-1762-1
The alpha format would be:
##-####-#
When the user enters “RB17621,” the field displays:
RB-1762-1
The field actually contains “RB17621.”
If the user enters more characters than the format allows, 4D displays the last characters. For example, if the format is:
(#######)
and the user enters “proportion,” the field displays:
(portion)
The field actually contains “proportion.” 4D accepts and stores the entire entry no matter what the display format. No information is lost.
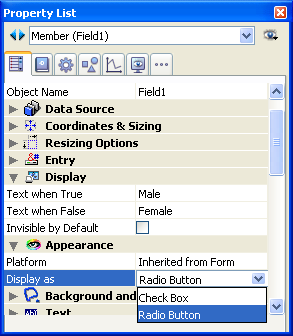
Boolean fields can contain one of two values: TRUE or FALSE. A Boolean field can be displayed as either a pair of radio buttons or as a check box.
You can specify the form and label(s) of a Boolean field in the field properties. If you want to display only the buttons or check boxes and not the field name, you can delete the field label in the form.
You set the appearance of Boolean fields using the “Display as” drop-down list in the “Appearance” theme. Once you have selected Radio Button from that list, you can enter the labels for each value in the Text when True and Text when False entry areas under the “Display” theme .
The buttons are displayed in the Form editor side by side as shown below.

If you use labels with different first letters, you can select the radio button by typing the first letter during data entry. For example, you can press “M” to select Male or “F” to select Female when the field is selected.
The following rules apply when the field is being used for data storage: if the first button is selected, the field is true; if the second button is selected, the field is false. The field is false by default.
Choose Check box from the “Display as” list located in the “Appearance” theme. Once you have selected that option, an entry area labeled “Title” is displayed in the “Objects” theme. This is the entry area in which you enter the label of the check box. The default label is the field’s name.
The following rules apply when the field is being used for data storage: if the check box is selected, the field is True; if the check box is deselected, the field is False. The field is False by default.
During execution, this field is displayed as a check box:

You can format a Boolean field as a check box with no label by entering a space in the Title area and setting a transparent border line style. In this case, you add the label for the check box as a separate object. You can then place the label wherever you want, draw a rectangle and insert dynamic references in the label (refer to #title id="669"/]). In the following example, the Boolean field is on top of the text object.

Picture formats control how pictures appear when displayed or printed. For data entry, the user always enters pictures by pasting them from the Clipboard or by drag and drop, regardless of the display format. Picture formats available in the Picture Format list of the Property List (“Display” theme).
The truncation and scaling options do not affect the picture itself. The contents of a Picture field are always saved. Only the display on the particular form is affected by the picture display format.
The Scaled to fit format causes 4D to resize the picture to fit the dimensions of the field area.

The Truncated (centered) format causes 4D to center the picture in the field and crop any portion that does not fit within the field area. 4D crops equally from each edge and from the top and bottom.
The Truncated (non-centered) format causes 4D to place the upper-left corner of the picture in the upper-left corner of the field and crop any portion that does not fit within the field area. 4D crops from the right and bottom.
Note: When the picture format is Truncated (non-centered), it is possible to add scroll bars to the field or variable area. For more information, refer to Scroll bars.


Truncated (centered) Truncated (non-centered)
When you use Scaled to fit (proportional), the picture is reduced proportionally on all sides to fit the area created for the picture. The Scaled to fit centered (proportional) option does the same, but centers the picture in the picture area.
If the picture is smaller than the area set in the form, it will not be modified. If the picture is bigger than the area set in the form, it is proportionally reduced. Since it is proportionally reduced, the picture will not appear distorted.
If you have applied the Scaled to fit centered (proportional) format, the picture is also centered in the field area:


Scaled to fit (proportional) Scaled to fit centered (proportional)
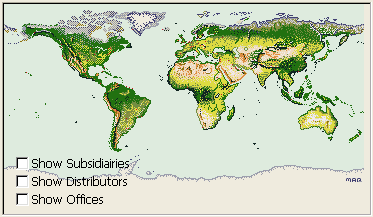
On Background makes the picture transparent. Any objects placed behind the graphic such as fields or variables are visible through the graphic.
Note: If you are printing pictures with the On Background format, they will be printed as bitmaps.
When a Picture field is in this format, the user can move the picture around the inside of the Picture field by dragging it. 4D remembers the object’s position on the background. The figure below shows a form that includes a picture with the On Background format.
When the area that contains a picture with the Replicated format is enlarged, the picture is not deformed but is replicated as many times as necessary in order to fill the area entirely.
 ->
-> 
If the field is reduced to a size smaller than that of the original picture, the picture is truncated (non-centered).

Product: 4D
Theme: Properties for active objects
ISO8601
4D Design Reference ( 4D v16)
4D Design Reference ( 4D v16.1)
4D Design Reference ( 4D v16.3)


