
4D v16.3
Designing an interface with menus
- 4D Design Reference
-
- Menus and menu bars
-
- Designing an interface with menus
- Menu editor
- Building menus
- Attaching menus
- Using references for menu titles
- Specifying the action of a menu
- Setting menu properties
- Managing menu bars
 Designing an interface with menus
You can create custom menus for your databases and custom applications. Because pull-down menus are a standard feature of any desktop application, their addition will make your databases easier to use and will make them feel more familiar to users. When you create custom menus, you can also create custom toolbars. With custom menus and toolbars, your databases will perform more like “stand-alone” applications.
A custom application must contain at least one menu bar with one menu. By default, when you create a new database, 4D creates a custom menu bar so that you can access the Application environment. For detailed information about creating custom applications, refer to Building a 4D Application in the 4D Language Reference manual.
In general, menus provide menu commands that the user chooses to perform database tasks: modifying records, searching for records, printing reports, and so on. The figure below shows an example of custom menus:
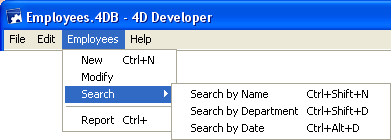
A menu bar is a group of menus that can be displayed on a screen together. Each menu on a menu bar can have numerous menu commands in it, including some that call cascading submenus (known as hierarchical submenus). When the user chooses a menu or submenu command, it calls a project method or a standard action that performs an operation.
You can have many separate menu bars for each database. For example, you can use one menu bar that contains menus for standard database operations and another that becomes active only for reporting. One menu bar may contain a menu with menu commands for entering records. The menu bar appearing with the input form may contain the same menu, but the menu commands are disabled because the user doesn’t need them during data entry.
You can also use the Menu Bar editor to create custom toolbars. To do so, you associate an icon with a menu command. The icon appears in the 4D toolbar and the text of the menu command is used as the icon’s Help Tip.
You can use the same menu in several menu bars or other menus, or you can leave it unattached and manage it only by programming (in this case, it is known as an independent menu).
When you design menus, keep the following two rules in mind:
- Use menus for functions that are suited to menus: Menu commands should perform tasks such as adding a record, searching for records, or printing a report.
- Group menu commands by function: For example, all menu commands that print reports should be in the same menu. For another example, you might have all the operations for a certain table in one menu.
To create menus and menu bars, you can use either:
- the Menu editor,
- language commands,
- a combination of both.
The 4D language can be used to create and manage menu bars and menus entirely by programming, without using the Menu editor. For more information about managing menus using programming, refer to the Menus chapter in the 4D Language Reference manual.

Product: 4D
Theme: Menus and menu bars
4D Design Reference ( 4D v16)
4D Design Reference ( 4D v16.1)
4D Design Reference ( 4D v16.3)


