
4D v16.3
Creating a form using the Form Wizard
- 4D Design Reference
-
- Managing forms
-
- Overview
- Creating a form using the Form Wizard
- Creating a blank form
- Editing a form
- Renaming a form
- Designating input and output forms
- Deleting a form
- Printing a form
- Saving forms
 Creating a form using the Form Wizard
You can create new forms quickly with the Form Wizard. You can use a new form immediately after creating it or choose to edit the form using the Form editor.
The Form Wizard has two screens. The Basic screen lets you create new forms with a few simple operations. The Advanced screen lets you customize the form before you build it.
To create a new form using the Form Wizard:
- Choose New > Form... in the File menu or using the New button of the toolbar.
OR
On the Forms Page of the Explorer, click on the options menu and choose New Form using Form Wizard.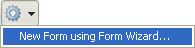
4D displays the Basic screen of the Form Wizard.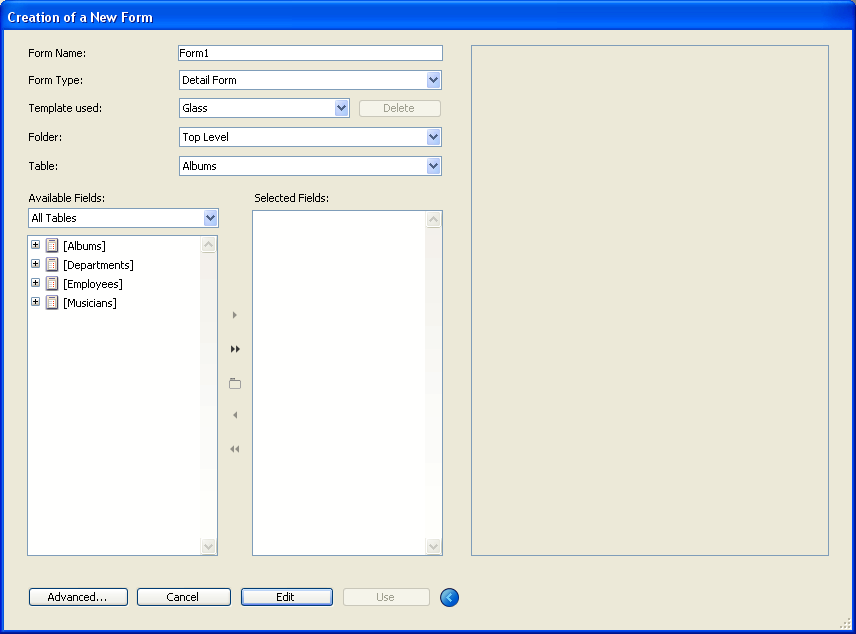
- To create a table form, choose the table for the form from the “Table” menu.
Its fields are then listed in alphabetical order in the Available Fields area when the Master Table option is selected in the drop-down list.
OR
To create a project form, choose None (Project Form) from the “Table” menu.
The list of fields from all the tables will then be displayed in the Available Fields area. The List Form and List Form for Printing types are removed from the list of available form types. - Name the form by filling in a name in the Form Name area.
You can refer to the form by name using the language. Make sure you use a name that complies with the rules specified for 4D (see Identifiers in the 4D Language Reference manual). - Choose a Form Type from the Form Type drop-down list.
Your choices are:- Detail Form: A form for data entry and modification,
- List Form (table forms only): A form for listing records on the screen,
- Detail Form for Printing: A printed report with one page per record, such as an invoice,
- List Form for Printing (table forms only): A printed report that list records.
- Choose a template for the form.
The template controls several aspects of the form appearance, including font attributes, field label placement, the design of decorative rectangles surrounding fields, and platform interface. 4D ships with several templates and you can use the Form Wizard to add custom templates to this list. For more information about adding custom templates, see “Creating a form template” at the end of this section. - (Optional) Select a storage folder for the form.
If you select a folder name from the drop-down list, the form will be placed in this folder. Folders can be used to organize the objects of your applications and are managed on the Home Page of the Explorer. By default, the form is created at the Top Level, i.e., not in any storage folder. - Select the fields you want on your form from the “Available Fields” area.
You can double-click on the fields, use drag and drop or use the buttons in the central panel: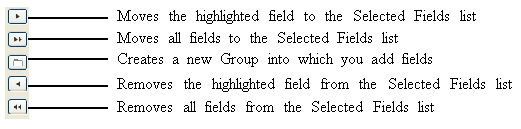
You can select any fields of any type, except BLOB fields. You can create forms that include fields from:- The master table (in the case of table forms),
- A related One table,
- Any table.
If you select fields from a table that is not the master table or an automatic related One table, you will need to use the language to manage data entry and display in the fields you select.
When you add fields or change the type or template of the form, your changes are shown in the preview area on the right-hand side of the wizard. After placing fields in the form, you can change their order using drag and drop in the Selected Fields area:
Note: If your screen is too small for you to create a form big enough to contain all the selected fields, the wizard creates a multi-page form and place all the buttons and static objects on page 0. When you edit this type of form, you will first need to display the page 0 in order to be able to edit these objects. - (Optional) If necessary, create one or more group boxes in the Selected Fields list.
Note: This function is not available for list forms.
A group box has its own label and a set of fields. It looks like this: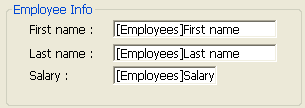
To make a group box, click on the group box button . An item is added in the Selected Fields list. Its default name is “Group.” You can rename it as necessary.
Note: The name of a group box is static text; you can use a “localizable” reference as with any 4D label (see Using references in static text and MissingRef).
You can add fields to the group box by simply dragging them over from the Available Fields list and dropping them onto the new item.
The Selected Fields list takes the form of a hierarchical list. As each field is added to the group box, it appears below the group box name.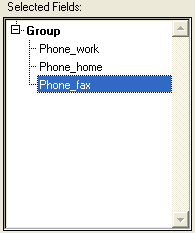
Note: When a group box item is expanded, you can add fields to it that are already in the Selected Fields list by drag and drop. - If you want to edit the new form in the Form editor, click Edit.
OR
If you want to test the form, click Use (table forms only).
OR
If you want to customize the new form with the Form Wizard’s advanced options, click Advanced...
To display the advanced options of the Form Wizard, click on the Advanced... button on the basic screen of the Wizard. If you want to go back to the first screen of the Form Wizard, you can do so by clicking the < Back button.
The Advanced screen also lets you create new forms with point-and-click operations but offers a wider variety of customization options.
The customization options depend on the form type that you select in the first screen of the Form Wizard. The Form Wizard supports the following form types:
- Detail Forms
- List Forms (table forms only)
- Detail Forms for Printing
- List Forms for Printing (table forms only)
In addition, the Form Wizard lets you save your customization options as a template. The template name is added to the Template drop-down list that appears on the Basic screen of the Form Wizard. With user-defined templates, you can create highly customized forms quickly from the Basic screen of the Form Wizard simply by selecting the desired fields and your custom template.
The Fields page is similar to the Basic screen of the Form Wizard. The Fields page is used to add fields to the form in exactly the same way as on the Basic screen of the Form Wizard. This functionality is duplicated for users who want to skip the Basic screen and go directly to the Advanced options screen. For a complete description of the process of adding fields to the form, see the previous section.
The Fields page offers an additional option: Enterable Related Fields. This option lets you choose whether or not to assign the “Enterable” property to the fields of related tables. By default, this option is checked (the fields are enterable). It may be useful to uncheck this option, for instance if you want to prevent users from being able to modify the values of related fields when the “Auto assign related value in subform” option is checked for a relation (for more about this, refer to Relation properties).
For more information about the “Enterable” property, refer to Enterable and Mandatory attributes and field properties.
The Options page sets various options concerning form size, placement of field labels and the display of the form.
This area lets you specify the form size. You can adjust the form size to its contents or set the form to a fixed size either by entering its maximum width and height, or by selecting a screen size. You can also combine the two settings.
The Screen Sizes drop-down list gives you the following choices:
- Automatic (the form size adapts to the current screen),
- 640x480 (Low resolution),
- 800x600 (SVGA),
- 1024x768 (Standard),
- 1280x1024 (High resolution),
- 1600x1200 (Large screen),
- 2048x1536 (QXGA).
The values correspond to the width x height ratio, expressed in pixels.
When you enter a screen size or choose a size from the drop-down list, the preview area changes to reflect your selection. The Form Wizard will try to adjust field and object placement on the form so that all the form objects will fit in the selected screen size. If the Create Multiple Pages if necessary option (see below) is selected and 4D cannot make all the fields fit on one page, it will generate multiple display pages to fit all the fields on the form. If the Form Wizard generates multiple pages, it places buttons, the form title, and decorative rectangles on the background page (page 0).
- Adjust Size to Fields: If you check this box, the Form Wizard will shrink the background items around the fields so that less blank space is left.
- For print forms (List form for Printing and Detail form for Printing):
- The “Form Size” area includes a Page Setup... button that displays the current print setup dialog box where you can choose the paper size for printing the report. 4D adjusts the size of the form and the preview area to the page format chosen here.
- In the "Display Options" area, you can select variables to insert into your reports in order to display the form title, page number and/or the date and time of printing.
- For the List form type: The “Form Size” area includes a Target Width option.
If you do not check this option, the output form width is calculated automatically with respect to that of the form fields. However, if you do check this option and set a width in pixels, the wizard will try to make all the fields "fit" into the set width by reducing the size of the fields. If you also check the Truncate if necessary option, the wizard then removes one or more fields so that the form width is less than the width specified. But if you do not check this second option, the form width may be slightly larger than the one specified by the Target width option.
The Label Location area on the Options page lets you set where a field label is placed in relation to the field. If you want labels, they can be placed either in front of or above the fields.
The Display Options area on the Options page lets you add several optional elements to the form and set additional options. Your choices are:
- Form Title: Adds the name of the table as the title of the form above the fields. This option is not available for project forms.
- One Field per Line: Check to arrange the fields vertically. If this option is not checked, the Form Wizard will try to arrange fields in rows.
- Create Multiple Pages if necessary: Check to have the Form Wizard create extra pages automatically if the fields do not fit on one page. If you use this option, the Form Wizard places the appropriate objects on the background page.
- Use Dynamic Field Names: When this option is selected, field and table names are inserted in the form as dynamic references. This ensures that the field and table labels will reflect any changes made to the field or table name. Table or field names can be modified in the Structure editor or using the SET FIELD TITLES or SET TABLE TITLES commands. For more information, see Using references in static text.
- Associated Menu Bar: Check this option and select the name of the menu bar that you want to associate with the form. For more information, please refer to Assigning a menu bar to a form.
- Record number/Record Count: Adds a 4D variable (named vRecNum by default) to the form that display the current record number and the total number of records. This option is not available for project forms.
The Buttons page lets you customize the buttons used in the form.
Note: This page is not available for "List form for Printing" and "Detail form for Printing" type forms.
List and Detail forms (non-printing) use buttons to let the user save and cancel changes to a record, or move from one page to another in a multi-page form.
In addition, table forms can include buttons that let you move from one record to another (first record, last record, next record, previous record), add or delete records in a subform, or delete the current record.
On the Buttons page, you can choose a button design, choose the desired button actions, specify the position of the buttons on the form, and label each button.
Note: In the Form editor, you can add, delete, or reposition other buttons or other controls and attach methods to them that specify their action when clicked.
The Button Family and Buttons Location areas let you choose the style and location of the buttons.
Choose a family from the Button Family drop-down list and click the [<] or [>] buttons to preview each button.
4D provides a set of built-in button actions. When you assign a built-in button action to a button, you don’t need to write a method to specify what happens when a user clicks the button.
The number of built-in actions will depend on the form category (table or project). For example, actions for moving between records in a table cannot be used with project forms.
For detail forms, the following built-in button actions are available via the Form Wizard:
- OK: Saves a new record or saves changes to an existing record.
- Cancel: Discards the new record or discards changes to an existing record.
- Next Page, Previous Page, First Page, Last Page: Displays the requested page in a multi-page form.
The following actions are only available for table forms:
- Next Record, Previous Record, First Record, Last Record: Saves the current record and displays the requested record.
- Delete Record: Deletes the current record from the database (a confirmation dialog box appears).
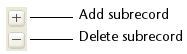
Note: When you insert a subform, 4D can automatically insert two additional subform buttons if you click the Addition and Deletion Buttons check box in the Options area of the Subform page. The subform buttons are: Add (adds a new record to a Many table or a subtable), and Delete (deletes the currently selected record in the subform).
4D provides other predefined actions to buttons. These actions are available when you create a form using the Form Wizard or when you modify a form using the Form editor. For more information, refer to Standard actions.
The default buttons are listed in the Actions area of the page:
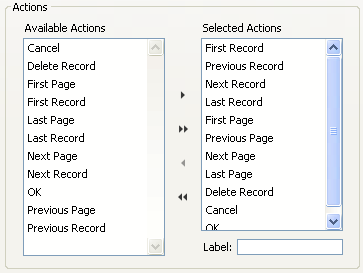
You can select and deselect automatic buttons in the same way that you can add or delete fields from the form on the Fields page. The buttons that you add to the Selected Actions area appear on the form.
Note: Even when they are selected in the “Selected Actions” area, the page management buttons (Previous Page, Next Page, etc.) will only be included in the form if it is necessary to create a multi-page form.
If you want to modify the default label of a button (the template chosen must include labels), highlight the button in the Selected Actions list and enter a new label in the Label area. After entering the label, press Tab or click another button in the Selected Actions list. The label you entered is then displayed in the preview area.
Notes:
- Button labels can be entered as references for the purpose of translating the database (see MissingRef).
- In the forms generated, the Variable name property is left blank for navigation buttons (see Dynamic variables).
- Button tips are independent of button labels. If you want to assign a tip to a button, you can do so using the Property List in the Form editor (refer to Help messages).
The Subform page lets you add a subform to the form. This subform must come from a related Many table if you want to be able to benefit from the automatic update mechanisms concerning subforms
When you want to use fields from a related Many table, add a subform to the form. The subform lists several records at once. Using a subform allows you to view the related records or those from another table. You can also enter information into records that are displayed in the subform.
You can display fields from a related Many table, or an unrelated table in a subform. If you include fields from a related Many table, the relation determines which records are displayed. If you include fields from an unrelated table or from a table with a manual relation, by default the current selection of records from that table is displayed. You can also control the selection of records using a method.
The Subform page of the Advanced screen lets you use a form as a subform, specify subform options, and add buttons to allow users to work with the subform.
To add a subform to the form, check the Include a Subform option. Select the table for the subform from the “Table” drop-down list and then select the subform to be used from the “List Form” drop-down list. You can also use the “Detail Form” drop-down list to set the form page to be displayed when the user clicks on the subform. This subform then appears in the preview area as part of the current form.
You can set the following options for the subform:
- Multiple Selection: The user can select several subrecords simultaneously using the Shift and Ctrl (Windows) or Command (Mac OS) keys.
- Enterable in List: The user can modify subrecord values directly in the subform.
- Addition and Deletion Buttons: The Wizard automatically inserts two buttons in the form (corresponding to the button family specified for the form), which are associated with the Add Subrecord and Delete Subrecord standard actions:
For more information about these options, refer to List subforms.
When you have finished specifying all the properties of the new form, click OK on any page to create the new form. When you click OK, the following dialog box appears:
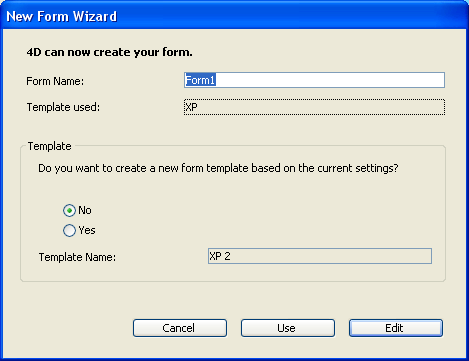
To create the new form, click either Use to switch to test the form (table forms only), or Edit to open the new form in the Form editor.
The form validation dialog box gives you the option of creating a new form template using the current Advanced settings by default (buttons, options, etc.). If you create a form template, its name will be added to the template drop-down list in the Form Wizard. The form template is saved separately from the form itself.
To create a form template, click on the Yes button and enter its name in the Template Name area.

Product: 4D
Theme: Managing forms
4D Design Reference ( 4D v16)
4D Design Reference ( 4D v16.1)
4D Design Reference ( 4D v16.3)


