
4D v16.3
Repair page
 Repair page
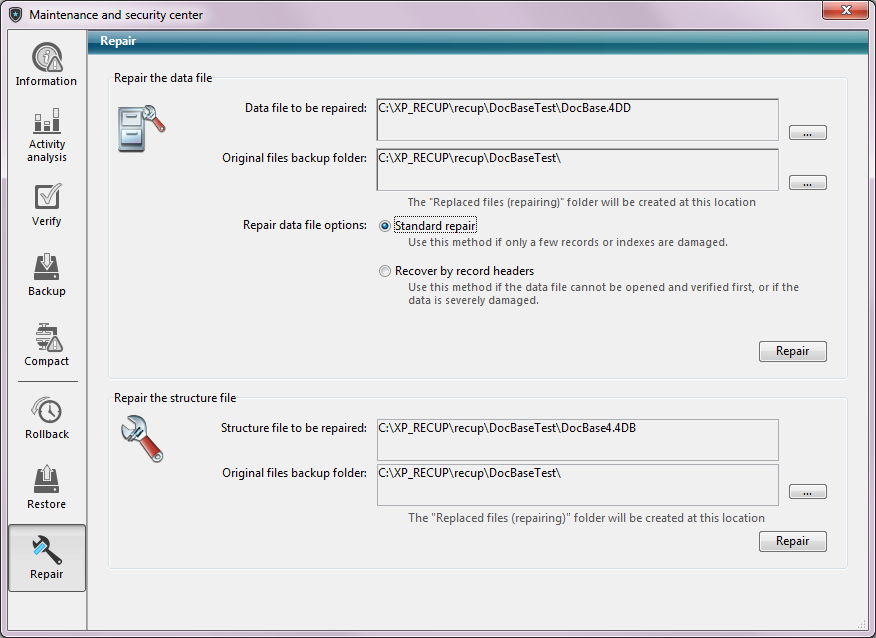
This page is used to repair the data or structure file when it has been damaged. Generally, you will only use these functions at the request of 4D, when anomalies were detected when opening the database or following a verification (see Verify page).
Warning: Each repair operation involves the duplication of the original file which increases the size of the application folder. It is important to take this into account (especially under OS X where 4D applications appear as packages) so that the size of the application does not increase excessively. Manually removing the copies of the original file inside the package can be useful in order to keep the package size down.
Note: Repairing is only available in maintenance mode. If you attempt to carry out this operation in standard mode, a warning dialog box will inform you that the database will be closed then restarted in maintenance mode.
The “Repair the data file” area displays the pathname of the current data file as well as a [...] button that can be used to specify another data file. When you click on this button, a standard Open document dialog box is displayed so that you can designate the data file to be repaired. If you perform a standard repair (see below), you must select a data file that is compatible with the open structure file. If you perform a repair using recovery by record headers, you can select any data file.
Once this dialog box has been validated, the pathname of the file to be repaired is indicated in the window.
By default, the original data file will be duplicated before the repairing operation. It will be placed in a subfolder named “Replaced files (repairing)” in the database folder. The second [...] button can be used to specify another location for the original files to be saved before repairing begins. This option can be used more particularly when repairing voluminous files while using different disks.
You have two repair options: Standard repair and Recovery by record headers. Both these options are described below.
Once you have configured the items to be recovered, you click on the Repair or Scan and repair... button (depending on the option chosen) to start the repair. If you have chosen recovery by record headers, an intermediate dialog box lets you choose the items to be recovered (see Recover by record headers below).
4D creates a new blank data file at the location of the original file. The original file is moved into the folder named "\Replaced Files (Repairing) date time" whose location is set in the "Original files backup folder" area (database folder by default). The blank file is filled with the recovered data.
When the repair procedure is finished, the "Repair" page of the MSC is displayed. A message indicates whether the repair was successful. If so, you can open the database immediately. 
The Open log file button displays a page in your browser describing the results of the operation performed. This page lists all the checks or repairs performed and indicates any errors that occurred ([OK] is displayed when the verification was correct). The file is generated in the Logs folder of the database. It is created in XML format and is named "<DatabaseName>_Repair_Log_<yyyy-mm-dd hh-mm-ss>.xml" where:
- <DatabaseName> is the name of the structure file without any extension, for example "Invoices",
- <yyyy-mm-dd hh-mm-ss> is the timestamp of the file, based upon the local system time when the maintenance operation was started, for example "2016-01-22 15-20-45".
This file allows you to view all the operations carried out. When you click on the Open log file button, 4D displays the most recent log file in the default browser of the machine (see Open log file).
Standard repair should be chosen when only a few records or indexes are damaged (address tables are intact). The data is compacted and repaired. This type of repair can only be performed when the data and structure file match.
Use this low-level repair option only when the data file is severely damaged and after all other solutions (restoring from a backup, standard repair) have proven to be ineffective.
4D records are variable in size. Hence it is necessary to keep the location where they are stored on your disk in a specific table, named address table, in order to find them again. The program therefore accesses the address of the record via an index and the address table. If only records or indexes are damaged, the standard repair option is usually sufficient to resolve the problem. However, when the address table itself is affected, it requires a more sophisticated recovery since it will be necessary to reconstitute it. To do this, the MSC uses the marker located in the header of each record. The markers are compared to a summary of the record, including the bulk of their information, and from which it is possible to reconstruct the address table.
Notes :
- If you have deselected the Records definitively deleted option in the properties of a table in the database structure, performing a recovery by header markers may cause records that were previously deleted to reappear.
- Recovery by headers does not take integrity constraints into account. More specifically, after this operation you may get duplicated values with unique fields or NULL values with fields declared Never Null.
When you click on Scan and repair..., 4D performs a complete scan of the data file. When the scan is complete, the results appear in the following window:
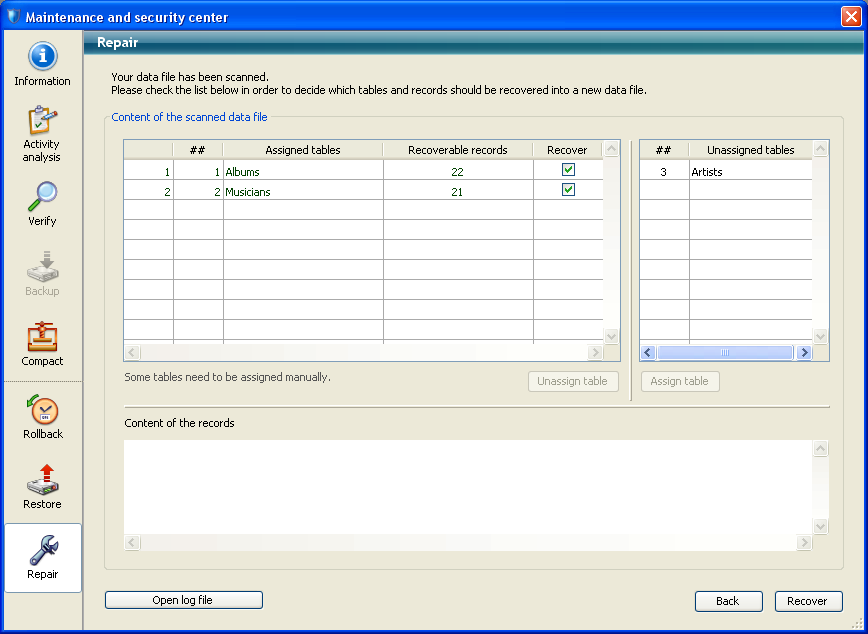
Note: If all the records and all the tables have been assigned, only the main area is displayed.
The "Content of the scanned data file" area includes two tables summarizing the information from the scan of the data file.
- The first table lists the information from the data file scan. Each row shows a group of recoverable records in the data file:
- The first column indicates the recovery order for the group of records.
- The ## column indicates the number of the table assigned to the group, if there is one.
- The Assigned tables column indicates the names of tables that were automatically assigned to the groups of identified records. The names of tables assigned automatically appear in green.
- The Recoverable records column indicates the number of recoverable records in the group.
- The Recover column lets you indicate for each group whether you want to recover the records. By default, this option is checked for every group.
- The second table lists the tables that were not assigned, i.e. tables that could not be associated with any records.
Manual assigning
If several groups of records could not be assigned to tables due to a damaged address table, you can assign them manually.
To do this, first select an unassigned group of records in the first table. The "Content of the records" area then displays a preview of the contents of the first records of the group to make it easier to assign them: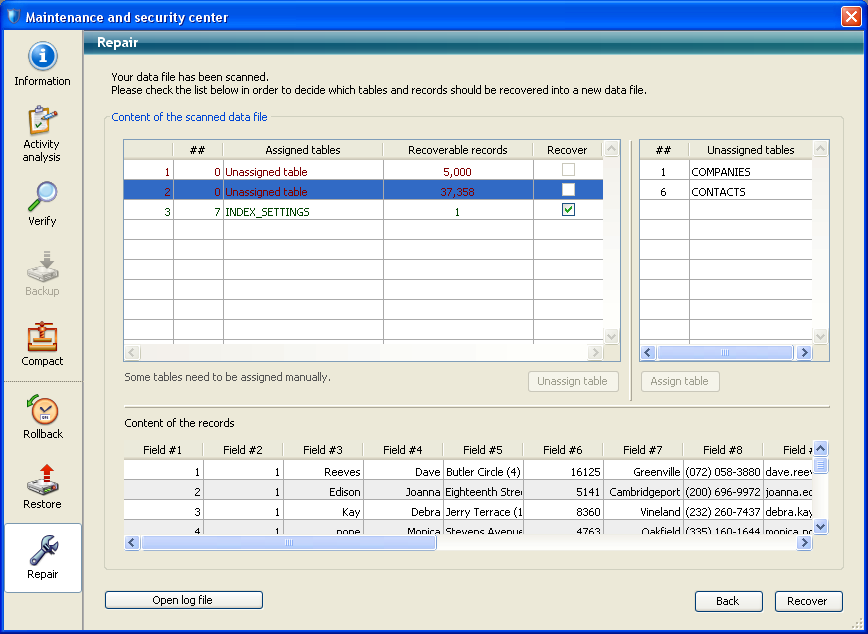
Next select the table you want to assign to the group in the "Unassigned tables" table and click on the Assign table button. You can also assign a table by drag and drop.
The group of records is then associated with the table and it will be recovered in this table. The names of tables that are assigned manually appear in black.
Use the Unassign table button to remove the association made manually between the table and the group of records.
The “Repair the structure file” area displays the pathname of the database structure file as well as a [...] button that can be used to specify another location for the original files to be saved before repairing them.
When you click on one of the Repair buttons, if necessary the database is closed then reopened in maintenance mode before the operation begins.
After the repair operation is completed, 4D generates a log file in the Logs folder of the database. It is created in XML format and named "<DatabaseName>_Repair_Log_<yyyy-mm-dd hh-mm-ss>.xml" où :
- <DatabaseName> is the name of the structure file without any extension, for example "Invoices",
- <yyyy-mm-dd hh-mm-ss> is the timestamp of the file, based upon the local system time when the maintenance operation was started, for example "2016-01-22 15-20-45".
This file allows you to view all the operations carried out. When you click on the Open log file button, 4D displays the most recent log file in the default browser of the machine (see Open log file).

Product: 4D
Theme: Maintenance and security center
Repair_Log
4D Design Reference ( 4D v16)
4D Design Reference ( 4D v16.1)
4D Design Reference ( 4D v16.3)


