
4D v16.3
Managing users and groups
 Managing users and groups
The editors for users and groups are located in the tool box of 4D. These editors can be used to create both users and groups, assign passwords to users, place users in groups, etc.
You use the users editor to create user accounts, set their properties and assign them to various groups, in addition to monitoring their use of the database.
To add a user:
- Select Tool Box > Users from the Design menu or click on the “Tool Box” button of the 4D tool bar.
4D displays the users editor.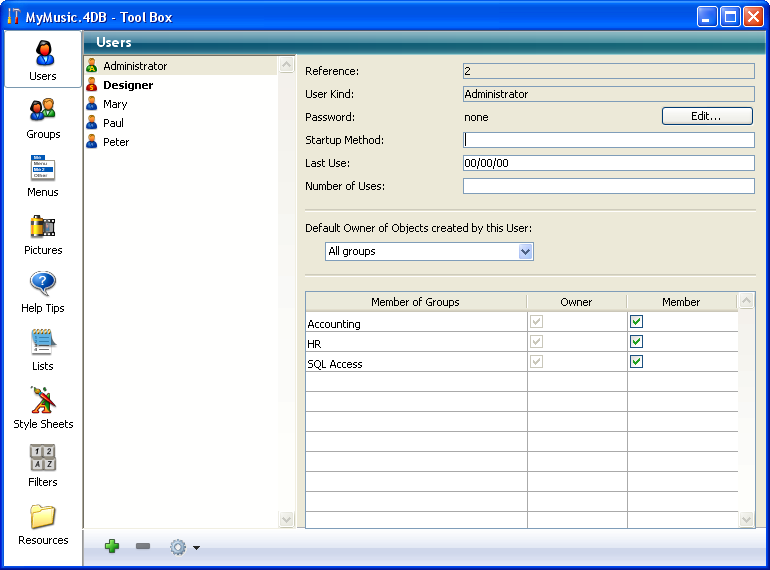
The list of users displays all the users “visible” by the current user, i.e.:- For the Designer: All users,
- For the Administrator: Users that they have created (green icons).
- Click on the add button
 located below the list of users.
OR
Right-click in the list of users and choose the Add or Duplicate command in the context menu.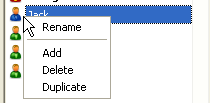
Note: The Duplicate command can be used to create several users having the same characteristics quickly.
4D adds a new user to the list, named New userX by default.
The properties area displays information about the user type:- The “Reference” field indicates the reference number of the selected user. This number is used by the language commands.
- The “User Kind” field indicates from where the user profile comes. The user types are as follows:
- Designer: Designer user
- Administrator: Administrator user
- Developer: User created by Designer
- User: User created by Administrator
- Enter the new user name.
This name will be used by the user to open the database. You can rename a user at any time using the Rename command of the context menu, or by using the Alt+click (Windows) or Option+click (Mac OS) shortcuts, or by clicking twice on the name you want to change. - Enter the password for the user by clicking the Edit... button in the user properties area.
The following dialog box appears: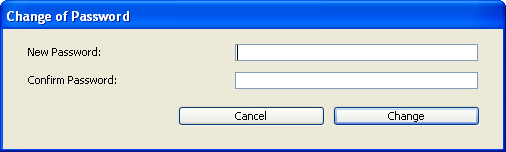
- Type the password in the New Password entry area and enter it again in the Confirm Password area.
You can use up to 15 alphanumeric characters for a password. The password editor is case sensitive — the user must enter the password exactly as it is entered here. For example, if you define a user’s password as “HolyCow,” the user must enter it with a capital H and capital C; otherwise 4D will not accept it.
When a password is entered, it is not visible in the dialog box. Asterisks are displayed instead of each character entered. - Validate the dialog box.
If the two password entries are different, 4D plays a Beep and cancels the password modification. - Choose a group from the “Default Owner of Objects created by this User” drop-down list.
This group owns any objects (forms, methods, and so on) that the user creates. For instance, you might specify that the Accounting group owns the objects created by each user in the Accounting group. If a user from another group attempts to modify a form created by a member of the Accounting group, a message appears stating that the user does not have adequate privileges to edit the form. - Enter the name of an associated method that will be executed when the user opens the database (optional).
This method can be used for example to load the user preferences. - Set the group(s) to which the user belongs using the “Member of Groups” table.
- You can add the selected user to a group by checking the corresponding option in the Member column. You can also remove the user from a group by unchecking this same option.
- The Owner column indicates whether the selected user is a group owner. This column cannot be modified.
To modify the characteristics of an existing user, simply select the user in the list then carry out the modifications. Refer to steps 3 to 9 above for more information about user parameters.
To delete a user, select it then click the deletion button  or use the Delete command of the context menu.
Deleted user names no longer appear in the Users editor. Note that the numbers for deleted users can be reassigned when new user accounts are created.
You can use the groups editor to set the elements that each group contains (users and/or other groups) and to distribute access to plug-ins. When you create a group, you can designate its owner from among the users.
Keep in mind that once a group has been created, it cannot be deleted. If you want to deactivate a group, you just need to remove any users it contains.
To create a group:
- Select Tool Box > User groups in the Design menu or click on the “Tool Box” button of the 4D tool bar then on the Groups button.
4D displays the groups editor window: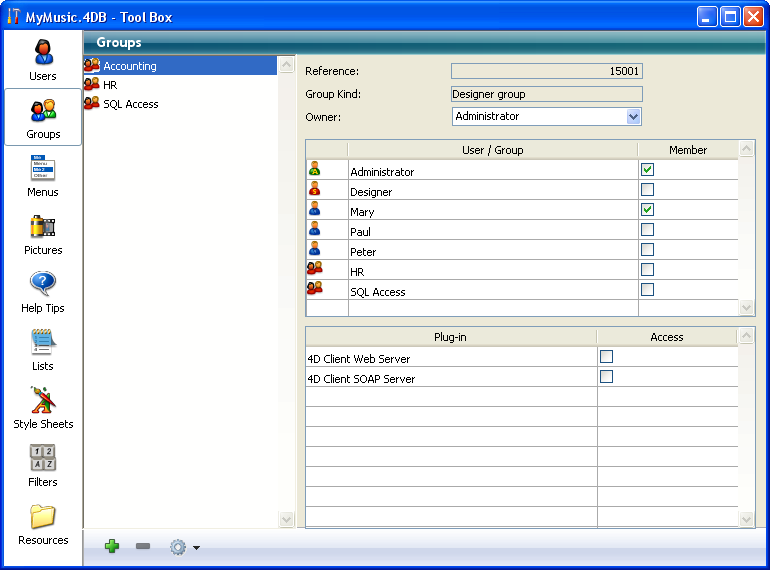
The list of groups displays all the groups of the database, regardless of which user created them. - Click on the add button located below the list of groups.
OR
Right-click in the list of groups and choose the Add or Duplicate command in the context menu.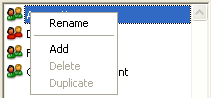
Note: The Duplicate command can be used to create several groups having the same characteristics quickly.
4D adds a new group to the list, named New groupX by default.
The properties area displays information about the group:- The “Reference” field indicates the reference number of the selected group. This number is used by the language commands.
- The “Group Kind” field indicates from where the group comes. The group types are as follows:
- Designer group: Group created by the Designer
- Administrator group: Group created by the Administrator
- Enter the name of the new group.
The group name can be up to 15 characters long.
You can rename a group at any time using the Rename command of the context menu, or by using the Alt+click (Windows) or Option+click (Mac OS) shortcuts, or by clicking twice on the name you want to change. You can only rename groups that you have created. The Designer cannot rename a group created by the Administrator and vice versa. - Select an owner from the “Owner” drop-down list (optional).
The group owner can add and remove users from the group (see next section). Keep in mind that by default, the Administrator is owner of all the groups, even those created by the Designer. - Set the members of the group by checking the corresponding options in the Member area.
- Distribute access to plug-ins (optional).
For these last two steps, refer to the following paragraphs.
You can designate an owner for each group using the "Owner" list. Usually, the owner is the Administrator, but you can designate any group member as the owner.
The group owner can be given the ability to add and remove users from any group he or she owns. The users to be added must already exist. Group owners cannot create users, or change user properties such as passwords. Group owners cannot add or remove other groups.
As with the Administrator, it may be necessary to grant access to the password editor explicitly for the group owner when access to the Design mode is restricted.For more information about this, refer to the "Acess for maintenance" section in Ensuring system maintenance.
You can place any user or group into a group, and you can also place the group itself into several other groups. It is not mandatory to place a user in a group.
The Designer can modify the contents of any group in the database. The Administrator and the users that are group owners can only modify the groups for which they are owners.
However, regardless of your user status, you can view, add or remove any user or group from your own groups.
To place a user or group in a group, you simply need to check the "Member" option for each user or group in the member attribution area:
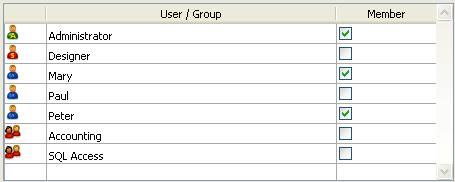
If you check the name of a user, this user is added to the group. If you check the name of a group, all the users of the group are added to the new group.
The affiliated user or group will then have the same access privileges as those assigned to the new group.
Placing groups into other groups lets you create a user hierarchy. The users of a group placed in another group will have the access privileges of both groups. For example, if you place the General Management group in the Accounting group, the users of the General Management group will benefit from the privileges of both groups; however, users which are only placed in the Accounting group will benefit from the privileges of that group only. For more explanations about the operation of an access system hierarchy, refer to the “An access hierarchy scheme” section in Access system overview.
To remove a user or group from another group, you just need to deselect the corresponding option in the member attribution area.
You can assign a group privileges to any plug-ins installed in the database. This includes all the 4D plug-ins and any third-party plug-ins. For more information about plug-ins, refer to Set user properties.
Distributing access to the plug-ins lets you control the use of the licenses you possess for these plug-ins. Any users that do not belong to the access group of a plug-in cannot load this plug-in.
You can also restrict the use of the 4D Client Web server and SOAP server via the plug-in access area.
The “Plug-in” area on the Groups page of the tool box lists all the plug-ins loaded by the 4D application. To give a group access to a plug-in, you simply need to check the corresponding option:

The 4D Client Web Server and 4D Client SOAP Server items lets you control the possibility of Web and SOAP (Web Services) publication for each 4D in remote mode. These licenses are considered as plug-in licenses by 4D Server. Therefore, in the same way as for plug-ins, you can restrict the right to use these licenses to a specific group of users.
4D allows the Administrator to save and load any groups that he or she has created or modified. When groups are saved, everything about the current users and groups are saved.
The ability to save groups means that the Administrator can save the access system of a database and transfer it to a modified version of the same database or to a new database. This is extremely useful for restoring the access system for a new version of the database. Because the groups can be reloaded, users of the database do not have to learn a new access system.
All the user names, passwords, startup method names, groups, group owners, and group memberships are preserved.
Note: The Designer cannot save or load groups via the Groups editor. However, the Designer can execute the USERS TO BLOB and BLOB TO USERS commands.
To save groups created or modified by the Administrator:
- Enter the database as the Administrator and display the Groups page of the tool box.
- Click on the options menu and choose the Save users and groups command.
4D displays a file creation dialog box so that you can name and save the group. Group and user files have the “.4UG” extension.
To load groups:
- Enter the database as the Administrator and display the Groups page of the tool box.
- Click on the options menu and choose the Load users and groups command.
4D displays a dialog box so that you can select the group file.

Product: 4D
Theme: Users and groups
4D Design Reference ( 4D v16)
4D Design Reference ( 4D v16.1)
4D Design Reference ( 4D v16.3)


