
4D v16.3
Access system overview
 Access system overview
If more than one person uses a database, you may want to control access to the database or provide different capabilities and interfaces to different users. If you are designing applications for use in a multi-user environment or the World-Wide Web, it may be essential that you provide security for sensitive data. You can provide this security by assigning passwords to users and creating access groups that have different levels of access to information in the database or to database operations.
For an overview of 4D's security features, see the 4D Security guide.
4D’s password access system is based on users and groups. You create users and assign passwords, put users in groups, and assign each group access rights to appropriate parts of the database. Groups can be assigned access privileges to operations on records in the table and to the table definition.
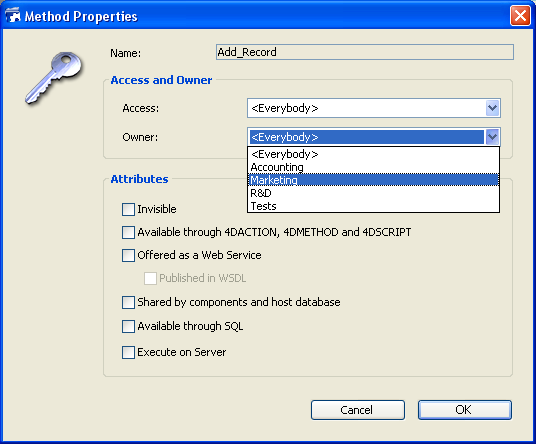
The following example shows “Owner” access rights for the Add_Record project method being assigned to a group. Groups can generally be assigned “Access” (use) and/or “Owner” (modification) access rights.
This point is described in Ensuring system maintenance.
To open the database, a user either selects or types his or her user name and then types his or her password. Then, depending on which groups the user belongs to and to which parts of the database the groups have been assigned, the user can operate the parts of the database that were specified by the access system.
You can configure access to the database using the "Security" page of the Database Settings dialog box (see the Security page).
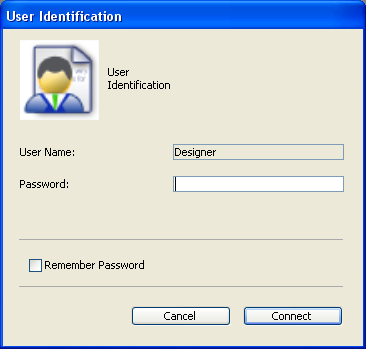
- By default, the following password entry dialog box is displayed:
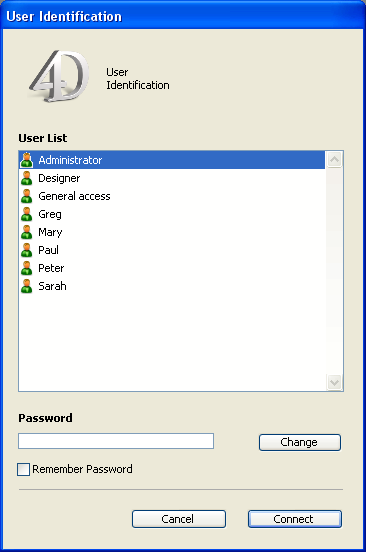
In this dialog box, the user selects his or her name from the list of users and types his or her password in the password entry area.
- If you deselect Display User List in Password Dialog Box in the Database Settings dialog box, the password entry dialog box shown below will be displayed:
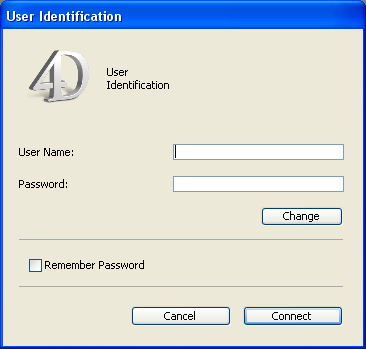
In this dialog box, the user must type both his or her name and password, which reinforces application security.
- If you have set a Default User in the Database Settings dialog dialog box and have assigned it a password, the following dialog box is displayed:
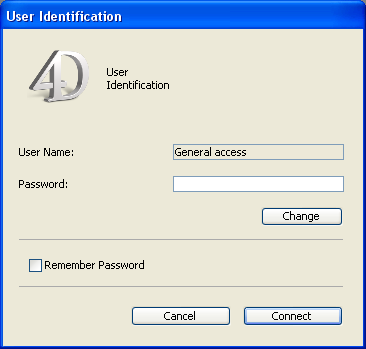
Users only have to enter the password. - If no password is assigned to the Default User, the dialog box is not displayed. Each user, in this case, has the same privileges and restrictions as set for the Default User.
If the The user can change their password option is checked in the Database Settings, the Change button is displayed in the password entry dialog box. This button lets the current user modify his or her own password.
4D Server Note: It is possible to save the parameters and the connection identifiers to a database in a .4DLink type access file. For more information, refer to Connecting to a 4D Server Database in the 4D Server Reference manual.
The user operates the database in a normal fashion. When the user attempts to use an object (form, menu command, method) that its group is not permitted to use, 4D displays an error message of the type “Your password does not allow you to use this object”.
Note: If an ON ERR CALL method is installed, the error message for methods is not displayed.
It is possible to customize the icon displayed in the database connection dialog box. By default, this icon depicts the 4D logo.
To replace this icon by one of your choice, you simply need to place a file named LoginImage.png in the Resources folder of the database (located next to the database structure file, see Description of 4D files). The custom file must be of the “png” type and its size must be 80x80 pixels.
 -->
--> 
When the user checks the Remember Password option, 4D saves the password when the dialog box is validated and reuses it automatically during subsequent connections. The password is encrypted and saved locally in the .4DLink file corresponding to the database.
Because of this, you cannot use the feature with all 4D applications. The following table shows when it is available:
| 4D local mode | 4D remote mode | |
| Unmerged database | Yes | Yes |
| Database merged with 4D Engine | No | Yes |
Once specified, the access control system can be used for several types of external access to the 4D database. You can therefore take advantage of the access hierarchy in these specific contexts.
The users and groups system of 4D can be used for:
- The integrated HTTP server of 4D. For more information about how 4D users and groups are taken into account during connections to the 4D Web server, refer to Connection Security in the Language Reference manual.
- The integrated SQL server of 4D. For more information about access groups for the integrated SQL server of 4D, refer to Configuration of 4D SQL Server in the 4D SQL Reference manual.
The best way to ensure the security of your database and provide users with different levels of access is to use an access hierarchy scheme. Users can be assigned to appropriate groups and groups can be nested to create a hierarchy of access rights. This section discusses several approaches to such a scheme.
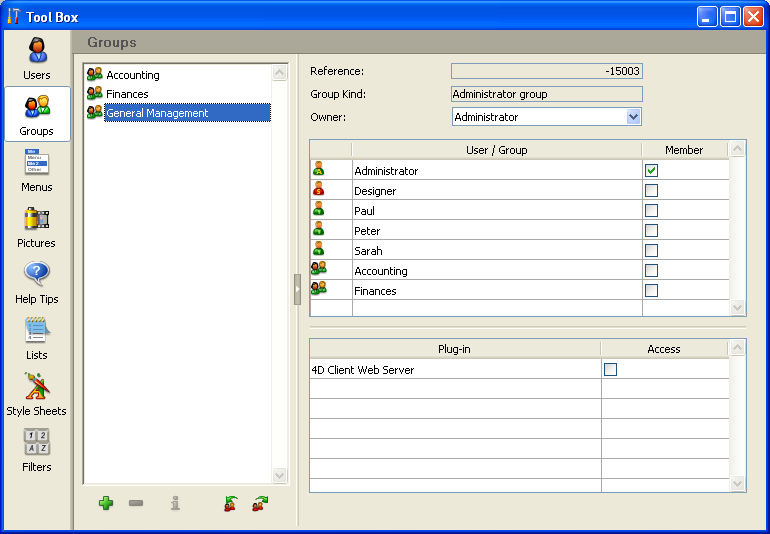
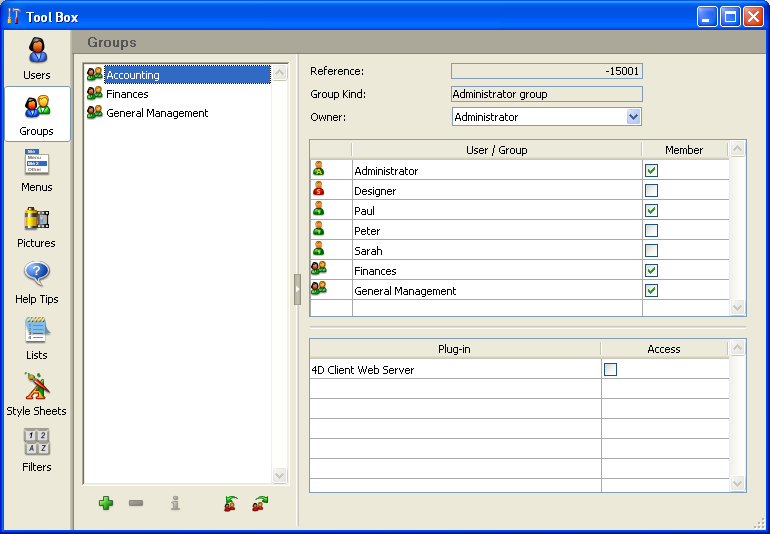
In this example, a user is assigned to one of three groups depending on their level of responsibility. Users assigned to the Accounting group are responsible for data entry. Users assigned to the Finances group are responsible for maintaining the data, including updating records and deleting outdated records. Users assigned to the General Management group are responsible for analyzing the data, including performing searches and printing analytical reports.
The groups are then nested so that privileges are correctly distributed to the users of each group.
- The General Management group contains only “high-level” users.
- The Finances group contains data maintenance users as well as General Management users, thus the users in General Management have the privileges of the Finances group as well.
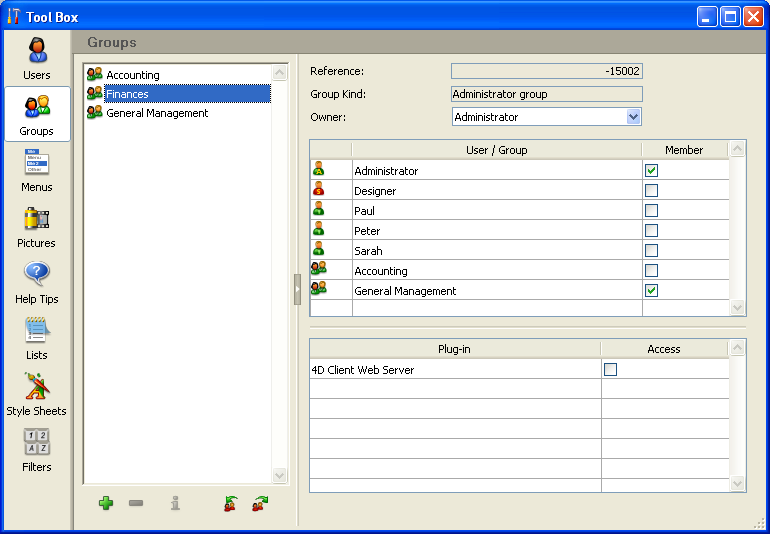
- The Accounting group contains data entry users as well as Finances group users, so the users who belong to the Finances group and the General Management group enjoy the privileges of the Accounting group as well.
You can decide which access privileges to assign to each group based on the level of responsibility of the users it includes.
If you assign the Accounting group to an input form, for example, it means that everyone can use this input form. If you assign the Finances group to the form, it is restricted to members of the Finances and General Management group. If you assign the General Management group, only members of this group can use the form.
Such a hierarchical system makes it easy to remember to which group a new user should be assigned. You only have to assign each user to one group and use the hierarchy of groups to determine access.
Your access scheme should restrict access at the lowest possible level, usually at the form level.

Product: 4D
Theme: Users and groups
4DLink
4D Design Reference ( 4D v16)
4D Design Reference ( 4D v16.1)
4D Design Reference ( 4D v16.3)


