
4D v16.3
Managing Hierarchical List Boxes
- 4D Language Reference
-
- List Box
-
- Managing List Box Objects
- Managing Hierarchical List Boxes
- Using object arrays in columns (4D View Pro)
- 4D View Pro
- LISTBOX COLLAPSE
- LISTBOX DELETE COLUMN
- LISTBOX DELETE ROWS
- LISTBOX DUPLICATE COLUMN
- LISTBOX EXPAND
- LISTBOX Get arrayUpd
- LISTBOX GET ARRAYS
- LISTBOX GET CELL COORDINATES
- LISTBOX GET CELL POSITION
- LISTBOX Get column formula
- LISTBOX Get column width
- LISTBOX Get footer calculation
- LISTBOX Get footers height
- LISTBOX GET GRID
- LISTBOX GET GRID COLORS
- LISTBOX Get headers height
- LISTBOX GET HIERARCHY
- LISTBOX Get information
- LISTBOX Get locked columns
- LISTBOX Get number of columns
- LISTBOX Get number of rows
- LISTBOX GET OBJECTS
- LISTBOX GET PRINT INFORMATION
- LISTBOX Get row color
- LISTBOX Get row font style
- LISTBOX Get row heightNew
- LISTBOX Get rows height
- LISTBOX Get static columns
- LISTBOX GET TABLE SOURCE
- LISTBOX INSERT COLUMN
- LISTBOX INSERT COLUMN FORMULA
- LISTBOX INSERT ROWS
- LISTBOX MOVE COLUMN
- LISTBOX MOVED COLUMN NUMBER
- LISTBOX MOVED ROW NUMBER
- LISTBOX SELECT BREAK
- LISTBOX SELECT ROW
- LISTBOX SET ARRAYUpd
- LISTBOX SET COLUMN FORMULA
- LISTBOX SET COLUMN WIDTH
- LISTBOX SET FOOTER CALCULATION
- LISTBOX SET FOOTERS HEIGHT
- LISTBOX SET GRID
- LISTBOX SET GRID COLOR
- LISTBOX SET HEADERS HEIGHT
- LISTBOX SET HIERARCHY
- LISTBOX SET LOCKED COLUMNS
- LISTBOX SET ROW COLOR
- LISTBOX SET ROW FONT STYLE
- LISTBOX SET ROW HEIGHTNew
- LISTBOX SET ROWS HEIGHT
- LISTBOX SET STATIC COLUMNS
- LISTBOX SET TABLE SOURCE
- LISTBOX SORT COLUMNS
 Managing Hierarchical List Boxes
4D lets you specify and use hierarchical list boxes. A hierarchical list box is a list box in which the contents of the first column appears in hierarchical form. This type of representation is adapted to the presentation of information including repeated values and/or values that are hierarchically dependent (country/region/city and so on).
Only list boxes of the array type can be hierarchical.
Hierarchical list boxes are a particular way of representing data but they do not modify the structure of these data (the arrays). Hierarchical list boxes are filled and managed exactly the same way as regular list boxes (see Managing List Box Objects).
To specify a hierarchical list box, there are three different possibilities:
- manually configure hierarchical elements using the Property list of the form editor or using the list box management pop-up menu. These points are covered in the Design Reference manual of 4D.
- use the LISTBOX SET HIERARCHY and LISTBOX GET HIERARCHY commands.
When a form containing a hierarchical list box is opened for the first time, by default all the rows are expanded.
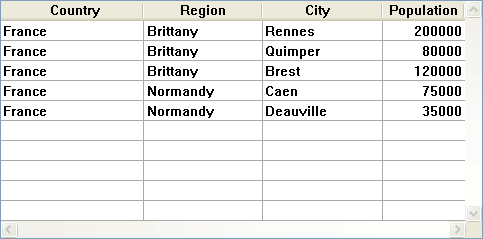
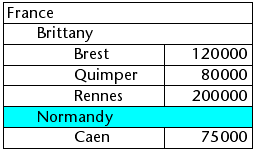
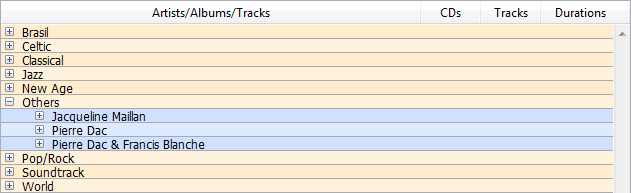
A break row and a hierarchical "node" are automatically added in the list box when values are repeated in the arrays. For example, imagine a list box containing four arrays specifying cities, each city being characterized by a country, a region, a name and a number of inhabitants:
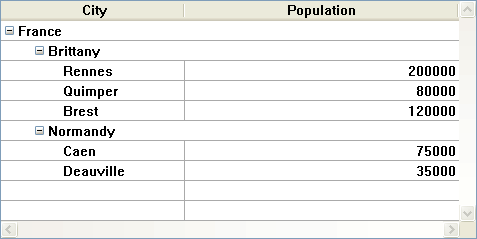
If this list box is displayed in hierarchical form (the first three arrays being included in the hierarchy), you will obtain:
The arrays are not sorted before the hierarchy is constructed. If, for example, an array contains the data AAABBAACC, the hierarchy obtained will be:
> A
> B
> A
> C
To expand or collapse a hierarchical "node", simply click on it. If you Alt+click (Windows) or Option+click (Mac OS) on the node, all its sub-elements will be expanded or collapsed. These operations can also be carried out by programming using the LISTBOX EXPAND and LISTBOX COLLAPSE commands.
A hierarchical list box displays a variable number of rows on screen according to the expanded/collapsed state of the hierarchical nodes. This does not however mean that the number of rows of the arrays vary. Only the display is modified, not the data.
It is important to understand this principle because programmed management of hierarchical list boxes is always based on the data of the arrays, not on the displayed data. In particular, the break rows added automatically are not taken into account in the display options arrays (see below).
Let’s look at the following arrays for example:
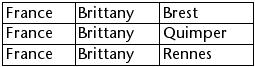
If these arrays are represented hierarchically, the row "Quimper" will not be displayed on the second row, but on the fourth, because of the two break rows that are added:
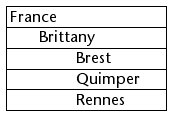
Regardless of how the data are displayed in the list box (hierarchically or not), if you want to change the row containing "Quimper" to bold, you must use the statement Style{2} = bold. Only the position of the row in the arrays is taken into account.
This principle is implemented for internal arrays that can be used to manage:
- colors
- background colors
- styles
- hidden rows
- selections
For example, if you want to select the row containing Rennes, you must pass:
->MyListbox{3}:=TrueNon-hierarchical representation: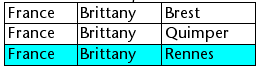
Hierarchical representation: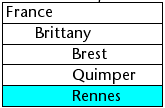
Note: If one or more rows are hidden because their parents are collapsed, they are no longer selected. Only the rows that are visible (either directly or by scrolling) can be selected. In other words, rows cannot be both hidden and selected.
As with selections, the LISTBOX GET CELL POSITION command will return the same values for a hierarchical list box and a non-hierarchical list box. This means that in both of the examples below, LISTBOX GET CELL POSITION will return the same position: (3;2).
Non-hierarchical representation: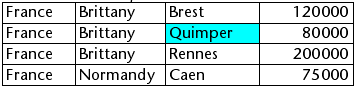
Hierarchical representation: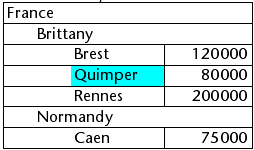
If the user selects a break row, LISTBOX GET CELL POSITION returns the first occurrence of the row in the corresponding array. In the following case:
... LISTBOX GET CELL POSITION returns (2;4). To select a break row by programming, you will need to use the LISTBOX SELECT BREAK command.
Break rows are not taken into account in the internal arrays used to manage the graphic appearance of list boxes (styles and colors). It is however possible to modify these characteristics for break rows via the graphic management commands for objects (Objects (Forms) theme). You simply need to execute the appropriate commands on the arrays that constitute the hierarchy.
Given for example the following list box (the names of the associated arrays are specified in parentheses):
Non-hierarchical representation: 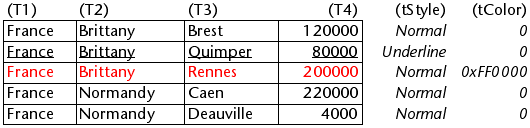
Hierarchical representation: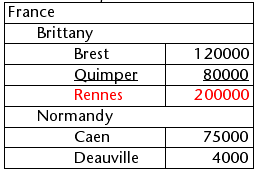
In hierarchical mode, break levels are not taken into account by the style modification arrays named tStyle and tColors. To modify the color or style of break levels, you must execute the following statements:
 OBJECT SET RGB COLORS(T1;0x0000FF;0xB0B0B0)

 OBJECT SET FONT STYLE(T2;Bold)
Note: In this context, only the syntax using the array variable can function with the object property commands because the arrays do not have any associated object.
Result:
When all the rows of a sub-hierarchy are hidden, the break line is automatically hidden. In the above example, if rows 1 to 3 are hidden, the "Brittany" break row will not appear.
You can optimize hierarchical list boxes display and management using the On Expand and On Collapse form events.
A hierarchical list box is built from the contents of its arrays so it can only be displayed when all these arrays are loaded into memory. This makes it difficult to build large hierarchical list boxes based on arrays generated from data (through the SELECTION TO ARRAY command), not only because of the display speed but also the memory used.
Using the On Expand and On Collapse form events can overcome these constraints: for example, you can now display only part of the hierarchy and load/unload the arrays on the fly, based on user actions.
In the context of these events, the LISTBOX GET CELL POSITION command returns the cell where the user clicked in order to expand or collapse a row.
In this case, you must fill and empty arrays through the code. The principles to be implemented are:
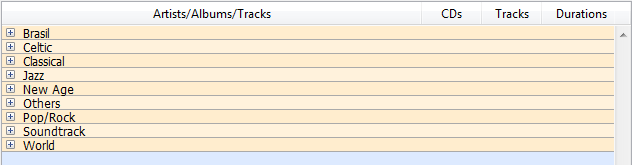
- When the list box is displayed, only the first array must be filled. However, you must create a second array with empty values so that the list box displays the expand/collapse buttons:
- When a user clicks on an expand button, you can process the On Expand event. The LISTBOX GET CELL POSITION command returns the cell concerned and lets you build the appropriate hierarchy: you fill the first array with the repeated values and the second with the values sent from the SELECTION TO ARRAY command and you insert as many rows as needed in the list box using the LISTBOX INSERT ROWS command.
- When a user clicks on a collapse button, you can process the On Collapse event. The LISTBOX GET CELL POSITION command returns the cell concerned: you remove as many rows as needed from the list box using the LISTBOX DELETE ROWS command.
LISTBOX GET HIERARCHY
LISTBOX SELECT BREAK
LISTBOX SET HIERARCHY
Managing List Box Objects

Product: 4D
Theme: List Box
4D Language Reference ( 4D v16)
4D Language Reference ( 4D v16.1)
4D Language Reference ( 4D v16.2)
4D Language Reference ( 4D v16.3)


