
4D v16.3
Creating and modifying lists
- 4D Design Reference
-
- Lists
-
- Overview
- Designing lists for data entry
- Creating and modifying lists
- Setting list properties
 Creating and modifying lists
You create lists with the Lists editor of the tool box. You can modify any list at any time by returning to the Lists editor and making changes.
To create a list:
- Choose Tool Box > Lists from the Design menu.
The following window appears (empty by default):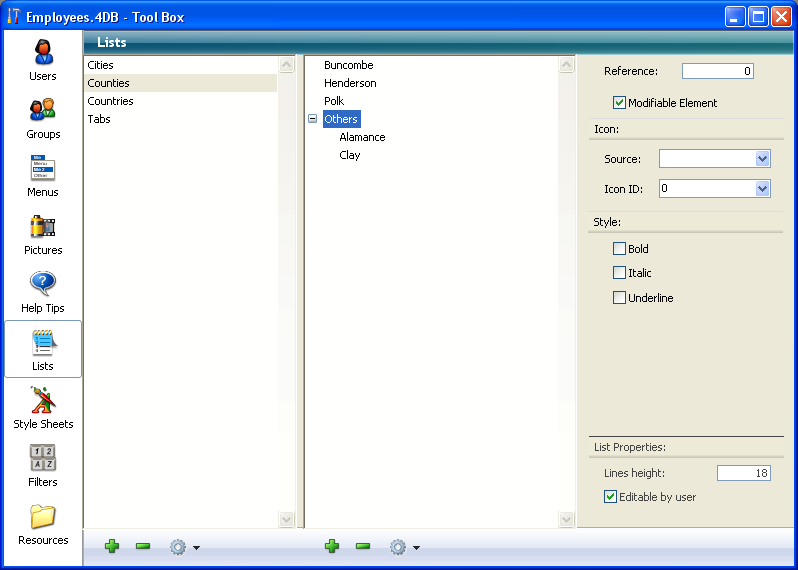
The Lists editor displays the names of existing lists on the left. The central part of the window displays the items of the current list and the right part displays the properties of the current item and the list. - Click on the add button
 located below the list of lists.
OR
Right-click in the list of lists and select the Add command from the context menu.
4D creates a new list named New ListX by default.
Note: If there is already at least one existing list, the Duplicate command is available. It can be used to quickly create a new list having characteristics in common with an existing list. - Change the name of the list and press Tab to validate your entry.
You can rename a list at any time by selecting the Rename command from the context menu or from the options menu of the editor, or by using the Alt+click (Windows) or Option+click (Mac OS) shortcut, or simply by clicking twice on the list you want to rename.
You have created a new empty list. Now, you will create the items that will appear in the list.
When you are adding items to a list, you can append new items to the end of the list or insert them anywhere in the existing list.
To append items to a list:
- Select the name of the list to which you want to add items.
If the list already contains items, they appear as a list on the right-hand side of the editor. If you want to insert a value into an existing list, select the value located above the value you want to insert. The new value will be created after that value. - Click on the add button found beneath the list of items.
OR
Choose Add from the options menu or from the context menu of the list of items.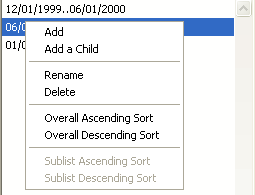
4D creates a new item in the list named New Item # X. - Enter the item value and press Tab to validate your entry.
You can rename a list item at any time by selecting the Rename command from the context menu or from the options menu, or by clicking twice on the item. - To add other items to the list, repeat steps 2 and 3 as many times as necessary.

Once the values entered, you can move the list items by drag and drop. You can also sort them by alphabetical order (see the “Sorting a list” section).
You can add a sublist to any list item. The number of levels of hierarchy is not limited.
To create a hierarchical list:
- Select the list item to which the sublist will be attached.
- Choose Add a Child from the options menu or from the context menu of the list of items.
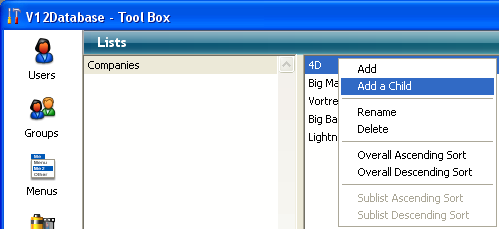
4D expands the selected list item and adds a new item (named New Item # X by default) for the first item on the su. - Enter the value of the item.
You can rename the item of a sublist at any time by selecting the Rename command from the context menu or from the options menu, or by clicking twice on the item. - To add other values to the sublist, keep the item selected and click on the add button located beneath the list of items.
OR
Select the parent item and use the Add a Child command again.
If you choose the Add a Child command when the item of a sublist is selected, you will create an additional sublevel in the hierarchy (see below). - Repeat steps 2 to 4 as many times as necessary.
If desired, you can attach sublists to sublist items to continue the hierarchy.
To attach a sublist to a sublist item:
- Select the sublist item.
- Select Add a Child from the options menu or the context menu of the list of items.
- Enter the item normally and repeat the process of entering items or attaching sublists to items, as desired.
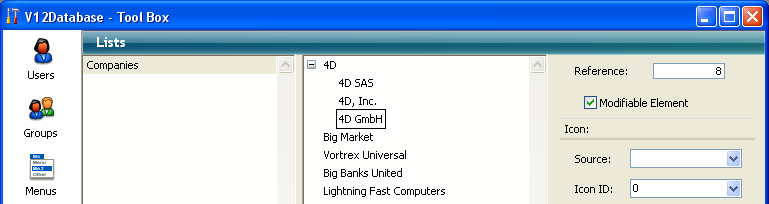
The following illustration shows a three-level hierarchy: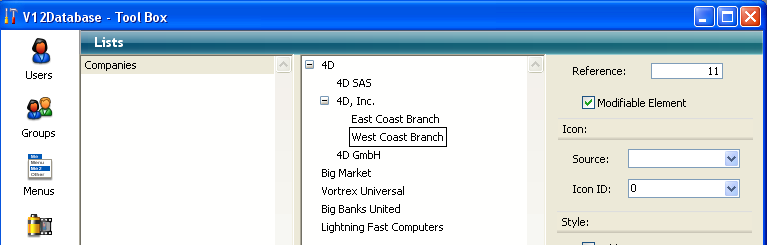
4D allows you to enter ranges of numbers, dates, and times in a list. You can use these ranges as data entry validation ranges by making the list required or excluded in a form.
To create ranges in a list:
- Create the list you want to use for ranges.
- For each item, enter the minimum value of the range, two periods (..), and the maximum value.
For example, “100..150” sets the range between 100 and 150, inclusive. - Continue specifying ranges as separate items until you have set as many as you need.
Here is an example of a list using ranges:
4D keeps the list of items in the order in which you enter them. You can sort the list or sublist alphabetically so that entries are more easily accessible to database users. Since a sorted list automatically scrolls to match characters typed at the keyboard, sorting usually makes data entry easier.
To sort a list or sublist:
- Select the list that contains the choices you want to sort.
- Choose one of the sort options available from the context menu or from the options menu located below the list of items.
The following sort options are available:- Overall Ascending Sort: 4D sorts the list and any sublists by ascending order (from A to Z).
- Overall Descending Sort: 4D sorts the list and any sublists by descending order (from Z to A).
- Sublist Ascending Sort: 4D sorts only the sublists by ascending order.
- Sublist Descending Sort: 4D sorts only the sublists by descending order.
You can delete items at any level of the hierarchy. Keep in mind that it is not possible to cancel the deletion of an item or list.
To delete an item:
- Select the list that contains the item you want to delete.
- Select the item you want to delete from the current list area.
If necessary, expand the list. - Click on the deletion button
 located below the list of items for the current list.
OR
Select the Delete command from the context menu of the list of items.
4D deletes the item from the list.
To delete a list:
- Select the list you want to remove.
- Click on the deletion button located below the list of lists.
OR
Select the Delete command from the context menu of the list of lists.
4D displays a dialog box that lets you confirm or cancel the operation. If you validate this dialog box, the list will be deleted.

Product: 4D
Theme: Lists
4D Design Reference ( 4D v16)
4D Design Reference ( 4D v16.1)
4D Design Reference ( 4D v16.3)


