
4D v16.3
Designing lists for data entry
- 4D Design Reference
-
- Lists
-
- Overview
- Designing lists for data entry
- Creating and modifying lists
- Setting list properties
 Designing lists for data entry
One use of lists is to provide the user with a list of values from which to choose during data entry. The following are some considerations about lists that stem from this purpose:
- You can make a list available for every form or for selected forms.
- Long lists can be split up into several smaller ones.
- You can restrict the possible entries to those in the list or you can allow the user to type additional entries.
- You can allow the user to modify the list or you can prevent the user from modifying it.
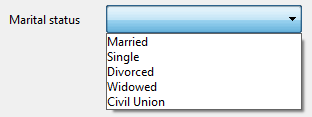
- You can represent a listed field or variable directly in a form by means of a pop-up menu/drop-down list or a combo box.
Tip: If the number of items that the list contains is limited, you may not need to use lists. For instance, in the case of a list that has only two values, such as Male or Female, you may consider using a Boolean field where you can enter data by checking a radio button or a picture radio button. Even when there are three or four different choices, it may be more suitable to use check boxes.
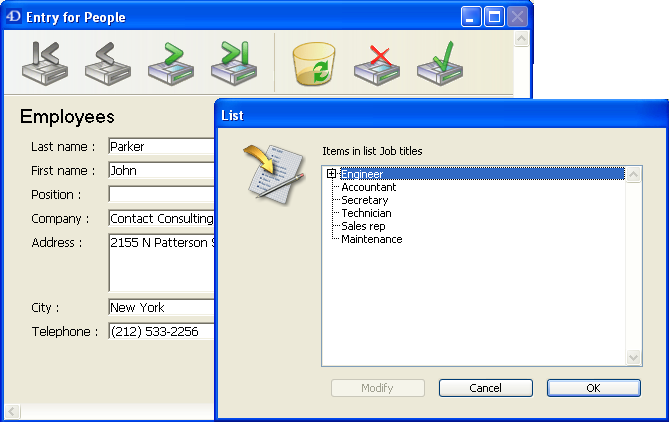
You can attach a list to a field as one of its attributes, set at the database structure level. Attaching a list to a field causes the list to appear in a window whenever that field is selected during data entry, whether directly in the list or on the detail page. The user can select a value from the list. If the list is sorted, the list automatically scrolls as the user types characters at the keyboard. For instance, if the user types “N,” the list scrolls to the first entry starting with “N.” The user can stop typing when the desired choice appears and select it from the list. The figure below shows a choice list being displayed.
If you attach a list to a field using its Field Properties in the Structure editor, the list also appears when the field is selected in the Query editor. For more information, see the "Allow choice list" section in Field properties.
You can also attach the list to the field or variable as a data entry control in a form. The list will appear only when the field or variable is selected in this input form.
Note that in this case, you can manage the entry and display in the field directly using Pop-up Menus/Drop-down Lists (non-modifiable choice lists) or Combo Boxes (modifiable choice lists) without having to use the choice list dialog box. To do so, you just assign the list to the object and then enter the field or variable name in the "Variable Name" area of the Property List. For more information about this, refer to Pop-up Menus/Drop-down Lists.

4D allows you to create hierarchical lists. Selecting an item from the parent list displays a sublist.
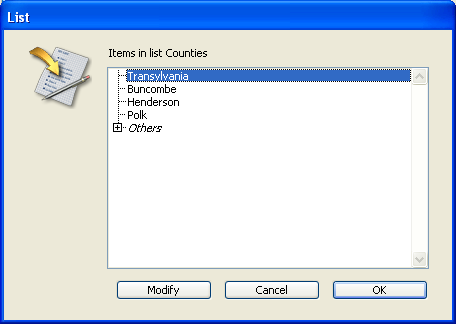
There is no standard way to use hierarchical lists; it depends on what you use them for. For example, a list of counties for a given state would take many entries, thus slowing down the selection process. There are several approaches when you want to use hierarchical lists for this type of problem.
Besides their use for entry purposes, you can use hierarchical lists to populate the following objects:
Note: It is possible to associate hierarchical lists with pop-up menus/drop-down lists or combo boxes. In this case, however, only the first hierarchical level is displayed.
You can often divide a list of values in two value categories. In the example mentioned above, you could determine which counties are selected the most often. If 80% of the values selected refer to a handful of counties, you can place those counties in a list and place the remainder in a sublist, as shown below.
This allows the user to be able to select an entry directly in 80% of the cases, thus making entry faster.
A different approach consists in organizing counties into different regions. The first list that is displayed allows the user to select the region and the sublists allow him to select the county. In this case, each selection will require the user to select a region, followed by a county. This is still faster than selecting a county from a long list.
Some data entry tasks are not crucial. If you enter a value that does not appear in a list, it may be perfectly acceptable. However, you may have an application in which an entry must be one of the values in a list. Any different value would cause a serious consequence such as delaying bill payment.
4D allows you to make a list required as part of the data entry controls on a form. This type of data entry control prevents a user from entering any value other than the ones in the list. For example, your company may have a specific group of job titles that are allowed in a personnel database.
Another data entry control makes it possible to exclude the values in a list. The user then cannot type in a value that should not appear in the field. For example, your company may be prevented from doing business in certain countries. Placing them in an excluded list prevents them from being entered.
One of the most useful data entry controls is the Maximum and Minimum setting for a number, date, or time field. Setting a maximum and minimum value prevents a user from entering a value outside this range.
Suppose you have three acceptable ranges for the field. You can use a list to create such non-sequential ranges. If you then make this list required for a field, values outside the three ranges are not accepted. The figure below shows a list of ranges:

On the other hand, you could create a list that specifies the ranges that are not valid. If you then make this list an Excluded list for a field, any entry within these ranges is not accepted.

Product: 4D
Theme: Lists
4D Design Reference ( 4D v16)
4D Design Reference ( 4D v16.1)
4D Design Reference ( 4D v16.3)


