
4D v16.3
Restoring databases
 Restoring databases
4D allows you to restore entire sets of database data in case of any incidents, regardless of the cause of the incident. Two primary categories of incidents can occur:
- The unplanned stoppage of a database while in use.
This incident can occur because of a power outage, system element failure, etc. In this case, depending on the current state of the data cache at the moment of the incident, the restore of the database can require different operations:- If the cache was empty, the database opens normally. Any changes made in the database were recorded. This case does not require any particular operation.
- If the cache contains operations, the data file is intact but it requires integrating the current log file.
- If the cache was in the process of being written, the data file is probably damaged. The last backup must be restored and the current log file must be integrated.
- The loss of database file(s).
This incident can occur because of defective sectors on the disk containing the database, a virus, manipulation error, etc. The last backup must be restored and then the current log file must be integrated. To find out if a database was damaged following an incident, simply relaunch the database using 4D. The program performs a self-check and details the necessary restore operations to perform. In automatic mode, these operations are performed directly without any intervention on the part of the user (refer to the following section). If a regular backup strategy was put into place, the 4D restore tools will allow you to recover (in most cases) the database in the exact state it was in before the incident.
Notes:
- 4D can launch procedures automatically to recover databases following incidents. These mechanisms are managed using two options available on the Backup/Backup & Restore page of the Database Settings. For more information, refer to the Automatic Restore paragraph.
- If the incident is the result of an inappropriate operation performed on the data (deletion of a record, for example), you can attempt to repair the database using the "rollback" function in the log file. This function is available on the Rollback page of the MSC.
You can restore the contents of an archive generated by the backup module manually. A manual restore may be necessary, for instance, in order to reproduce the contents of an archive in full (structure files and/or enclosed attached files), or for the purpose of carrying out searches among the archives.
The manual restore can also be performed along with the integration of the current log file.
The manual restore of backups can be carried out either via the standard Open document dialog box, or via the “Restore” page of the Maintenance and Security Center (MSC).
- Restoring via a standard dialog box can be used to restore any archive. This function is described below.
- Restoring via the MSC provides more options and allows the archive contents to be previewed. On the other hand, only archives associated with the open database can be restored. This function is described in Manually restoring a backup (MSC) below.
To restore a database manually via a standard dialog box:
- Start the 4D application and choose Restore... in the File menu.
It is not mandatory that a database be open.
OR
Execute the RESTORE command from a 4D method.
A standard Open file dialog box appears so that you can indicate the backup file (.4bk) or the backup log file (.4bl) to be restored. - Select the file to restore and click Open.
The following dialog box appears, which allows you to specify the location where files will be restored: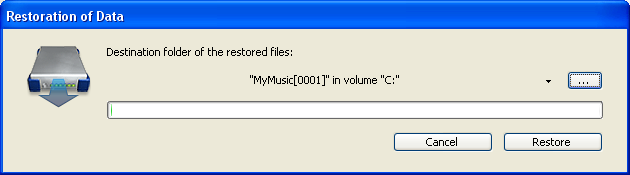
By default, 4D restores the files in a folder named “Archivename” (no extension) located next to the archive. You can click on the [...] button to specify a different location. - Click on the Restore button.
4D extracts all backup files from the specified location.
If the current log file or a backup log file with the same number as the backup file is stored in the same folder, 4D examines its contents. If it contains operations not present in the data file, the program asks you if you want to integrate these operations. Integration is done automatically if the “Integrate last log file...” option is checked (see Automatic Restore). - (Optional) Click OK to integrate the log file into the restored database.
If the restore and integration were carried out correctly, 4D displays a dialog box indicating that the operation was successful. - Click OK.
The destination folder is displayed. During the restore, 4D places all backup files in this folder, regardless of the position of the original files on the disk when the backup starts. This way your files will be easier to find.
You can manually restore an archive of the current database using the Restore page of the Maintenance and Security Center (MSC). This page provides several options that can be used to control the Restoring databases :
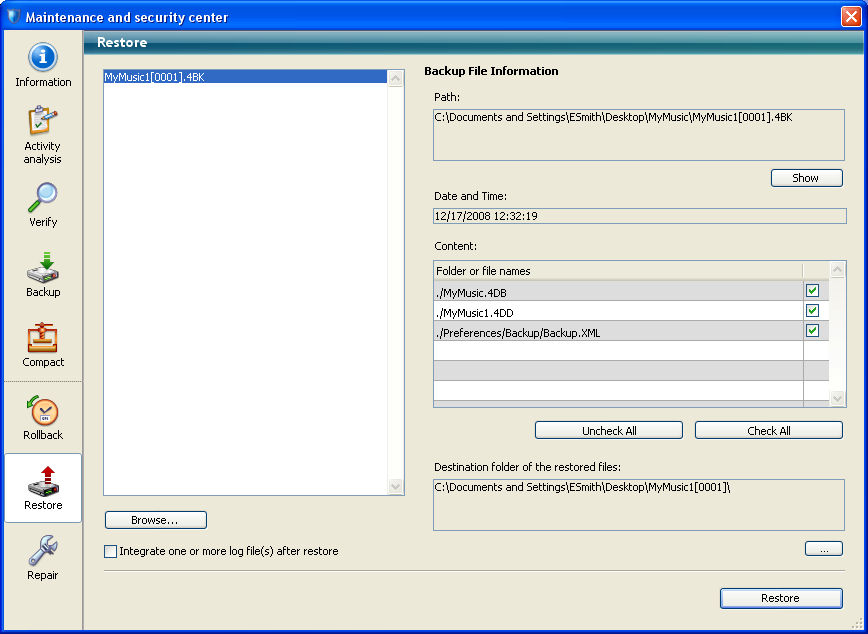
The list found in the left part of the window displays any existing backups of the database. You can also click on the Browse... button found just under the area in order to open any other archive file from a different location. It is then added to the list of archives.
When you select a backup in this list, the right part of the window displays the information concerning this particular backup:
- Path: Complete pathname of the selected backup file. Clicking the Show button opens the backup file in a system window.
- Date and Time: Date and time of backup.
- Content: Contents of the backup file. Each item in the list has a check box next to it which can be used to indicate whether or not you want to restore it. You can also use the Check All or Uncheck All buttons to set the list of items to be restored.
- Destination folder of the restored files: Folder where the restored files will be placed. By default, 4D restores the files in a folder named “Archivename” (no extension) that is placed next to the database structure file. To change this location, click on [...] and specify the folder where you want the restored files to be placed.
The Integrate one or more log file(s) after restore option allows you to integrate several log files successively into a database. If, for example, you have 4 log archives (corresponding to 4 database backups), you can restore the first backup then integrate the log archives one by one. This means that you can, for example, recover a data file even when the last backup files are missing.
When this option is checked, 4D displays the standard Open file dialog box after the restore, which can be used to select log file to be integrated. The Open file dialog box is displayed again after each integration until it is cancelled.
If you have not checked the option for the automatic integration of the log file on the Restore page of the MSC (see Successive integration of several log files above), a warning dialog box appears during the opening of the database when 4D notices that the log file contains more operations than have been carried out in the database.
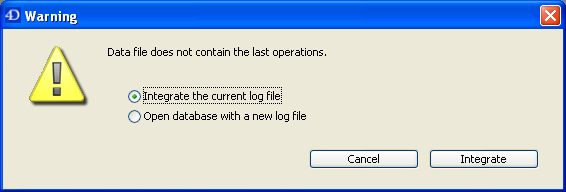
In order for this mechanism to work, 4D must be able to access the log file in its current location.
You can choose whether or not to integrate the current log file. Not integrating the current log file allows you to avoid reproducing errors made in the data.

Product: 4D
Theme: Backup and restoring of the application
4D Design Reference ( 4D v16)
4D Design Reference ( 4D v16.1)
4D Design Reference ( 4D v16.3)


