
4D v16.3
Process page
 Process page
On the Process page, you can view the CPU time consumed as well as various other information for each process created in the database. There are also several tools available for the processes (excluding the System process). For more information about processes in 4D, refer to the Processes section in the 4D Language Reference manual.
Note for 4D Server: The Process page of the Runtime Explorer on a 4D client controls the processes of this 4D client. The Processes Page of the administration window of 4D Server controls all the processes of all the client machines connected to the server.
For each process, the page provides the following information:
- Process type (icon)
- Process number (process ID, which is the same as the process number. You use this process ID to identify a specific process in commands and functions).
- Process name,
- Current status of the process,
- Total amount of execution time in seconds that the process has taken since it was started,
- Percentage of CPU time consumed by the process.
Each process is identified by an icon as well as a type. The color and form of the icon indicates the type of process:
 | Application server |
 | SQL Server |
 | DB4D Server (database engine) |
 | Web Server |
 | SOAP Server |
 | Protected 4D client process (development process of a connected 4D) |
 | Main 4D client process (main process of a connected 4D). Collaborative process, equivalent on the server of the process created on the client machine) |
 | 4D client base process (process parallel to a 4D client process. Preemptive process responsible for controlling the corresponding main 4D client process) |
 | Spare process (former or future "4D client database process") |
 | SQL server worker process |
 | HTTP server worker process |
 | 4D client process (process running on the connected 4D) |
 | Stored procedure (process launched by a connected 4D and running on the server) |
 | Web method (launched by a 4DACTION for example) |
 | Web method (preemptive) |
 | SOAP method (launched by a Web Service) |
 | Logger |
 | TCP connection listener |
 | TCP session manager |
 | Other process |
 | Worker process (cooperative) |
 | Stored procedure (preemptive process) |
 | Worker process (preemptive) |
Note: Each main 4D client process and its "twinned" 4D client base process are grouped together when the Display processes by groups option is checked.
Each process has a unique number which corresponds to the order it was created during the session underway. When the application is started, the first numbers are assigned to the processes created automatically by 4D (their number will vary according to the servers executed on startup).
When you start your own process, it either appears as the next process in sequence or takes the place of a process that has been aborted. For example, suppose processes 7 and 8 are executing. If process 7 is aborted, the next process to be started becomes process 7.
Note: Processes are automatically aborted upon completion. You can abort a process before it has completed using the Runtime Explorer. For more information about aborting a process, see Aborting a process.
If you start a new process using New process or Execute on server, you can specify its name as a parameter to the function. The name specified in the parameter appears as the process name in the list of processes.
If you do not specify a process name using a command, 4D automatically assigns the process a default name. Default names are based on the method used to start the process, as follows:
- Processes started from a menu command: If you start a process from a menu command, the process is given the default name “ML_ProcessNumber.” For instance, if process number 7 is started when a menu command is selected, the process is given the name “ML_7.”
- Processes started from executing a method: If you start a process from the Execute Method dialog box or directly from the Method editor, the method is given the default name “P_ProcessNumber.” For instance, if process number 8 is started programmatically, the process is given the name “P_8.”
- Processes started using a command, but not explicitly named: If you start a process using a method but do not specify the name as a parameter to the New process command, the process name is left blank.
Note for 4D Server: If the name of a process begins with a dollar sign ($), it is a local process that does not have access to tables or 4D Server (see Global and Local Processes).
The status of a process is the current state of its execution — what the process is actually doing. Here is an explanation of each status that can appear in the Runtime Explorer window:
- Executing: The process is currently executing.
- Delayed: The process is delayed for a specific amount of time. During the period that the process is delayed, it does not take up any processing time. For information about how to delay a process, refer to the 4D Language Reference manual.
- Waiting Event: The process is waiting for an action from the user such as a button being clicked or a menu command chosen.
- Waiting I/O: The process is waiting for some input or output to occur. For example, a process might need to wait while a group of records is being updated to disk.
- Waiting Semaphore: The process is waiting for the internal processes to finish executing 4D database tasks.
- Paused: The process is paused until you tell it to resume execution. During the period that the process is paused, it does not take up any processing time. For more information, see Pausing and resuming a process.
- Aborted: The process has been terminated. When a process is aborted, 4D frees any locked records, cancels any transactions opened by the process but not yet validated or canceled, and frees the current selection and current record. Processes are automatically aborted upon completion. You can also abort a process before it has completed by using the Runtime Explorer. For more information about aborting a process, see Aborting a process.
- Hidden Modal Dialog: A process which was displaying a modal dialog box has been hidden so that the user can no longer view the dialog box. The process will remain in this state until the dialog is shown again.
The Runtime Explorer displays the processing time of each process. In managing processes, 4D divides processing time among existing processes so that no single process is executing at every moment. Thus, the process time is the total amount of execution time a process has taken (in seconds) since it started executing. Note that the process time does not reflect the total amount of time that has elapsed since the process started executing since, in reality, execution alternates between all open processes.
The CPU ratio corresponds to the percentage of time that 4D devotes to this process. The update frequency can be set using a context menu (right click on row):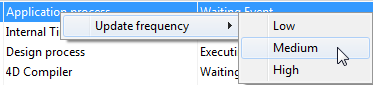
The greater the update time is, the more CPU time is consumed by the Runtime Explorer process.
The Runtime Explorer allows you to control the execution of processes by pausing, resuming, or aborting a process. You can also choose to run a process in debug mode. Lastly, you can hide and redisplay its windows at any time. These operations are covered in detail in the sections below.
These operations are carried out by means of control buttons found below the list of processes. These buttons affect the selection of processes. You can select more than one process at a time (Shift+click for an adjacent selection or Command/Ctrl+click for a non-adjacent selection).
Note: You can also delay a process for a specific period of time. For more information about delaying a process, refer to the 4D Language Reference manual.
You can temporarily suspend the execution of a process by pausing it. You may want to pause a process to give other processes more execution time or to allow an event upon which the process depends to occur.
For instance, suppose you start a process that prints a selection of records. You then realize that you want to modify the data in one of the records so you first pause the process, finish your modifications, and then resume the process to continue printing the records.
- To pause a process, select it and click the Pause button
 . The status of the process in the Runtime Explorer window automatically changes to “paused.” The process remains paused indefinitely until you tell it to resume execution.
 - To resume execution of a process, select it and click the Resume button
 . The status of the process returns to the status it had at the time it was paused. For example, if the process was executing before it was paused, the process begins executing again. If the process was waiting for an event before it was paused, it continues waiting for an event.
A process is automatically aborted upon completion. However, you may need to abort a process before it completes for debugging purposes. Processes should not be aborted for any other reason. To stop the process from continuing execution, you abort the process in the Runtime Explorer.
When a process is aborted, 4D frees any locked records, cancels any transactions opened by the process but not yet validated or canceled, and frees the current selection and current record.
To abort a process, select it and click the Abort button  . The status of the process in the Runtime Explorer automatically changes to “aborted.”
You can debug a process by monitoring its execution in the 4D debugger.
To debug a process, select it and click the Trace button  .
.
If the process is being executed, the 4D Debug window appears, allowing you to debug the process by stepping through its execution and evaluating expressions such as the values of fields and variables used in the method. If the process was paused, 4D “stores” the request and displays the Debug window as soon as the execution of the process resumes.
For information about using the Debug window, refer to the 4D Language Reference manual.
You cannot debug the internal processes created and managed by 4D.
You can make a process invisible in the Application environment by hiding it. When a process is hidden, any windows or menus created by the process are invisible to the user while it is executing.
Hiding a process is useful for operations in which you open a window which you later want to close. Instead of aborting the process to close the window, you can make the window invisible to the user by hiding the process that opened it. Even though the window is hidden, the process continues to execute and complete the operation it began.
To hide a process, select it and click on the Hide button  .
.
The process is now hidden from view in the Application environment. Note that it continues to execute even though it is hidden.
You can display a hidden process at any time.
To display a process again, click on the Show button  . The process is displayed again in the Application environment.
You can make a window the frontmost window by bringing its process to the front. For instance, if the Application process is brought to the front, the Application environment is brought to the front of the screen.
You can bring any user processes to the front. If you have created a window for a process, the window becomes the frontmost window on the screen. If a menu bar is attached to the window, 4D brings the menu bar to the front of the screen and makes its menus the current menus. The current menu bar is replaced by the menu bar of the process that is brought to the front.
To bring a process to the front, select it and click on the Bring to Front button  .
.
Any windows attached to the process are brought to the front of the screen. In addition, 4D displays the menu bar for the frontmost process window.

Product: 4D
Theme: Runtime Explorer
4D Design Reference ( 4D v16)
4D Design Reference ( 4D v16.1)
4D Design Reference ( 4D v16.3)


