4D v14.3
Creating and using hierarchical list boxes
 Creating and using hierarchical list boxes
4D v12 lets you specify and use hierarchical list boxes. A hierarchical list box is a list box in which the contents of the first column appears in hierarchical form. This type of representation is adapted to the presentation of information that includes repeated values and/or values that are hierarchically dependent (country/region/city and so on).
Only aray type list boxes can be hierarchical.
Hierarchical list boxes are a particular way of representing data but they do not modify the data structure (arrays). Hierarchical list boxes are managed exactly the same way as regular list boxes.
To specify a hierarchical list box, there are three different possibilities:
- Manually configure hierarchical elements using the Property list of the form editor.
- Visually generate the hierarchy using the list box management pop-up menu, in the form editor.
- Use the LISTBOX SET HIERARCHYand LISTBOX GET HIERARCHY commands, described in the 4D Language Reference manual.
This section covers how to create hierarchical list boxes in the 4D Form editor and the basics of how they work during execution. For more information about programmed management of hierarchical list boxes (selections, breaks, using On Expand and On Collapse form events, etc. ), refer to Managing Hierarchical List Boxes in the 4D Language Reference manual.
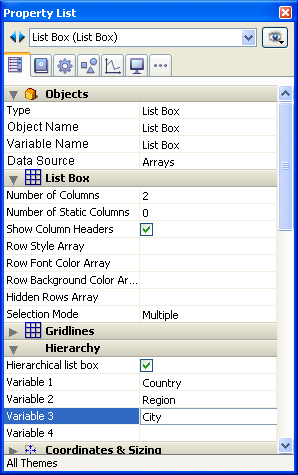
You can enable and configure the hierarchical mode in the "Hierarchy" theme of the Property List. For more information, refer to List box specific properties.
When you click on the columns area of a list box, the context menu of the Form editor contains the Create hierarchy and Cancel hierarchy commands.
When you select at least one column in addition to the first one in a list box object (of the array type) in the form editor, the Create hierarchy command is available in the context menu:
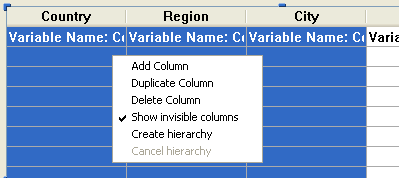
When you choose this command, the following actions are carried out:
- The "Hierarchical list box" option is checked for the object in the Property List.
- The variables of the columns are used to specify the hierarchy. They replace any variables already specified.
- The columns selected no longer appear in the list box (except for the title of the first one).
Example: given a list box whose first columns contain Country, Region, City and Population. When Country, Region and City are selected (see illustration above), if you choose Create hierarchy in the context menu, a three-level hierarchy is created in the first column, columns 2 and 3 are removed and the Population column becomes the second:
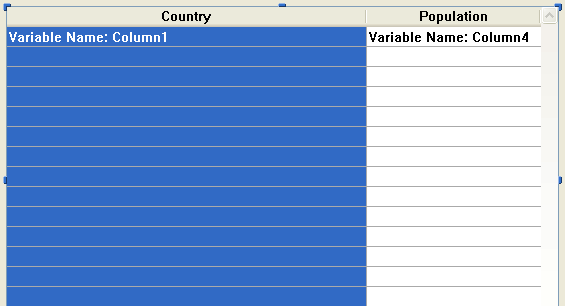
When the first column is selected and already specified as hierarchical, you can use the Cancel hierarchy command. When you choose this command, the following actions are carried out:
- The "Hierarchical list box" option is deselected for the object,
- The hierarchical levels 2 to X are removed and transformed into columns added to the list box.
When a form containing a hierarchical list box is opened for the first time, by default all the rows are expanded.
A break row and a hierarchical "node" are automatically added in the list box when values are repeated in the arrays. For example, imagine a list box containing four arrays specifying cities, each city being characterized by its country, its region, its name and its number of inhabitants:
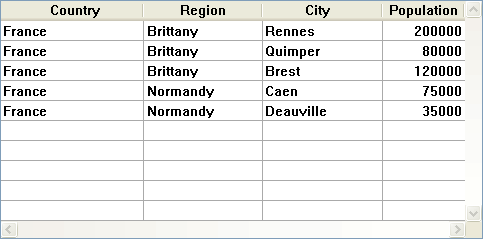
If this list box is displayed in hierarchical form (the first three arrays being included in the hierarchy), you obtain:
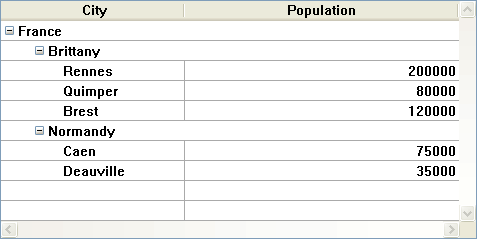
The arrays are not sorted before the hierarchy is constructed. If, for example, an array contains the data AAABBAACC, the hierarchy obtained is:
> A
> B
> A
> C
To expand or collapse a hierarchical "node," you can just click on it. If you Alt+click (Windows) or Option+click (Mac OS) on the node, all its sub-elements will be expanded or collapsed as well.
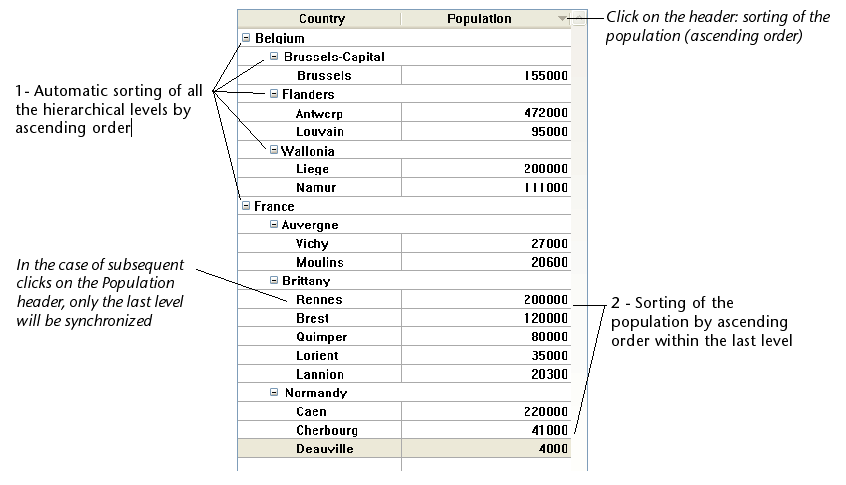
In a list box in hierarchical mode, a standard sort (carried out by clicking on the header of a list box column) is always constructed as follows:
- In the first place, all the levels of the hierarchical column (first column) are automatically sorted by ascending order.
- The sort is then carried out by ascending or descending order (according to the user action) on the values of the column that was clicked.
- All the columns are synchronized.
- During subsequent sorts carried out on non-hierarchical columns of the list box, only the last level of the first column is sorted. It is possible to modify the sorting of this column by clicking on its header.
Given for example the following list box, in which no specific sort is specified:
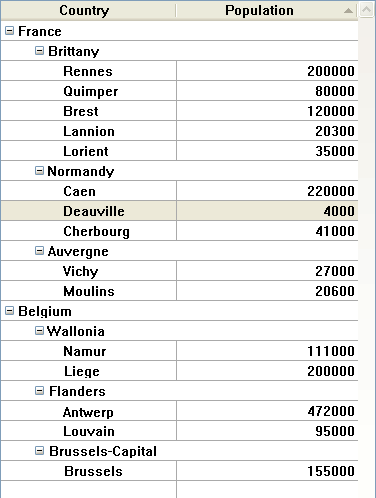
If you click on the "Population" header to sort the populations by ascending (or alternately descending) order, the data appear as follows:
As for all list boxes, you can disable the standard sort mechanism by deselecting the "Sortable" option for the list box and managing sorts using programming.
When values of the date or time type are included in a hierarchical list box, they are displayed in a standard format:
- Dates are displayed in the short system format (for example, for May 30, 2009, "05/30/09" on an American system and "30/05/09" on a European system).
- Times are also displayed in the short system format ("12:15:30" or "12:15" depending on the system parameters).
Product: 4D
Theme: List boxes
4D Design Reference ( 4D v14 R2)
4D Design Reference ( 4D v13.4)
4D Design Reference ( 4D v14 R3)
4D Design Reference ( 4D v14.3)
4D Design Reference ( 4D v14 R4)
Inherited from : Creating and using hierarchical list boxes ( 4D v12.4)


