4D v14.3
Exporting data to files
 Exporting data to files
When you export data, you create a 4D, XML, SYLK, DIFF, DBF, Text, or Fixed Length Text file that can be opened by or imported by other applications. If you are exporting data for use with another application, see that application’s documentation for information about importing data. Choose a file format and delimiters compatible with the other application.
In some cases, you need to use one or more export options to structure the export file correctly for the target application. For example, some programs accept the Text file format but require that the first record consist of the field names. You can add this record using word processing software.
4D exports the records in the current sort order. You can choose to export all the records of a table or the current selection only.
You have the option of selecting the fields to be exported in the Export Data dialog box or specifying a form. If you use a form, the fields on the form will be exported.
In the Design environment, you export data by the intermediary of the export dialog box. In the Application environment, you can also display this dialog box (EXPORT DATA command) or export files directly via the commands of the Import and Export theme.
To export data in the Design environment:
- Choose Export > Data to File... from the File menu of 4D.
The Export Data dialog box appears: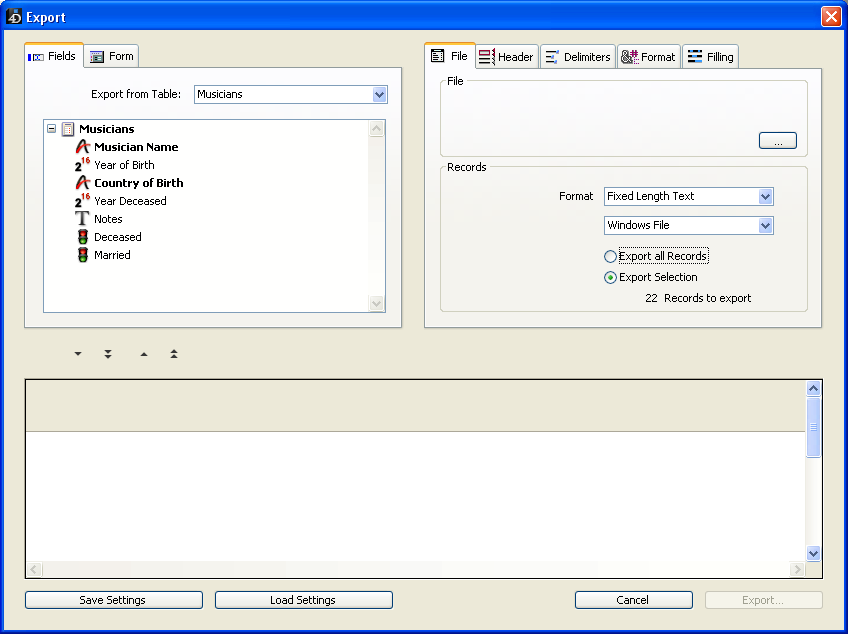
- In the “Records” area, select the format of the export file — Text, Fixed Length Text, DIFF, SYLK, DBF, 4D or XML and its formatting options (see the File formats section).
- (Optional) Click the [...] button, enter a name and a location for the export file and click Save.
The Export Data dialog box reappears, with the export file’s pathname shown in the File area. This step does not start the export. (If you skip these steps, you can also specify the name and location of the export file when you click the Export button). - In the Table and Field Selection Area, select the table and the fields that you want to export.
You can choose either of the following options:- Select the fields to export in the Export Data dialog box.
If you use this option, choose a table from the Export From Table drop-down list to populate the Fields list with the eligible fields for the export. You then choose fields using the two blue buttons just above the Preview area. You can remove fields from the Preview area using the red buttons:
- Export the data using a form.
This option exports the fields on the form. This option is discussed in detail in Exporting data using a form.
- Select the fields to export in the Export Data dialog box.
- (Optional) In the Preview Area, modify the fields from which the data will be exported.
Note: This feature is not available if you export data using a form.
The Preview area displays the contents of the export file as columns of data. The Header area for each column is a pop-up menu that you can use to change the field assigned to that column. You can also resize each column.
The icon to the left of the field name indicates its data type. You can right-click to display a context menu of formats that are appropriate for the column’s data type. If desired, choose a format from the context menu. If you do not assign a format, the Default Format is used. A format can also be selected on the Format options page (see Format page).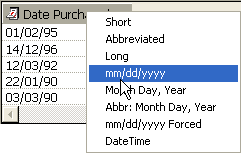
You can remove a column from the export file and the Preview Area. do so, click the column’s header and click the Delete button.- Changing the lengths of Fixed Length Text fields
If you choose the Fixed Length text format, the Preview Area indicates the number of characters for each column.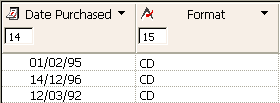
You can resize each column by dragging the column divider in the title bar with the mouse. If you are using the Fixed Length Text format, this changes the number of characters allocated to the column in the export file. You can set the exact number of characters by entering a value in the entry area below the field’s data type icon. The default number of characters is as follows: Text fields have a length of 80 characters, Alpha fields have the maximum length assigned in the Design environment, and numeric fields have a length of 10 characters.
- Changing the lengths of Fixed Length Text fields
- In the Records area, indicate if you want to export all the records of the selected table (the Export all Records option), or only the current selection (the Export Selection option).
In both cases, the number of records to be exported is displayed in this area.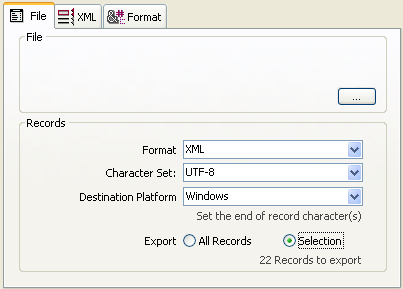
- (Optional) Specify any other export options using the Header, Delimiters, Format, XML, and Filling pages.
These options are discussed in Export options. - If you want to save your settings, click the Save Settings button.
This feature is discussed in the Saving and loading import and export settings section. - Click Export to begin exporting to the disk file.
If you have not specified the pathname for the export file, a standard save file dialog appears (see step 3). Otherwise, the export is carried out directly.
4D offers you various export options that are accessible using tabs in the Options area. The number of tabs as well as their contents depends on the type of export file and the selected options.
This page is only available for Text and Fixed Length Text exports:
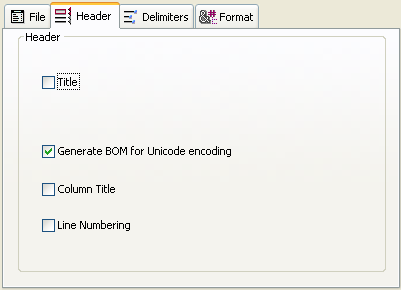
It allows you to specify the header of the export file:
- Title: Allows you to enter a title for the export document. Enter the title in the area below the check box.
- Generate BOM for Unicode encoding: Inserts a Byte Order Mark (BOM) in the export file header. This additional information facilitates the text interpretation by the import software, if it supports this function.
This option is enabled by default but it is only taken into account when the Unicode character set is selected for the export. If this is not the case, the BOM is not added. - Column Title: Exports the field names as the first ‘record’ in the export file.
- Line Numbering: Numbers each line, which is each exported record. The numbering starts at 1 and increments by 1.
This page allows you to specify the field, record, and file delimiters used in Text and Fixed Length Text files. This options are preconfigured according to the platform specified in the "Destination Platform" menu of Records area.
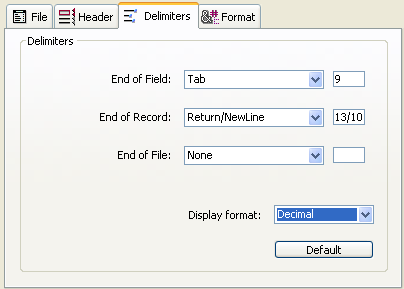
Delimiters are discussed in detail in the Field, record, and file delimiters section. To change the default delimiters, use the drop-down lists containing the values most frequently used for each delimiter. You can also enter a delimiter into the entry areas on the right.
The drop-down list at the bottom of the page allows you to view the delimiters in different formats: Character, Decimal (default format), and Hexadecimal. Please note that, if you use unprintable characters as delimiters (such as Tab, Linefeed, and Return), the Character option will not show anything.
Note: The delimiters are reset to their default values if you click the Default button or if the type of the document is modified on the File page.
This page of parameters is only available for XML exports. It enables the configuration of the exported XML file contents.
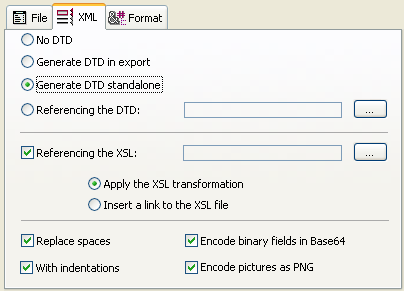
When exporting in XML format, 4D allows you the choice of whether or not to generate a Document Type Declaration (DTD). A DTD records the set of specific rules and properties that the XML must follow. These rules define, more particularly, the name and contents of each tag, as well as its context. This formalization of elements enables you to check an XML document to make sure it is “valid” and is particularly useful in the case of recurrent tags in an XML document. Note that a DTD is not mandatory.
To define the handling of the DTD, you must select one of the following options:
- No DTD (default option): When this option is selected, a DTD is not generated during export. Le document XML généré ne pourra pas être “validé”.
- Generate DTD in export: Generates a DTD during export which will be included in the XML file itself (internal DTD). The generated XML file is thus independent.
- Generate DTD standalone: A DTD will be generated in a separate file (external DTD). An external DTD can be shared between several users and thus enables the harmonization of XML document structures generated from different sources.
Note: 4D allows a table and a field to have the same name. However, the XML language prohibits the use of different elements having the same name. Consequently, when the “Generate DTD” option is used, the exported 4D data must not include a table and field having the same name; otherwise, the XML file generated is invalid and cannot be opened by an XML parser. - Referencing the DTD: Using the associated [...] button, this option allows you to designate an existing external DTD file. 4D will include a reference to this DTD in the exported file.
XSL (eXtensible Stylesheet Language) enables visual representation of the elements defined in an XML document. This language is used to schematically define the style sheets that can be used to process and display the contents of an XML document. For more information, refer to XSL transformations management in the 4D Language Reference manual.
- Referencing the XSL: Using the [...] button, allows you to associate an XSL file for the exported data.
When an XSL file has been selected, you must set up how it will be used with exported data using two options:
- Apply the XSL transformation: When this option is checked, 4D performs the transformation of XSL data directly on the set XSL document at the moment of export.
- Insert a link to the XSL file: When this option is checked, 4D only inserts the reference to the designated XSL in the exported document (the transformation is not carried out).
The exported XML file will therefore contain references to this XSL file.
- Replace spaces: This option causes “space” characters to be replaced by underlines (“_”) in value name fields of the XML file generated. This option is checked by default since spaces are not allowed in XML value name fields.
However, it is possible to uncheck the option when necessary for specific purposes. In this case, of course, the generated file will not be in conformity with the general syntax rules defined by the W3C for XML.
- Encode binary fields in Base64: This option adds the "data:;base64," header to exported binary fields (BLOB and/or picture type fields). When this option is not checked, fields are encoded in Base64 without the header.
- With indentations: This option applies automatic indentation to the exported data. Indentation makes it possible to display the hierarchy of the XML elements.
- Encode pictures as PNG: This option automatically encodes the exported pictures in PNG format, regardless of their original format. When this option is not checked, pictures are encoded in their native format.
Note that when pictures are exported in SVG, we recommend not checking this option so pictures will retain their properties.
This page allows you to set the export formats. It is available for all the files formats, except for the 4D Application format. This option is available for Text and Fixed Length Text exports. By default, 4D’s standard formats are used
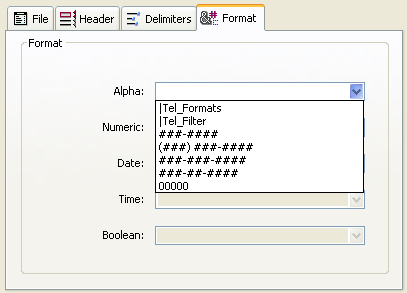
Note: You can also set a column’s export format using the contextual menu in the column’s header area (see step 5 in Specifying the data to export).
You can set an export format for Alpha, Numeric, Date, Time or Boolean fields in the Preview Area. When you select a column, the combo-box corresponding to its data type becomes enabled. You can then choose a format from the combo box or (for Alpha, Numeric, or Boolean data types) enter a custom format. For more information about 4D display formats, refer to the Display formats section.
- ISO Date Time Format
The ISO Date Time display format is available for exporting date or time data. This format corresponds to the XML date and time representation standard (ISO8601 format). For example, in this format the date/time May 31, 2008 at 1:20 p.m. is noted 2008-05-31T13:20:00.
4D does not allow both a date and time to be stored in a single field. However, you can export data in this format so that the dates or times are recorded in conformity with the XML standard. If you export dates, the exported values will be of the style: 2008-05-31T00:00:00; whereas if you export times, they will be of the style: 0000-00-00T13:20:55.
This page appears only for Fixed Length Text files. It allows you to specify the fill characters to use for each data type. The default fill character is the space.
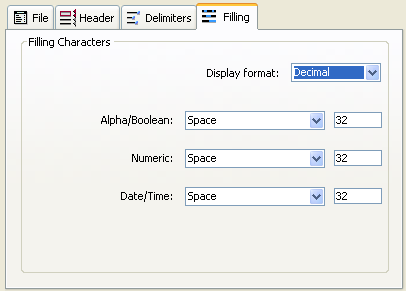
For more information about the Fixed Length Text file format, refer to the File formats section.
Different fill characters can be used for three data types: Alpha/Boolean (Boolean fields are imported as alphas), Numeric and Date/Time. Normally, the space is used to pad fixed format fields. The drop-down lists contain other choices. The entry areas to the right display the selected fill character. If you wish to use other characters, enter them directly in the entry areas.
The menu at the top of the page allows you to view the fill characters in different formats: Character, Decimal (default format), and Hexadecimal. An unprintable fill character will not appear if you use the Character format menu.
If you want to use a form for the export, click on the Form tab, located at the top of the Export dialog box. You can then choose a form from the list of forms for the selected table.
The main advantage of using a form is that the form method and the object methods associated with fields and variables are executed when each record is exported. This allows you to process the data during the export. Fields and variables will be exported in the order specified by the entry order of the form. Note, however, that the effects of these methods are not shown in the Preview Area.
Do not place buttons on the form. Subform objects are ignored.
Note for 4D Server: It is not possible to export data using a form that includes methods in a stored procedure on the server. In fact, since form events are not managed by the server, the associated methods will not be called.
Product: 4D
Theme: Exporting and importing data
BOM
4D Design Reference ( 4D v14 R2)
4D Design Reference ( 4D v13.4)
4D Design Reference ( 4D v14 R3)
4D Design Reference ( 4D v14.3)
4D Design Reference ( 4D v14 R4)
Parent of : Exporting data to files ( 4D v12.4)


