
4D v17.4
Using TLS Protocol (HTTPS)
- 4D Language Reference
-
- Web Server
-
- Web Server, Overview
- Web server configuration and connection management
- Support of IPv6
- Connection Security
- On Web Authentication Database Method
- On Web Connection Database Method
- On Web Close Process database method
- Web Sessions Management
- Semi-dynamic pages
- URLs and Form Actions
- Binding 4D objects with HTML objects
- Web Server Settings
- Using preemptive Web processes
- Information about the Web Site
- Defining custom HTTP error pages
- Using TLS Protocol (HTTPS)
- XML and WML Support
- WEB CLOSE SESSION
- WEB GET BODY PART
- WEB Get body part count
- WEB Get Current Session ID
- WEB GET HTTP BODY
- WEB GET HTTP HEADER
- WEB GET OPTIONUpd
- WEB Get server infoUpd
- WEB GET SESSION EXPIRATION
- WEB Get session process count
- WEB GET STATISTICS
- WEB GET VARIABLES
- WEB Is secured connection
- WEB Is server running
- WEB SEND BLOB
- WEB SEND FILE
- WEB SEND HTTP REDIRECT
- WEB SEND RAW DATA
- WEB SEND TEXT
- WEB SET HOME PAGE
- WEB SET HTTP HEADER
- WEB SET OPTIONUpd
- WEB SET ROOT FOLDER
- WEB START SERVER
- WEB STOP SERVER
- WEB Validate digest
- _o_SET CGI EXECUTABLE
- _o_SET WEB DISPLAY LIMITS
- _o_SET WEB TIMEOUT
- _o_Web Context
 Using TLS Protocol (HTTPS)
The 4D Web server can communicate in secured mode through the TLS (Transport Layer Security) protocol -- the successor of the SSL (Secured Socket Layer) protocol. By default, the minimum supported version in 4D is TLS 1.2.
The TLS protocol (successor of SSL) has been designed to secure data exchanges between two applications —mainly between a Web server and a browser. This protocol is widely used and is compatible with most Web browsers.
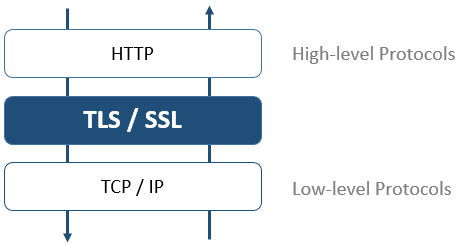
At the network level, the security protocol is inserted between the TCP/IP layer (low level) and the HTTP high level protocol. It has been designed mainly to work with HTTP.
Network configuration using TSL:
Note: The TLS protocol can also be used to secure standard 4D Server client/server connections as well as SQL server connections. For more information, refer to the section Encrypting Client/Server Connections in the 4D Server Reference manual as well as the Configuration of 4D SQL Server section in the SQL Reference manual.
The TLS protocol is designed to authenticate the sender and receiver and to guarantee the confidentiality and integrity of the exchanged information:
- Authentication: The sender and receiver identities are confirmed.
- Confidentiality: The sent data is encrypted so that no third person can understand the message.
- Integrity: The received data has not been changed, by accident or malevolently.
TLS uses a public key encryption technique based on a pair of asymmetric keys for encryption and decryption: a public key and a private key.
The private key is used to encrypt data. The sender (the web site) does not give it to anyone. The public key is used to decrypt the information and is sent to the receivers (Web browsers) through a certificate. When using TLS with the Internet, the certificate is delivered through a certification authority, such as Verisign®. The Web site pays the Certificate Authority to deliver a certificate which guaranties the server authentication and contains the public key allowing to exchange data in a secured mode.
Note: For more information on the encryption method and the public and private key issues, refer to the ENCRYPT BLOB command description.
A server working in secured mode means that you need a digital certificate from a certification authority. This certificate contains various information such as the site ID as well as the public key used to communicate with the site. This certificate is transmitted to the clients (Web browsers) connecting to this site. Once the certificate has been identified and accepted, the communication is made in secured mode.
Note: A browser authorizes only the certificates issued by a certification authority referenced in its properties.
The certification authority is chosen according to several criteria. If the certification authority is well known, the certificate will be authorized by many browsers, however the price to pay will be expensive.
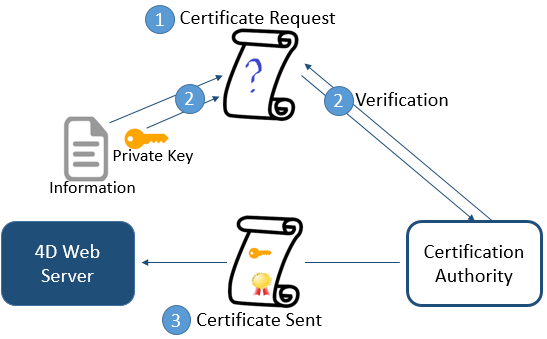
To get a digital certificate:
1. Generate a private key using the GENERATE ENCRYPTION KEYPAIR command.
Warning: For security reasons, the private key should always be kept secret. Actually, it should always remain with the server machine. For the Web server, the Key.pem file must be placed in the Database structure folder.
2. Use the GENERATE CERTIFICATE REQUEST command to issue a certificate request.
3. Send the certificate request to the chosen certificate authority.
To fill in a certificate request, you might need to contact the certification authority. The certification authority checks that the information transmitted are correct. The certificate request is generated in a BLOB using the PKCS format encoded in base64 (PEM format). This principle allows you to copy and paste the keys as text and to send them via E-mail without modifying the key content. For example, you can save the BLOB containing the certificate request in a text document (using the BLOB TO DOCUMENT command), then open and copy and paste its content in a mail or a Web form to be sent to the certification authority.
4. Once you get your certificate, create a text file named “cert.pem” and paste the contents of the certificate into it.
You can receive a certificate in different ways (usually by E-mail or HTML form). 4D accepts all platform-related text formats for certificates (OS X, PC, Linux...). However, the certificate must be in PEM format, i.e. PKCS encoded in base64.
Note: CR line-ending characters are not supported on their own; you must use CRLF or LF.
5. Place the “cert.pem” file in the correct location. For the Web server, this is the folder containing the database structure.
The Web server can now work in a secured mode. A certificate is valid between 6 months to a year.
If you want to use the TLS protocol with the 4D Web server, the following components should be installed on the server, at different locations:
- 4DSLI.DLL (Windows) or 4DSLI.bundle (Mac OS): Secured Layer Interface dedicated to the TLS management.
This file is installed by default, it is placed:
- (Windows) next to the executable file of the 4D or 4D Server application
- (Mac) in the Native Components subfolder of the 4D or 4D Server package.
Note: 4DSLI is also necessary to use the encryption commands ENCRYPT BLOB and DECRYPT BLOB.
- key.pem (document containing the private encryption key) and cert.pem (document containing the certificate):
- with 4D in local mode or 4D Server, these files must be placed next to the database structure file
- with 4D in remote mode, these files must be located in the local resources folder of the database on the remote machine (for more information about the location of this folder, refer to the 4D Client Database Folder paragraph in the description of the Get 4D folder command). You must copy these files manually on the remote machine.
Note: Default key.pem and cert.pem files are provided with 4D. For a higher level of security, we strongly recommend that you replace these files with your own certificates.
The installation of these elements makes it possible to use TLS for connections to the 4D Web server. However, in order for TLS connections to be accepted by the 4D Web server, you must “activate” it by enabling HTTPS. This parameter is accessible on the Configuration tab of the Web page in the Database Settings:
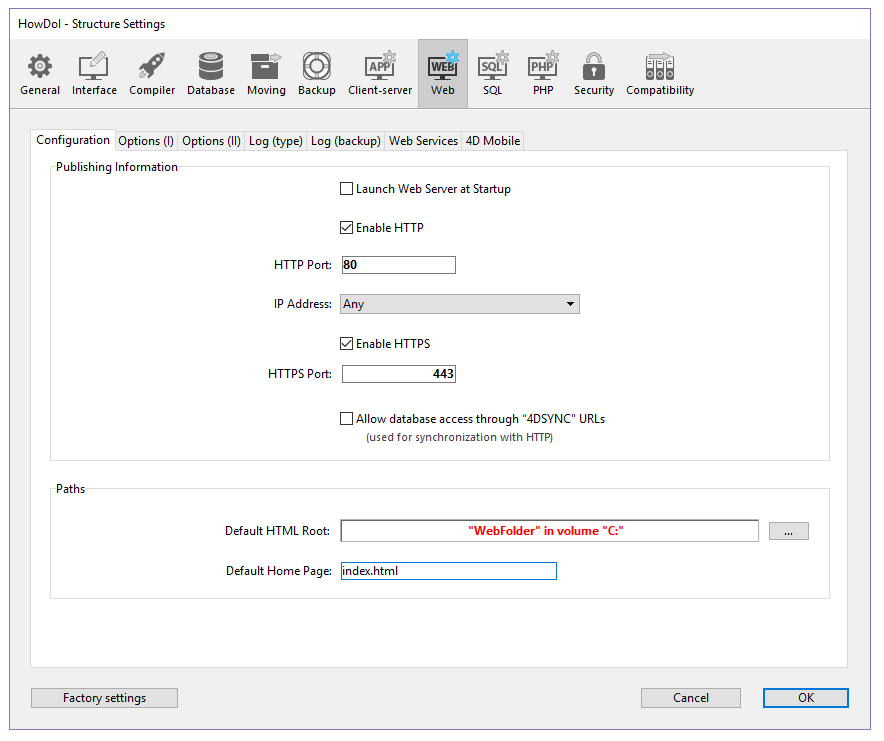
By default, TLS connections are allowed. You can uncheck the HTTPS option if you do not want to use TLS functionalities with your Web server, or if another Web server allowing secure connections is operating on the same machine.
The HTTPS port dedicated to TLS data exchange is 443 by default. This port number can be modified in the HTTPS Port area in order, for example, to reinforce the security of the Web server (for more information about this point, refer to the Web Server Settings section). The HTTP port defined on this page of the Database Settings is used for standard mode Web server connections.
Note: The other settings defined for the 4D Web Server management (password, timeout, cache size, etc.) are applied, regardless of whether or not the server is operating in TLS mode.
PFS adds an additional layer of security to your communications. Rather than using pre-established exchange keys, PFS creates session keys cooperatively between the communicating parties using Diffie-Hellman (DH) algorithms. The joint manner in which the keys are constructed creates a "shared secret" which impedes outside parties from being able to compromise them.
When TLS is activated on the 4D Web Server, PFS is automatically enabled. If the dhparams.pem file (document containing the server's DH private key) does not already exist, 4D will automatically generate it with a key size of 2048. The initial generation of this file could take several minutes. The file is placed with the key.pem and cert.pem files, as discussed in the previous section (TLS installation and activation within 4D).
If you use a custom cipher list and want to enable PFS, you must verify that it contains entries with DH or ECDH (Elliptic-curve Diffie–Hellman) algorithms.
Note: For more information, refer to the SSL cipher list selector of the SET DATABASE PARAMETER command.
For a Web connection to be carried out in secure mode, the URL sent by the browser simply needs to begin with “https” (instead of “http”).
In this case, a warning dialog appears on the browser. If the user clicks OK, the Web server sends the certificate to the browser.
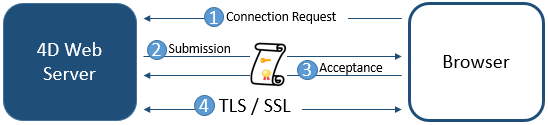
The encryption algorithm used for the connection is then decided by the browser and the Web server. The server offers several symetric encryption algorithms. The most powerful common algorithm is used.
Warning: The level of encryption allowed might depend on current laws in the country of use.
Using TLS with a 4D Web server requires checking the "Enable HTTPS" checkbox in the Database Settings dialog. This ensures that connections with the Web server can happen in a secure mode. However, keep in mind that if the "Enable HTTP" checkbox is also checked, the browser can still switch between HTTPS and HTTP (for example, in the browser URL area, the user can replace "https" by "http").
Notes:
- You can get the current connection mode using the WEB Is secured connection command.
- Enabling HTTP and/or HTTPS can also be set for the session using the WEB SET OPTION command.
You can forbid or redirect requests made in a non-secured mode:
- To forbid http redirections, uncheck the "Enable HTTP" option (or use the corresponding WEB SET OPTION selector). In this case, client HTTP requests will be ignored by the 4D Web server and an error message will be displayed.
- To automatically redirect HTTP requests to HTTPS, you can activate HTTP Strict Transport Security (HSTS) using the WEB SET OPTION command with the Web HSTS enabled selector. This will enforce the use of TLS and ensure that all communications take place via HTTPS. Please refer to the WEB SET OPTION command description for detailed information on HSTS.
DECRYPT BLOB
ENCRYPT BLOB
GENERATE CERTIFICATE REQUEST
GENERATE ENCRYPTION KEYPAIR
HTTP SET CERTIFICATES FOLDER
WEB Is secured connection
Web Server Settings

Product: 4D
Theme: Web Server
4DSLI.DLL, cert.pem, key.pem
4D Language Reference ( 4D v17)
4D Language Reference ( 4D v17.1)
4D Language Reference ( 4D v17.2)
4D Language Reference ( 4D v17.3)
4D Language Reference ( 4D v17.4)


