
4D v16
Installing an ODBC Driver on OS X
- 4D ODBC Driver
-
- Installation on OS X
-
- Installing an ODBC Driver on OS X
- Uninstalling an ODBC Driver on OS X
 Installing an ODBC Driver on OS X
To install the ODBC Driver:
- Copy the 4D ODBC x64.bundle and/or the 4D ODBC x32.bundle into the {Library}/ODBC/ folder
- Open the odbcinst.ini text file found in the /Library/ODBC/ folder with a text editor and modify it as follows:
[ODBC Drivers]
4D ODBC Driver 64-bit = Installed
4D ODBC Driver 32-bit = Installed

[4D ODBC Driver 64-bit]
Driver = /Library/ODBC/4D ODBC x64.bundle/Contents/MacOS/4D ODBC x64
Setup = /Library/ODBC/4D ODBC x64.bundle/Contents/MacOS/4D ODBC x64
APILevel = 2
ConnectFunctions = YYN
DriverODBCVer = 3.52
FileUsage = 0
SQLLevel = 3

[4D ODBC Driver 32-bit]
Driver = /Library/ODBC/4D ODBC x32.bundle/Contents/MacOS/4D ODBC x32
Setup = /Library/ODBC/4D ODBC x32.bundle/Contents/MacOS/4D ODBC x32
APILevel = 2
ConnectFunctions = YYN
DriverODBCVer = 3.52
FileUsage = 0
SQLLevel = 3
You can now launch the ODBC Manager located in the "Applications/Utilities/" folder in order to create a Data Source Name (DSN) or you can use the one provided with the iODBC framework.
Note: Since Mac OS X 10.6 Snow Leopard, the ODBC Administration Tool is no longer provided as standard. However, it can be downloaded from here:
http://support.apple.com/downloads/ODBC_Administrator_Tool_for_Mac_OS_X
By clicking on the "Drivers” tab, you can check that the 4D ODBC Driver is correctly installed:
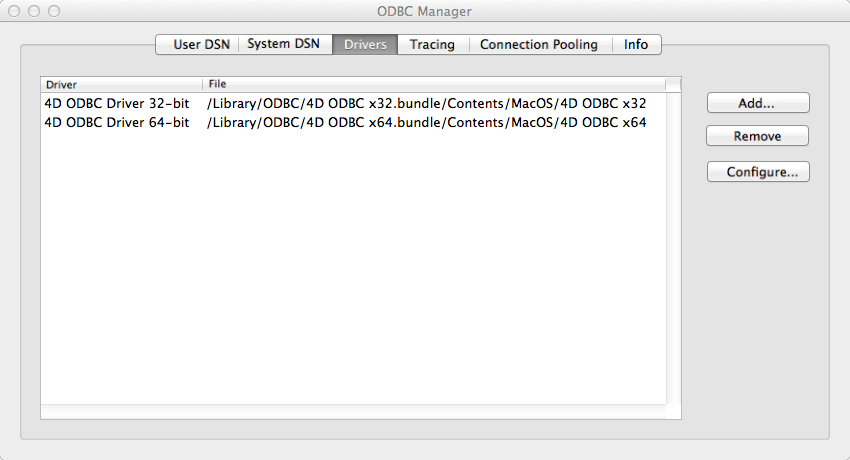
This window provides you with the complete path name for each driver installed.
You can do the same with the iODBC Administrator:
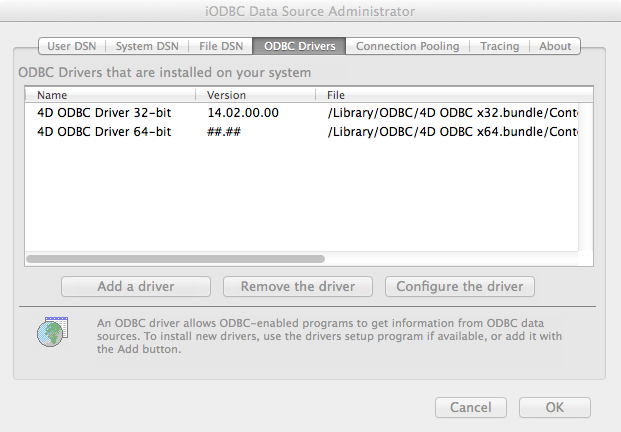
Here you can also see the version number but only for 32-bit versions.
Note: Beginning with version 14R2, version numbers include the subversion and modification date in the form: <Version><Subversion><Year><Month+Day>
For example: "14.2.2014.0217", this indicates the 14R2 version modified on February 17, 2014.
To add a DSN using the 4D ODBC Driver:
- Click on the System DSN tab
Note: On Mac OS X, we recommend that you use a System DSN and not a User DSN. - Click the Add button and choose the 32-bit 4D ODBC Driver from the list of configured drivers:
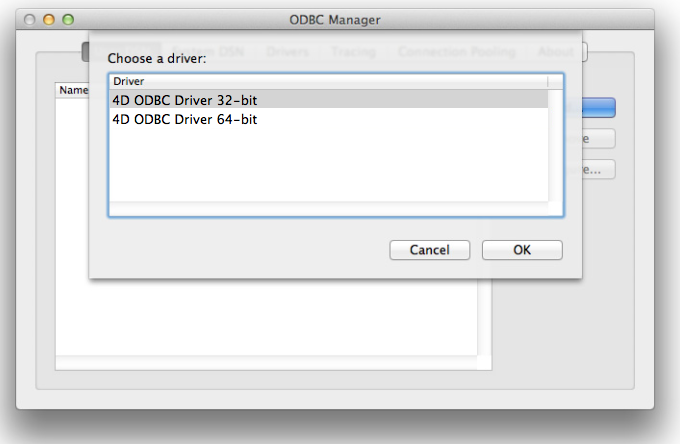
- Click OK.
The 4D ODBC Driver’s own configuration panel appears: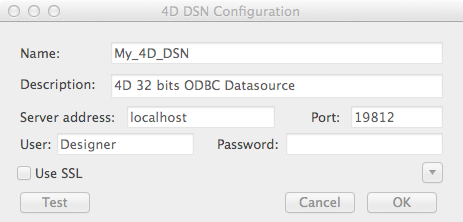
- Click OK to save any changes before you close the configuration panel window.
Note: You may encounter the following anomalies when creating a DSN via the Mac OS X ODBC Administrator:
- When you create a new DSN, you may not see it right away and may need to quit and restart the Mac OS X Administrator in order for it to appear.
- Even if you add a new ODBC User data source, the ODBC Driver will create it as a System DSN.
These anomalies are both due to bugs in the Mac OS X ODBC Administrator and have nothing to do with the 4D ODBC Driver or Installer.
The fields of these dialog boxes need to be filled in with the following information:
- Data Source Name:
Enter a unique name for this Data Source.
Default: "".
This field is mandatory. - Description:
Enter a short description of this Data Source.
Default: "".
This field is optional. - Server Address:
Examples:"localhost" The 4D application is located on the local machine. "PC-1" The 4D application is located on the PC-1 machine, published on port 19812 (default port). "148.1.2.3" The 4D application has the IP address 148.1.2.3.
Default: "localhost".
This field is mandatory. - Port:
Enter the 4D access port.
Default: "19812".
This field is optional. - SSL checkbox:
Checking this option enables connection to the 4D Server if the “Enable SSL” option has been set on the SQL/Configuration page of the Database Settings. - User:
Enter the user name used to test the connection with 4D.
Default: "".
This field is optional. - Password:
Enter the password used (in conjunction with the user name) to test the connection with 4D.
Default: "".
This field is optional. - Test button
Tests the connection with the current parameters.
Uses “User Name” and “Password” fields to login.
Clicking on the Advanced >> button gives you access to additional options as shown here:
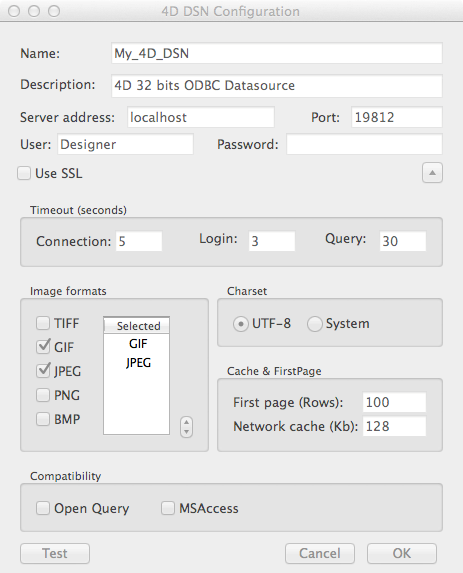
Timeouts (Seconds)
- Connection:
Enter the timeout in seconds to be used (0 means no timeout) after you log in for the driver to connect to a socket on the server:port address.
Default: "".
This field is optional. - Login:
Enter the timeout in seconds to be used (0 means no timeout) when the driver sends a request and receives the status from the server.
Default: "".
This field is optional. - Query:
Enter the timeout in seconds to be used (0 means no timeout) when waiting for a response after a query to the server.
Default: "".
This field is optional.
Favorite image formats
Pictures stored in 4D databases are retrieved by ODBC as Blobs. This setting lets you select the formats you prefer. By default, if you do not choose any favorites, 4D selects the best format available with respect to screen display.
When you choose one or more formats, 4D only provides one of those formats (in order of preference). If there are no pictures available in any of your favorite formats, 4D converts the pictures to the first format in the list.
For example, if you have selected GIF and JPEG as your favorite image formats: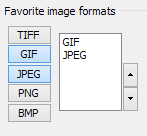
4D first checks whether there are any .gif or .jpeg formats available. If neither are available, then it converts the formats to .gif since it is first in the list.
Encoding: sets the text encoding.
- UTF-8 (Unicode) (recommended)
- System (depends on the settings of your OS)
Cache Settings: used to modify how the network handles the cache. Generally, these settings should be left untouched.
Compatibility: settings to enable the ODBC Driver to work properly with OpenQuery and MSAccess. They should only be checked if you encounter problems with these particular applications.
The 64-bit driver is faceless but there are two ways to create a 64-bit DSN:
- using the 32-bit driver, or
- using the ODBC Administrator.
Using the 32-bit driver
You can use the 32-bit ODBC driver to create a 32-bit DSN and then modify this DSN directly from the /Library/ODBC folder. Just open the /Library/ODBC/odbc.ini text file in a text editor and make the following edits:
- In the [ODBC Data Sources] section: change "4D ODBC Driver 32-bit" to "4D ODBC Driver 64-bit"
- In the [{your data source name}] section, change:
Driver=/Library/ODBC/4D ODBC x32.bundle/Contents/MacOS/4D ODBC x32
to:
Driver=/Library/ODBC/4D ODBC x64.bundle/Contents/MacOS/4D ODBC x64
Using the ODBC Administrator or the iODBC Administrator
- Click on the System DSN tab.
- Click the Add button and choose the 64-bit 4D ODBC Driver from the list of configured drivers. The generic DSN generator appears.
- Fill in the following Keyword/Value pairs in the dialog:
Keyword Value Driver /Library/ODBC/4D ODBC x64.bundle/Contents/MacOS/4D ODBC x64 Server <IP address of 4D Server> UID <User's name> PWD <User's password (can be left blank)> 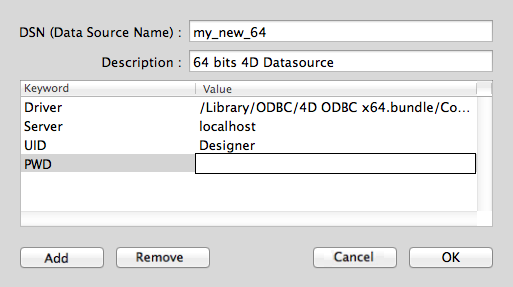
Here is the equivalent for iODBC: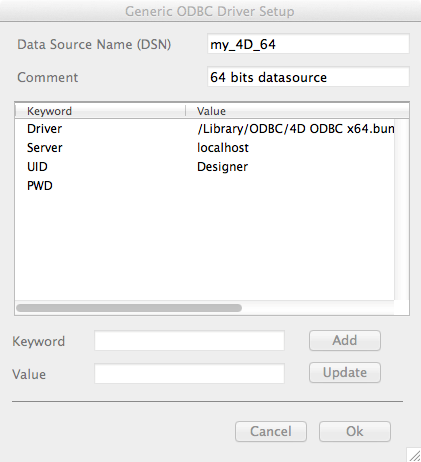
- Click OK
The new DSN will then be available on the System DSN tab of your ODBC Administrator.

Produkt: 4D
Thema: Installation on OS X
4D ODBC Driver ( 4D v16)


