
4D v16.3
Using Transactions
 Using Transactions
Transactions are a series of related data modifications made to a database within a process. A transaction is not saved to a database permanently until the transaction is validated. If a transaction is not completed, either because it is canceled or because of some outside event, the modifications are not saved.
During a transaction, all changes made to the database data within a process are stored locally in a temporary buffer. If the transaction is accepted with VALIDATE TRANSACTION, the changes are saved permanently. If the transaction is canceled with CANCEL TRANSACTION, the changes are not saved. In all cases, neither the current selection nor the current record are modified by the transaction management commands.
4D supports nested transactions, i.e. transactions on several hierarchical levels. The number of subtransactions allowed is unlimited. The Transaction level command can be used to find out the current transaction level where the code is executed.
When you use nested transactions, the result of each subtransaction depends on the validation or cancellation of the higher-level transaction. If the higher-level transaction is validated, the results of the subtransactions are confirmed (validation or cancellation). On the other hand, if the higher-level transaction is cancelled, all the subtransactions are cancelled, regardless of their respective results.
Note: For compatibility, nested transactions are disabled by default in databases converted from versions prior to v11 (see Compatibility page).
4D includes a feature allowing you to suspend and resume transactions within your 4D code. When a transaction is suspended, you can execute operations independently from the transaction itself and then resume the transaction to validate or cancel it as usual. When the transaction is suspended, you can, more particularly:
- create or modify records outside of the transaction (for example to increment an invoice number counter),
- start, suspend and/or close other transactions.
For more information about this point, refer to Suspending transactions.
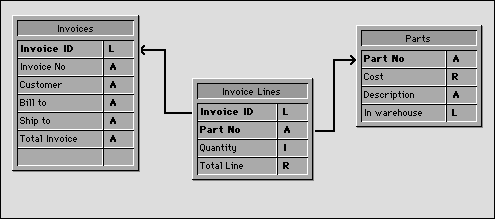
In this example, the database is a simple invoicing system. The invoice lines are stored in a table called [Invoice Lines], which is related to the table [Invoices] by means of a relation between the fields [Invoices]Invoice ID and [Invoice Lines]Invoice ID. When an invoice is added, a unique ID is calculated, using the Sequence number command. The relation between [Invoices] and [Invoice Lines] is an automatic Relate Many relation. The Auto assign related value in subform check box is checked.
The relation between [Invoice Lines] and [Parts] is manual.
When a user enters an invoice, the following actions are executed:
- Add a record in the table [Invoices].
- Add several records in the table [Invoice Lines].
- Update the [Parts]In Warehouse field of each part listed in the invoice.
This example is a typical situation in which you need to use a transaction. You must be sure that you can save all these records during the operation or that you will be able to cancel the transaction if a record cannot be added or updated. In other words, you must save related data.
If you do not use a transaction, you cannot guarantee the logical data integrity of your database. For example, if one record of the [Parts] records is locked, you will not be able to update the quantity stored in the field [Parts]In Warehouse. Therefore, this field will become logically incorrect. The sum of the parts sold and the parts remaining in the warehouse will not be equal to the original quantity entered in the record. You can avoid such a situation by using transactions.
There are several ways of performing data entry using transactions:
1. You can handle the transactions yourself by using the transaction commands START TRANSACTION, VALIDATE TRANSACTION and CANCEL TRANSACTION. You can write, for example:
 READ WRITE([Invoice Lines])

 READ WRITE([Parts])

 FORM SET INPUT([Invoices];"Input")

 Repeat

    START TRANSACTION

    ADD RECORD([Invoices])

    If(OK=1)

       VALIDATE TRANSACTION

    Else

       CANCEL TRANSACTION

    End if

 Until(OK=0)

 READ ONLY(*)
2. To reduce record locking while performing the data entry, you can also choose to manage transactions from within the form method and access the tables in READ WRITE only when it becomes necessary.
You perform the data entry using the input form for [Invoices], which contains the related table [Invoice Lines] in a subform. The form has two buttons: bCancel and bOK, both of which are no action buttons.
The adding loop becomes:
 READ WRITE([Invoice Lines])

 READ ONLY([Parts])

 FORM SET INPUT([Invoices];"Input")

 Repeat

    ADD RECORD([Invoices])

 Until(bOK=0)

 READ ONLY([Invoice Lines])
Note that the [Parts] table is now in read-only access mode during data entry. Read/write access will be available only if the data entry is validated.
The transaction is started in the [Invoices] input form method listed here:
 Case of

    :(Form event=On Load)

       START TRANSACTION

       [Invoices]Invoice ID:=Sequence number([Invoices]Invoice ID)

    Else

       [Invoices]Total Invoice:=Sum([Invoice Lines]Total line)

 End case
If you click the bCancel button, the data entry as well as the transaction must be canceled.
Here is the object method of the bCancel button:
 Case of

    :(Form event=On Clicked)

       CANCEL TRANSACTION

       CANCEL

 End case
If you click the bValidate button, the data entry must be accepted and the transaction must be validated. Here is the object method of the bOK button:
 Case of

    :(Form event=On Clicked)

       $NbLines:=Records in selection([Invoice Lines])

       READ WRITE([Parts]) ` Switch to Read/Write access for the [Parts] table

       FIRST RECORD([Invoice Lines]) ` Start at the first line

       $ValidTrans:=True ` Assume everything will be OK

       For($Line;1;$NbLines) ` For each line

          RELATE ONE([Invoice Lines]Part No)

          OK:=1 ` Assume you want to continue

          While(Locked([Parts]) & (OK=1)) ` Try getting the record in Read/Write access

             CONFIRM("The Part "+[Invoice Lines]Part No+" is in use. Wait?")

             If(OK=1)

                DELAY PROCESS(Current process;60)

                LOAD RECORD([Parts])

             End if

          End while

          If(OK=1)

  ` Update quantity in the warehouse

             [Parts]In Warehouse:=[Parts]In Warehouse-[Invoice Lines]Quantity

             SAVE RECORD([Parts]) ` Save the record

          Else

             $Line:=$NbLines+1 ` Leave the loop

             $ValidTrans:=False

          End if

          NEXT RECORD([Invoice Lines]) ` Go next line

       End for

       READ ONLY([Parts]) ` Set the table state to read only

       If($ValidTrans)

          SAVE RECORD([Invoices]) ` Save the Invoices record

          VALIDATE TRANSACTION ` Validate all database modifications

       Else

          CANCEL TRANSACTION ` Cancel everything

       End if

       CANCEL ` Leave the form

 End case
In this code, we call the CANCEL command regardless of the button clicked. The new record is not validated by a call to ACCEPT, but by the SAVE RECORD command. In addition, note that SAVE RECORD is called just before the VALIDATE TRANSACTION command. Therefore, saving the [Invoices] record is actually a part of the transaction. Calling the ACCEPT command would also validate the record, but in this case the transaction would be validated before the [Invoices] record was saved. In other words, the record would be saved outside the transaction.
Depending on your needs, you can customize your database, as shown in these examples. In the last example, the handling of locked records in the [Parts] table could be developed further.
CANCEL TRANSACTION
In transaction
START TRANSACTION
VALIDATE TRANSACTION

Product: 4D
Theme: Transactions
Modified: 4D v15 R4
4D Language Reference ( 4D v16)
4D Language Reference ( 4D v16.1)
4D Language Reference ( 4D v16.2)
4D Language Reference ( 4D v16.3)


