
4D v16.3
List subforms
- 4D Design Reference
-
- Subforms and widgets
-
- Overview
- List subforms
- Page subforms
 List subforms
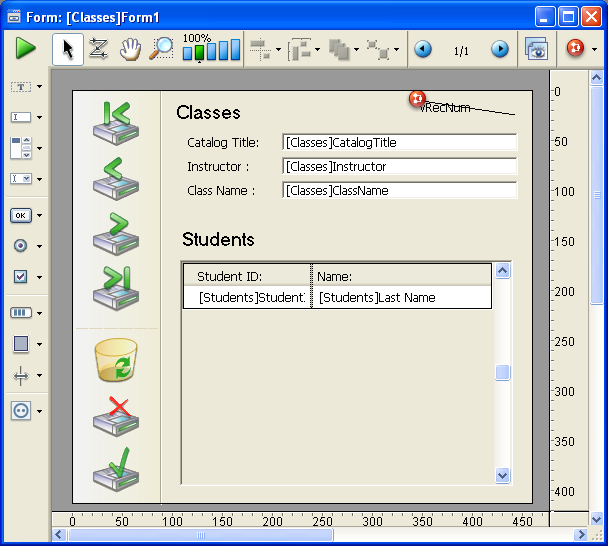
A subform is a form from another table that is displayed in a Detail form. A list subform lets you enter, view, and modify data in other tables. You usually use list subforms in databases in which you have established One to Many relations.
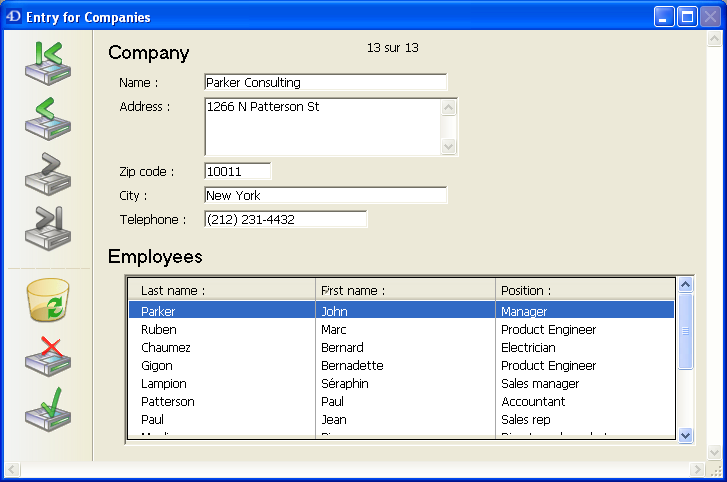
A list subform on a form in a related One table lets you view, enter, and modify data in a related Many table. You can have several subforms coming from different tables in the same form. However, it is not possible to place two subforms that belong to the same table on the same page of a form.
For example, a Contacts manager database might use a list subform to display all the telephone numbers for a particular contact. Although the telephone numbers appear on the Contacts screen, the information is actually stored in a related table. Using a One to Many relation, this database design makes it easy to store an unlimited number of telephone numbers per contact. With automatic relations, you can support data entry directly into the related Many table without programming.
Although list subforms are generally associated with Many tables, a subform instance can display the records of any other database table.
You can create a list subform using the Form Wizard or by adding an existing form using the Form editor. You must create the List form that you want to use as the subform.
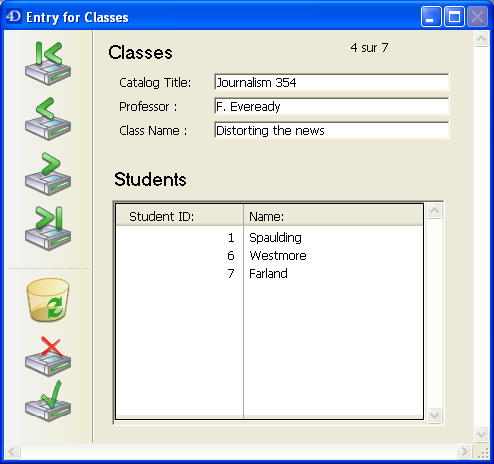
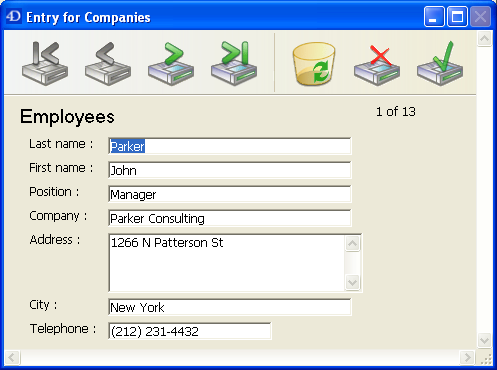
List subforms can be used for data entry in two ways: the user can enter data directly in the subform, or enter it in an input form. In this configuration, the form used as the subform is referred to as the List form. The input form is referred to as the Detail form.
 ------>
You can also allow the user to enter data in the List form:
To define a list form, you must first Create and configure the subform that you want to use in the parent form. For more information about list forms, refer to the chapter Output forms and reports.
In the parent form, create a subform object using the Subform tool  of the object bar (variation of the last button).
Note: You can also perform a drag-and-drop operation from the Forms Page of the Explorer.
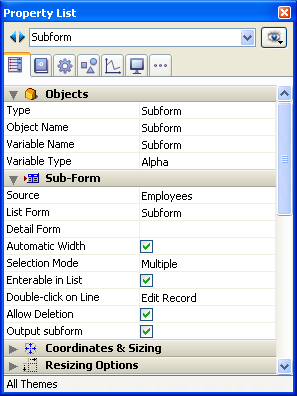
In the Property List (“Sub-Form” theme), make sure that the Output subform option is checked and choose the source table in the Source menu as well as the List Form that you want to use.
In the parent form, you can resize and reposition the subform container as desired.
You can add custom buttons for handling data entry in a subform. Any kind of button — standard, highlight or invisible — can be used. You can set the action of these buttons using programming (see Data Entry) or using Standard actions.
4D offers three standard actions to meet the basic needs for managing subrecords: Edit Subrecord, Delete Subrecord, and Add Subrecord. When the form includes several subform instances, the action will apply to the subform that has the focus.
For more information about adding these buttons and their associated standard actions, refer to Buttons and Standard actions.
You can specify several specific properties for list subforms. You use these properties to control various automatic features and allowed user actions (selection and data entry modes).
You normally use these properties for page subforms. Refer to Page subforms.
You use this property to specify the type of source for the subform. For list subforms, choose the table that the subform belongs to.
You use this option to associate a detail form with a list subform. A detail form can be used to enter or view subrecords. It generally contains more information than the list subform. Naturally, the detail form must belong to the same table as the subform. You normally use an Output form as the list form and an Input form as the detail form. If you do not specify the form to use for full page entry, 4D automatically uses the default Input format of the table.
Depending on the configuration of the subform, the user may display the detail form by double-clicking on a subrecord or by using the commands for adding and editing subrecords.
Note: You can associate a detail form with a list subform by holding down Shift and dragging the detail form from the Explorer onto the subform cpntainer.
You can resize the subform area in the form as desired, just like any other form object.
You can also let 4D automatically set the width of the subform so that all the fields it contains are displayed. To do this, check the Automatic Width option in the object container properties.
Note: When you create a subform area by dragging a form directly from the Explorer, 4D automatically sets the width of the subform.
List subforms can have three user selection modes: None, Single and Multiple.
- None
Records cannot be selected if this mode is chosen. Clicking on the list will have no effect unless the Enterable in List option is checked. The navigation keys only cause the list to scroll; the On Selection Change form event is not generated. - Single
One record at a time can be selected in this mode. Clicking on a record will select it and it will become the current record. A Ctrl+click (Windows) or Command+click (Mac OS) on a record toggles its state (between selected or not).
The Up and Down arrow keys select the previous/next record in the list. The other navigation keys scroll the list. The On Selection Change form event is generated every time the current record is changed. - Multiple
Several records can be selected simultaneously in this mode. The selected subrecords are returned by the GET HIGHLIGHTED RECORDS command. Clicking on the record will select it, but it does not modify the current record. A Ctrl+click (Windows) or Command+click (Mac OS) on a record toggles its state (between selected or not). The Ctrl+click (Windows) or Command+click (Mac OS) and Shift+click key combinations allow you to make multiple selections. The Up and Down arrow keys select the previous/next record in the list. The other navigation keys scroll the list. The On Selection Change form event is generated every time the selected record is changed.
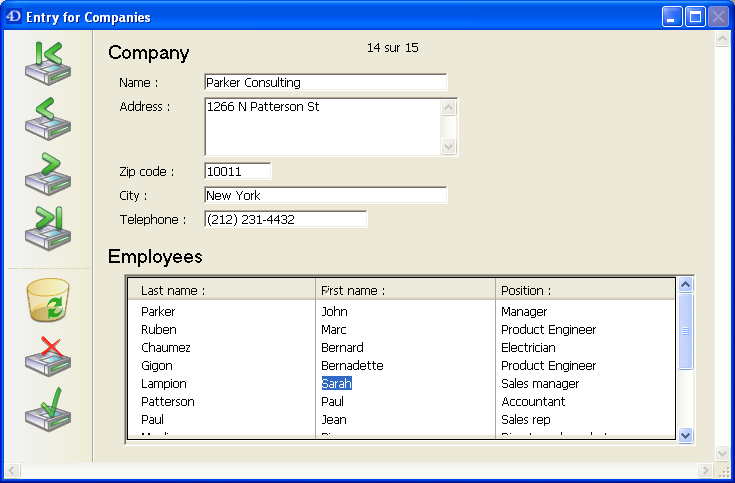
When a list subform is Enterable in List, the user can modify record data directly in the list, without having to use the associated detail form. To do this, simply click twice on the field to be modified in order to switch it to editing mode (make sure to leave enough time between the two clicks so as not to generate a double-click).
By default, this mode is activated for all list subforms:
When this option is not checked, entry must be carried out via the associated detail form.
You can set parameters for how a list subform should behave in response to a user double-click. In databases created with a previous version of 4D, you can also set the response to a double-click on an empty line (compatibility option).
- Double-click on Line: Action to perform in case of a double-click on a subform record. The following options are available:
- Do nothing: Ignores double-click.
- Edit Record: Changes the subform record to editing mode. Modification will be carried out directly in the list if the “Enterable in List” option is checked. Otherwise, it will be carried out in page mode, in the detail form associated with the subform.
- Display Record: Displays the data of the record in page mode in the detail form associated with the subform (read only).
- Double-click on Empty Line: Action to perform in case of a double-click on an empty line of a subform. The following options are available:
- Do nothing: Ignores double-click.
- Add Record: Creates a new record in the subform and changes to editing mode. The record will be created directly in the list if the “Enterable in List” option is checked. Otherwise, it will be created in page mode, in the detail form associated with the subform.
By default, the user can delete subrecords in a list subform using the Del or Backspace keys.
Since this could disturb the standard operation of the interface for certain applications (based, for instance, on buttons), you can prevent it using the Allow Deletion option.
When this option is not checked, the user can no longer delete subrecords using the deletion keys of the keyboard.
The subform instance can have the Focusable property (“Entry” theme). When a subform instance has the focus, the user can control it using navigation keys, using the Select All menu command (if the selection has multiple lines), etc.
When a subform receives or loses the focus, the form method of the parent form is called using the On Getting Focus or On Losing Focus events. In this case, the OBJECT Get pointer command (or the Focus object command) returns a pointer to the table of the subform.
As with all focusable objects, you can use the Hide focus rectangle property when you do not want to show the focus graphically .
Since there may be several records that the subform area cannot hold, 4D offer three options (“Print” theme) to handle the printing of subform records:
- Variable (default option)
If you check this option, 4D enlarges or reduces the subform area in order to print all the subrecords. - Fixed (Truncation)
If you check this option, 4D only prints the subrecords that appear in the subform area. The form is only printed once and the records not printed are ignored. - Fixed (Multiple Records)
If you check this option, the initial size of the subform area is kept but 4D prints the form several times in order to print all the records.
Notes:- You cannot place any objects on either side of subform object container. Objects placed on either side of the container will be repeated for every line of the subform.
- You cannot print more than one subform instance coming from the same table on the same form page.
- The Print object and Print form commands are not compatible with variable size printing options.
- The Print Variable Frame option can be set by programming using the OBJECT SET PRINT VARIABLE FRAME command.
- For more information about printing objects of variable size, refer to Print Variable Frame.

Product: 4D
Theme: Subforms and widgets
4D Design Reference ( 4D v16)
4D Design Reference ( 4D v16.1)
4D Design Reference ( 4D v16.3)


